在本文中,我们将比较 documenso 和 aws s3 图像上传示例之间将文件上传到 aws s3 所涉及的步骤。
我们从 vercel 提供的简单示例开始。
vercel 提供了一个将文件上传到 aws s3 的良好示例。
此示例的自述文件提供了两个选项,您可以使用现有的 s3 存储桶或创建新存储桶。了解这一点有帮助
您正确配置了上传功能。
又到了我们看源码的时间了。我们正在寻找 type=file 的输入元素。在 app/page.tsx 中,您将找到以下代码:
return (
    <main>
      <h1>upload a file to s3</h1>
      <form onsubmit={handlesubmit}>
        <input
          id="file"
          type="file"
          onchange={(e) => {
            const files = e.target.files
            if (files) {
              setfile(files[0])
            }
          }}
          accept="image/png, image/jpeg"
        />
        <button type="submit" disabled={uploading}>
          upload
        </button>
      </form>
    </main>
  )
}
onchange 使用 setfile 更新状态,但不执行上传。当您提交此表单时就会进行上传。
onchange={(e) => {
  const files = e.target.files
  if (files) {
    setfile(files[0])
  }
}}
handlesubmit 函数中发生了很多事情。我们需要分析这个handlesubmit函数中的操作列表。我已在此代码片段中编写了注释来解释这些步骤。
const handlesubmit = async (e: react.formevent<htmlformelement>) => {
    e.preventdefault()

    if (!file) {
      alert('please select a file to upload.')
      return
    }

    setuploading(true)

    const response = await fetch(
      process.env.next_public_base_url + '/api/upload',
      {
        method: 'post',
        headers: {
          'content-type': 'application/json',
        },
        body: json.stringify({ filename: file.name, contenttype: file.type }),
      }
    )

    if (response.ok) {
      const { url, fields } = await response.json()

      const formdata = new formdata()
      object.entries(fields).foreach(([key, value]) => {
        formdata.append(key, value as string)
      })
      formdata.append('file', file)

      const uploadresponse = await fetch(url, {
        method: 'post',
        body: formdata,
      })

      if (uploadresponse.ok) {
        alert('upload successful!')
      } else {
        console.error('s3 upload error:', uploadresponse)
        alert('upload failed.')
      }
    } else {
      alert('failed to get pre-signed url.')
    }

    setuploading(false)
  }
api/upload/route.ts 有以下代码:
import { createpresignedpost } from '@aws-sdk/s3-presigned-post'
import { s3client } from '@aws-sdk/client-s3'
import { v4 as uuidv4 } from 'uuid'

export async function post(request: request) {
  const { filename, contenttype } = await request.json()

  try {
    const client = new s3client({ region: process.env.aws_region })
    const { url, fields } = await createpresignedpost(client, {
      bucket: process.env.aws_bucket_name,
      key: uuidv4(),
      conditions: [
        ['content-length-range', 0, 10485760], // up to 10 mb
        ['starts-with', '$content-type', contenttype],
      ],
      fields: {
        acl: 'public-read',
        'content-type': contenttype,
      },
      expires: 600, // seconds before the presigned post expires. 3600 by default.
    })

    return response.json({ url, fields })
  } catch (error) {
    return response.json({ error: error.message })
  }
}
handlesubmit 中的第一个请求是 /api/upload 并发送内容类型和文件名作为负载。解析如下:
const { filename, contenttype } = await request.json()
下一步是创建一个 s3 客户端,然后创建一个返回 url 和字段的预签名帖子。您将使用此网址上传您的文件。
有了这些知识,我们来分析一下documenso中的上传工作原理并进行一些比较。
让我们从 type=file 的输入元素开始。 documenso 中的代码组织方式不同。您会在名为 document-dropzone.tsx.
的文件中找到输入元素
<input {...getinputprops()} />

<p classname="text-foreground mt-8 font-medium">{_(heading[type])}</p>
这里getinputprops返回的是usedropzone。 documenso 使用react-dropzone。
import { usedropzone } from 'react-dropzone';
ondrop 调用 props.ondrop,你会在 upload-document.tsx 中找到一个名为 onfiledrop 的属性值。
<documentdropzone
  classname="h-[min(400px,50vh)]"
  disabled={remaining.documents === 0 || !session?.user.emailverified}
  disabledmessage={disabledmessage}
  ondrop={onfiledrop}
  ondroprejected={onfiledroprejected}
/>
让我们看看 onfiledrop 函数会发生什么。
const onfiledrop = async (file: file) => {
    try {
      setisloading(true);

      const { type, data } = await putpdffile(file);

      const { id: documentdataid } = await createdocumentdata({
        type,
        data,
      });

      const { id } = await createdocument({
        title: file.name,
        documentdataid,
        teamid: team?.id,
      });

      void refreshlimits();

      toast({
        title: _(msg`document uploaded`),
        description: _(msg`your document has been uploaded successfully.`),
        duration: 5000,
      });

      analytics.capture('app: document uploaded', {
        userid: session?.user.id,
        documentid: id,
        timestamp: new date().toisostring(),
      });

      router.push(`${formatdocumentspath(team?.url)}/${id}/edit`);
    } catch (err) {
      const error = apperror.parseerror(err);

      console.error(err);

      if (error.code === 'invalid_document_file') {
        toast({
          title: _(msg`invalid file`),
          description: _(msg`you cannot upload encrypted pdfs`),
          variant: 'destructive',
        });
      } else if (err instanceof trpcclienterror) {
        toast({
          title: _(msg`error`),
          description: err.message,
          variant: 'destructive',
        });
      } else {
        toast({
          title: _(msg`error`),
          description: _(msg`an error occurred while uploading your document.`),
          variant: 'destructive',
        });
      }
    } finally {
      setisloading(false);
    }
  };
发生了很多事情,但为了我们的分析,我们只考虑名为 putfile 的函数。
putpdffile 定义在 upload/put-file.ts
/**
 * uploads a document file to the appropriate storage location and creates
 * a document data record.
 */
export const putpdffile = async (file: file) => {
  const isencrypteddocumentsallowed = await getflag('app_allow_encrypted_documents').catch(
    () => false,
  );

  const pdf = await pdfdocument.load(await file.arraybuffer()).catch((e) => {
    console.error(`pdf upload parse error: ${e.message}`);

    throw new apperror('invalid_document_file');
  });

  if (!isencrypteddocumentsallowed && pdf.isencrypted) {
    throw new apperror('invalid_document_file');
  }

  if (!file.name.endswith('.pdf')) {
    file.name = `${file.name}.pdf`;
  }

  removeoptionalcontentgroups(pdf);

  const bytes = await pdf.save();

  const { type, data } = await putfile(new file([bytes], file.name, { type: 'application/pdf' }));

  return await createdocumentdata({ type, data });
};
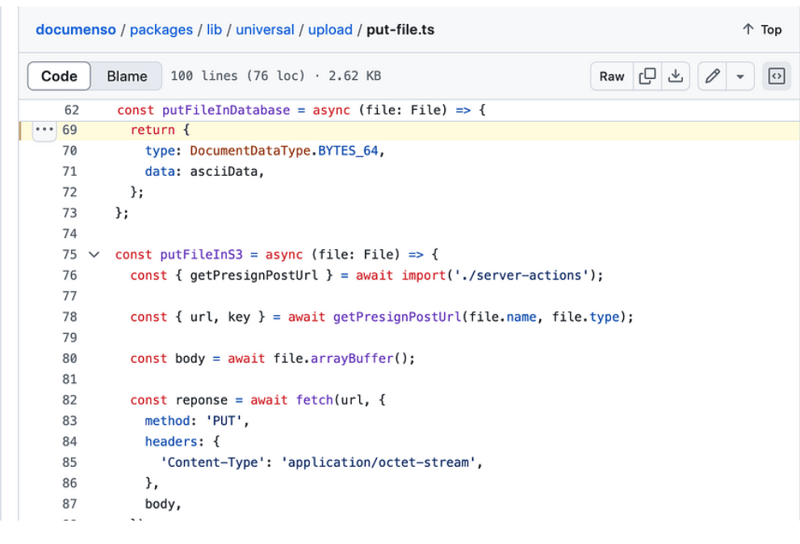
这会调用 putfile 函数。
/**
 * uploads a file to the appropriate storage location.
 */
export const putfile = async (file: file) => {
  const next_public_upload_transport = env('next_public_upload_transport');

  return await match(next_public_upload_transport)
    .with('s3', async () => putfileins3(file))
    .otherwise(async () => putfileindatabase(file));
};
const putfileins3 = async (file: file) => {
  const { getpresignposturl } = await import('./server-actions');

  const { url, key } = await getpresignposturl(file.name, file.type);

  const body = await file.arraybuffer();

  const reponse = await fetch(url, {
    method: 'put',
    headers: {
      'content-type': 'application/octet-stream',
    },
    body,
  });

  if (!reponse.ok) {
    throw new error(
      `failed to upload file "${file.name}", failed with status code ${reponse.status}`,
    );
  }

  return {
    type: documentdatatype.s3_path,
    data: key,
  };
};
export const getPresignPostUrl = async (fileName: string, contentType: string) => {
  const client = getS3Client();

  const { getSignedUrl } = await import('@aws-sdk/s3-request-presigner');

  let token: JWT | null = null;

  try {
    const baseUrl = APP_BASE_URL() ?? 'http://localhost:3000';

    token = await getToken({
      req: new NextRequest(baseUrl, {
        headers: headers(),
      }),
    });
  } catch (err) {
    // Non server-component environment
  }

  // Get the basename and extension for the file
  const { name, ext } = path.parse(fileName);

  let key = `${alphaid(12)}/${slugify(name)}${ext}`;

  if (token) {
    key = `${token.id}/${key}`;
  }

  const putObjectCommand = new PutObjectCommand({
    Bucket: process.env.NEXT_PRIVATE_UPLOAD_BUCKET,
    Key: key,
    ContentType: contentType,
  });

  const url = await getSignedUrl(client, putObjectCommand, {
    expiresIn: ONE_HOUR / ONE_SECOND,
  });

  return { key, url };
};
您在 documenso 中没有看到任何 post 请求。它使用名为 getsignedurl 的函数来获取 url,而
vercel 示例向 api/upload 路由发出 post 请求。
在 vercel 示例中可以轻松找到输入元素,因为这只是一个示例,但可以找到 documenso
使用react-dropzone并且输入元素根据业务上下文定位。
在 thinkthroo,我们研究大型开源项目并提供架构指南。我们开发了使用 tailwind 构建的可重用组件,您可以在您的项目中使用它们。
我们提供 next.js、react 和 node 开发服务。
与我们预约会面讨论您的项目。

https://github.com/documenso/documenso/blob/main/packages/lib/universal/upload/put-file.ts#l69
https://github.com/vercel/examples/blob/main/solutions/aws-s3-image-upload/readme.md
https://github.com/vercel/examples/tree/main/solutions/aws-s3-image-upload
https://github.com/vercel/examples/blob/main/solutions/aws-s3-image-upload/app/page.tsx#l58c5-l76c12
https://github.com/vercel/examples/blob/main/solutions/aws-s3-image-upload/app/api/upload/route.ts
https://github.com/documenso/documenso/blob/main/packages/ui/primitives/document-dropzone.tsx#l157
https://react-dropzone.js.org/
https://github.com/documenso/documenso/blob/main/apps/web/src/app/(dashboard)/documents/upload-document.tsx#l61
https://github.com/documenso/documenso/blob/main/packages/lib/universal/upload/put-file.ts#l22
以上就是Documenso 和 aws-smage-upload 示例之间的 Spload 功能比较的详细内容,更多请关注php中文网其它相关文章!

每个人都需要一台速度更快、更稳定的 PC。随着时间的推移,垃圾文件、旧注册表数据和不必要的后台进程会占用资源并降低性能。幸运的是,许多工具可以让 Windows 保持平稳运行。

 广告
广告Copyright 2014-2025 https://www.php.cn/ All Rights Reserved | php.cn | 湘ICP备2023035733号


 145
145