
软件定时器的实现实际上是建立在硬件定时器的基础之上的。在esp32中,内部运行着一个精度为1微秒(1us)的硬件定时器,软件定时器的回调函数都被放置在这个1微秒硬件定时器的中断函数中。通过这种方式,软件定时器能够利用硬件定时器的高精度特性来实现定时功能。
以下是一张图示,帮助理解软件定时器与硬件定时器的关系:
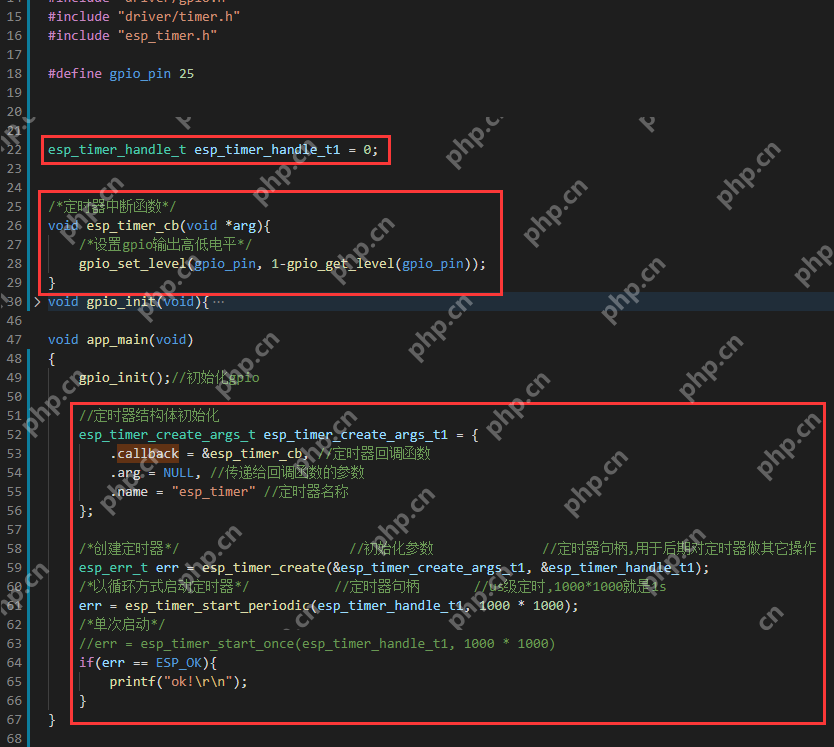
下面是相关的代码示例,使用JavaScript语法展示了如何设置和使用软件定时器:
#include <stdio.h>
#include "freertos/FreeRTOS.h"
#include "freertos/task.h"
#include "freertos/queue.h"
#include "driver/gpio.h"
#include "driver/timer.h"
#include "esp_timer.h"

#define gpio_pin 25

esp_timer_handle_t esp_timer_handle_t1 = 0;

/*定时器中断函数*/
void esp_timer_cb(void *arg) {
    /*设置gpio输出高低电平*/
    gpio_set_level(gpio_pin, 1-gpio_get_level(gpio_pin));
}

void gpio_init(void) {
    gpio_config_t io_conf;
    //禁止中断
    io_conf.intr_type = GPIO_PIN_INTR_DISABLE;
    //输入输出模式
    io_conf.mode = GPIO_MODE_INPUT_OUTPUT;
    //配置要设置的引脚
    io_conf.pin_bit_mask = (unsigned long long)1 << gpio_pin;
    //禁用上拉下拉
    io_conf.pull_down_en = 0;
    io_conf.pull_up_en = 0;
    //配置GPIO
    gpio_config(&io_conf);
}

void app_main(void) {
    gpio_init();
    const esp_timer_create_args_t periodic_timer_args = {
        .callback = &esp_timer_cb,
        .arg = NULL,
        .name = "periodic_gpiotoggle"
    };
    ESP_ERROR_CHECK(esp_timer_create(&periodic_timer_args, &esp_timer_handle_t1));
    ESP_ERROR_CHECK(esp_timer_start_periodic(esp_timer_handle_t1, 1000000)); // 1秒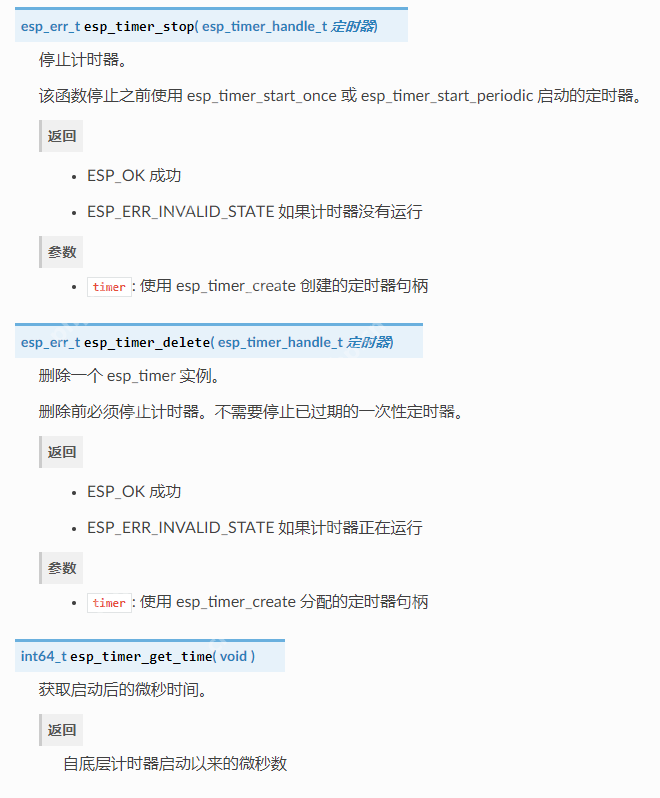
}此外,还有一张图展示了软件定时器的更多细节:
以上就是104-ESP32_SDK开发-软件定时器esp_timer的详细内容,更多请关注php中文网其它相关文章!

每个人都需要一台速度更快、更稳定的 PC。随着时间的推移,垃圾文件、旧注册表数据和不必要的后台进程会占用资源并降低性能。幸运的是,许多工具可以让 Windows 保持平稳运行。

 广告
广告


Copyright 2014-2025 https://www.php.cn/ All Rights Reserved | php.cn | 湘ICP备2023035733号


 858
858


