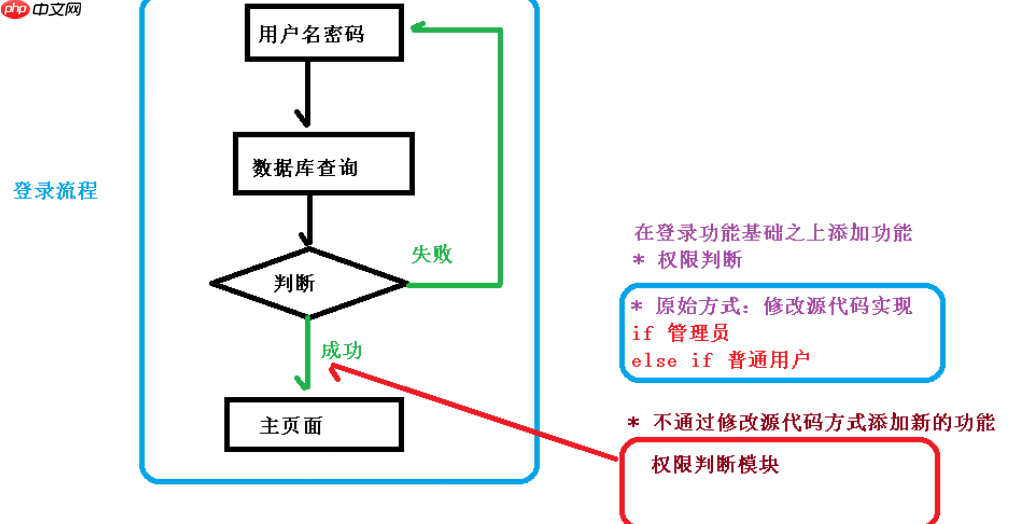
什么是aop面向切面编程?aop是一种编程范式,它通过将业务逻辑的各个部分隔离,从而降低了这些部分之间的耦合度,提升了程序的可重用性,并提高了开发效率。简单来说,aop允许你在不修改原始代码的情况下,向主干功能中添加新功能。例如,在登录系统中,aop可以用来添加日志记录、权限验证等功能,而无需改变登录逻辑本身。

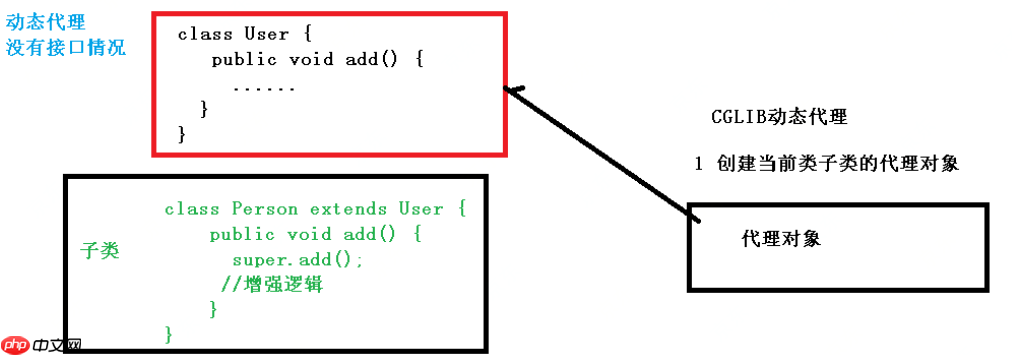
AOP的底层原理是使用动态代理技术实现的。动态代理有两种情况:
JDK动态代理:适用于有接口的情况。通过创建接口实现类的代理对象来增强类的方法。

CGLIB动态代理:适用于没有接口的情况。通过创建子类的代理对象来增强类的方法。

AOP(JDK动态代理)使用JDK动态代理,通过Proxy类中的方法创建代理对象。

调用newProxyInstance方法,该方法有三个参数:
InvocationHandler,创建代理对象,写增强的部分编写JDK动态代理代码,首先创建接口并定义方法:
package com.dance.spring.learn.proxy;
public interface UserDao {
    public int add(int a, int b);
    public String update(String id);
}然后创建接口实现类并实现方法:
package com.dance.spring.learn.proxy.impl;
import com.dance.spring.learn.proxy.UserDao;
public class UserDaoImpl implements UserDao {
    @Override
    public int add(int a, int b) {
        return a+b;
    }
    @Override
    public String update(String id) {
        return id;
    }
}接着使用Proxy创建接口代理对象:
package com.dance.spring.learn.proxy;
import com.dance.spring.learn.proxy.impl.UserDaoImpl;
import java.lang.reflect.InvocationHandler;
import java.lang.reflect.Method;
import java.lang.reflect.Proxy;
import java.util.Arrays;
public class JDKProxy {
    public static void main(String[] args) {
        Class>[] classes = {UserDao.class};
        UserDaoImpl userDao = new UserDaoImpl();
        UserDao userDao1 = (UserDao)Proxy.newProxyInstance(JDKProxy.class.getClassLoader(), classes, new UserDaoProxy(userDao));
        int add = userDao1.add(1, 2);
        System.out.println(add);
    }
}
class UserDaoProxy implements InvocationHandler{
    private UserDao userDao;
    public UserDaoProxy(UserDao userDao) {
        this.userDao = userDao;
    }
    @Override
    public Object invoke(Object proxy, Method method, Object[] args) throws Throwable {
        System.out.println("方法之前执行:"+method.getName()+",参数:"+ Arrays.toString(args));
        // 执行方法
        Object invoke = method.invoke(userDao, args);
        System.out.println("方法之后执行:返回值为:"+invoke);
        return invoke;
    }
}执行结果:
方法之前执行:add,参数:[1, 2]
方法之后执行:返回值为:3
CGLIB动态代理(扩展知识点):CGLIB(Code Generation Library)是一个开源项目,是一个强大、高性能、高质量的代码生成类库。它可以在运行时扩展Java类和实现Java接口。Hibernate使用它来实现持久化对象的动态生成。CGLIB通过ASM字节码处理框架来转换字节码并生成新的类。它广泛用于许多AOP框架中,如Spring AOP,用于方法拦截。脚本语言如Groovy和BeanShell也使用ASM来生成Java字节码。
如果有兴趣尝试CGLIB动态代理,可以参考以下链接:
https://www.php.cn/link/5001e11e24d2f4e723a67feb678f4e27
AOP术语:
AOP操作(准备工作):Spring框架通常基于AspectJ实现AOP操作。AspectJ不是Spring的组成部分,而是一个独立的AOP框架。通常将AspectJ和Spring框架一起使用来进行AOP操作。基于AspectJ的AOP操作可以通过XML配置文件或注解方式实现。
切点表达式:切点表达式的作用是知道对哪个类中的哪个方法进行增强。语法结构为:execution([权限修饰符] [返回类型] [类全路径] [方法名称]([参数列表]))。例如:
com.dance.spring.learn.BookDao类中的add方法进行增强:execution(* com.dance.spring.learn.BookDao.add(..))
com.dance.spring.learn.BookDao类中的所有方法进行增强:execution(* com.dance.spring.learn.BookDao.*(..))
com.dance.spring.learn.dao包中所有类、类中所有方法进行增强:execution(* com.dance.spring.learn.*.*(..))
AOP操作(AspectJ注解):首先创建User类:
package com.dance.spring.learn.aop;
@Component
public class User {
    public void add(){
        System.out.println("add......");
    }
}然后创建增强类并编写增强逻辑:
package com.dance.spring.learn.aop;
public class UserProxy {
    /**
     * 前置通知
     */
    public void before() {
        System.out.println("before......");
    }
}进行通知的配置:
<?xml version="1.0" encoding="UTF-8"?>
<beans xmlns="http://www.springframework.org/schema/beans"
       xmlns:aop="http://www.springframework.org/schema/aop"
       xmlns:context="http://www.springframework.org/schema/context"
       xmlns:xsi="http://www.w3.org/2001/XMLSchema-instance"
       xsi:schemaLocation="http://www.springframework.org/schema/beans
       http://www.springframework.org/schema/beans/spring-beans.xsd
       http://www.springframework.org/schema/context
       http://www.springframework.org/schema/context/spring-context.xsd
       http://www.springframework.org/schema/aop
       http://www.springframework.org/schema/aop/spring-aop.xsd">
    <component-scan base-package="com.dance.spring.learn.aop"></component-scan>
    <aop:aspectj-autoproxy></aop:aspectj-autoproxy>
</beans>修改增强类,配置前置通知:
/**
 * 前置通知
 */
@Before(value = "execution(* com.dance.spring.learn.aop.User.add(..))")
public void before() {
    System.out.println("before......");
}编写测试类:
@Test
public void test10(){
    ClassPathXmlApplicationContext classPathXmlApplicationContext = new ClassPathXmlApplicationContext("Spring-aop.xml");
    User user = classPathXmlApplicationContext.getBean("user", User.class);
    user.add();
}执行结果:
before......
add......
编写其他通知:
package com.dance.spring.learn.aop;
import org.aspectj.lang.ProceedingJoinPoint;
import org.aspectj.lang.annotation.*;
import org.springframework.stereotype.Component;
@Aspect
@Component
public class UserProxy {
    /**
     * 前置通知
     */
    @Before(value = "execution(* com.dance.spring.learn.aop.User.add(..))")
    public void before() {
        System.out.println("before......");
    }
    /**
     * 后置通知(返回通知)
     */
    @AfterReturning(value = "execution(* com.dance.spring.learn.aop.User.add(..))")
    public void afterReturning() {
        System.out.println("afterReturning.........");
    }
    /**
     * 最终通知
     */
    @After(value = "execution(* com.dance.spring.learn.aop.User.add(..))")
    public void after() {
        System.out.println("after.........");
    }
    /**
     * 异常通知
     */
    @AfterThrowing(value = "execution(* com.dance.spring.learn.aop.User.add(..))")
    public void afterThrowing() {
        System.out.println("afterThrowing.........");
    }
    /**
     * 环绕通知
     * @param proceedingJoinPoint
     * @return
     * @throws Throwable
     */
    @Around(value = "execution(* com.dance.spring.learn.aop.User.add(..))")
    public Object around(ProceedingJoinPoint proceedingJoinPoint) throws Throwable {
        System.out.println("环绕之前.........");
        //被增强的方法执行
        Object proceed = proceedingJoinPoint.proceed();
        System.out.println("环绕之后.........");
        return proceed;
    }
}执行结果(使用test10进行测试):
环绕之前.........before......add......环绕之后.........after.........afterReturning.........
异常通知只有在方法抛出异常时才会执行。手动修改代码模拟异常:
修改User类的add方法:
public void add(){
    int i = 5/0;
    System.out.println("add......");
}再次调用test10:
环绕之前.........before......after.........afterThrowing.........
可以看到在报错后执行了异常通知,但后置通知和环绕之后的通知未执行。
注解总结:
@Aspect:标识这是一个aspect类。@Before:前置通知。@AfterReturning:后置通知(返回通知)。@After:最终通知(finally)。@AfterThrowing:异常通知。@Around:环绕通知。相同的切入点抽取:
package com.dance.spring.learn.aop;
import org.aspectj.lang.ProceedingJoinPoint;
import org.aspectj.lang.annotation.*;
import org.springframework.stereotype.Component;
@Aspect
@Component
public class UserProxy {
    @Pointcut(value = "execution(* com.dance.spring.learn.aop.User.add(..))")
    public void pointcut(){}
    /**
     * 前置通知
     */
    @Before(value = "pointcut()")
    public void before() {
        System.out.println("before......");
    }
    /**
     * 后置通知(返回通知)
     */
    @AfterReturning(value = "pointcut()")
    public void afterReturning() {
        System.out.println("afterReturning.........");
    }
    /**
     * 最终通知
     */
    @After(value = "pointcut()")
    public void after() {
        System.out.println("after.........");
    }
    /**
     * 异常通知
     */
    @AfterThrowing(value = "pointcut()")
    public void afterThrowing() {
        System.out.println("afterThrowing.........");
    }
    /**
     * 环绕通知
     * @param proceedingJoinPoint
     * @return
     * @throws Throwable
     */
    @Around(value = "pointcut()")
    public Object around(ProceedingJoinPoint proceedingJoinPoint) throws Throwable {
        System.out.println("环绕之前.........");
        //被增强的方法执行
        Object proceed = proceedingJoinPoint.proceed();
        System.out.println("环绕之后.........");
        return proceed;
    }
}如果有多个类对同一个方法进行增强,可以设置优先级。在增强类上添加注解@Order(数字类型值),数字越小优先级越高:
@Order(1)
完全注解开发,使用配置类替换XML:
package com.dance.spring.learn.aop.config;
import org.springframework.context.annotation.ComponentScan;
import org.springframework.context.annotation.Configuration;
import org.springframework.context.annotation.EnableAspectJAutoProxy;
@Configuration
@ComponentScan(basePackages = {"com.dance.spring.learn.aop"})
@EnableAspectJAutoProxy(proxyTargetClass = true)
public class SpringConfig {}编写测试类:
@Test
public void test11(){
    AnnotationConfigApplicationContext annotationConfigApplicationContext = new AnnotationConfigApplicationContext(com.dance.spring.learn.aop.config.SpringConfig.class);
    User user = annotationConfigApplicationContext.getBean("user", User.class);
    user.add();
}执行结果:
环绕之前.........before......add......环绕之后.........after.........afterReturning.........
以上就是03-Spring5 AOP的详细内容,更多请关注php中文网其它相关文章!

每个人都需要一台速度更快、更稳定的 PC。随着时间的推移,垃圾文件、旧注册表数据和不必要的后台进程会占用资源并降低性能。幸运的是,许多工具可以让 Windows 保持平稳运行。

Copyright 2014-2025 https://www.php.cn/ All Rights Reserved | php.cn | 湘ICP备2023035733号