目录
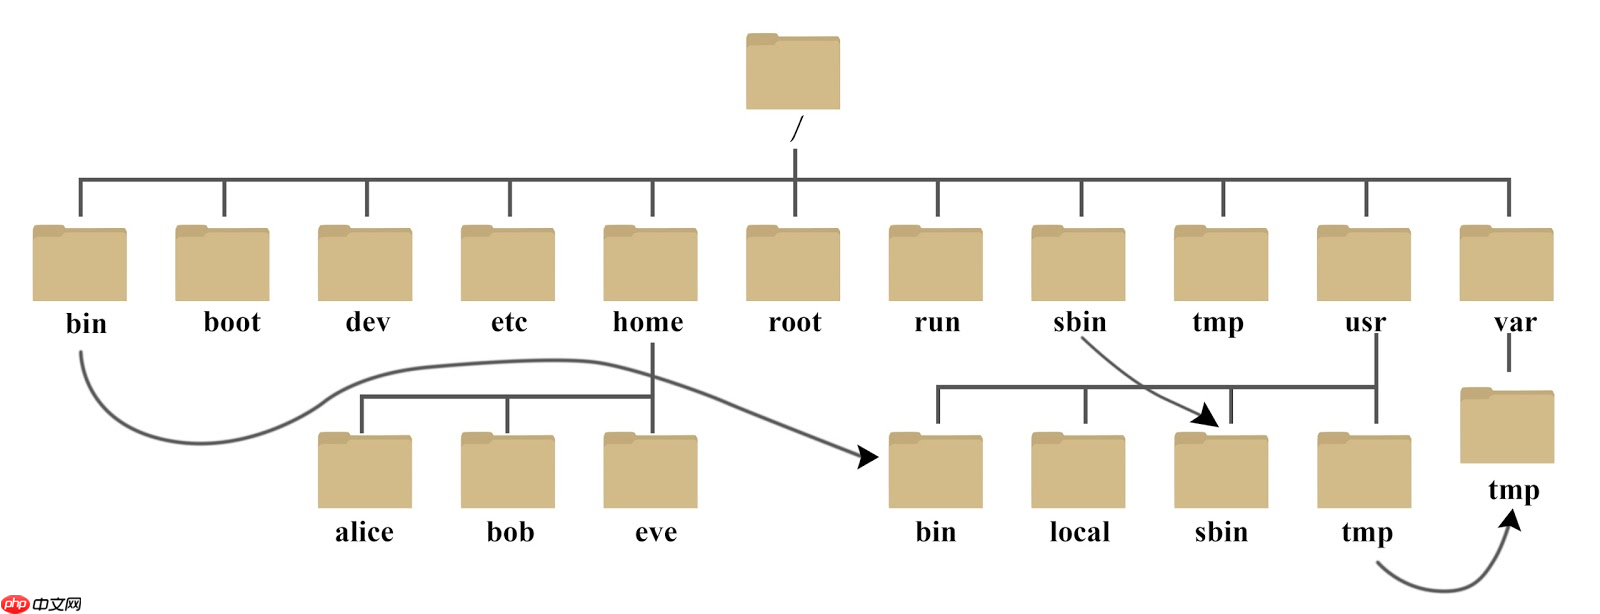
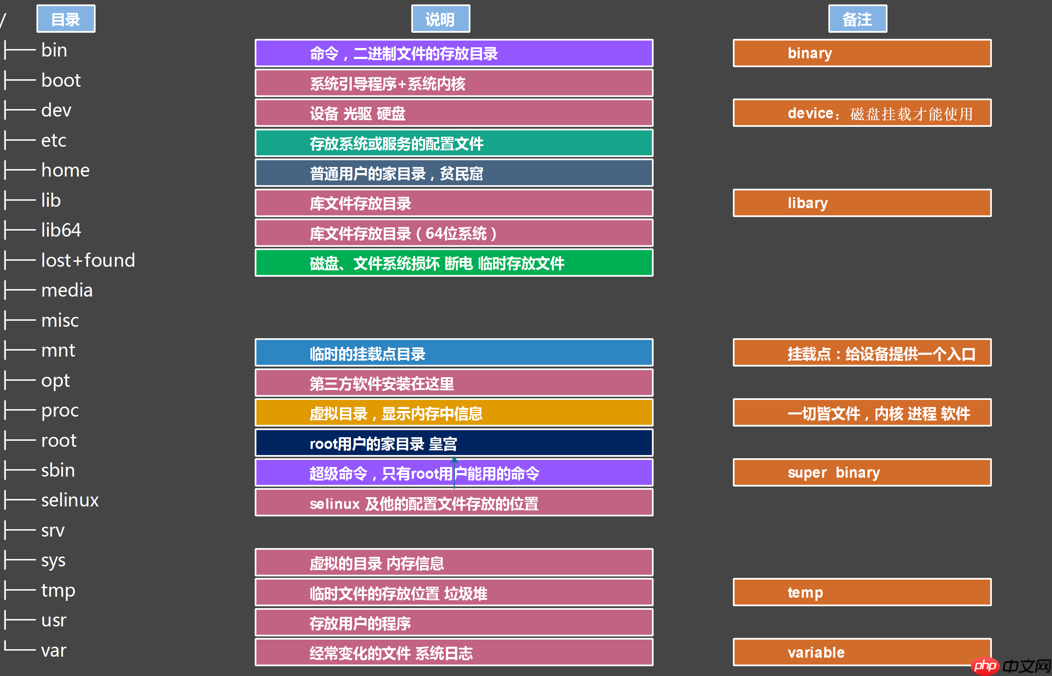
Linux 目录结构及详细操作目录结构目录结构的特点目录结构挂载目录结构发展关闭selinux(了解)重要目录说明(etc目录说明)1、网卡配置文件2、解析配置文件3、主机名称文件4、解析映射文件5、磁盘挂载文件6、开机加载脚本7、系统启动级别8、变量加载文件(环境变量)9、登录提示文件重要目录说明(/usr目录说明)重要目录说明(/var目录说明)重要目录说明(/proc目录说明)补充知识:
# 挂载命令及格式mount [磁盘路径] [挂载的路径]# 查看本机挂载的命令[root@localhost dev]# df -h# 卸载挂载的磁盘[root@localhost dev]# umount /mnt/
临时关闭[root@localhost ~]# setenforce 0永久关闭[root@localhost ~]# vim/etc/selinux/config修改文件内参数SELINUX=disabled
# 网卡配置文件(有以下几种情况,通过ip a 查看自己的名称)/etc/sysconfig/network-scripts/ifcfg-eth0/etc/sysconfig/network-scripts/ifcfg-eth1/etc/sysconfig/network-scripts/ifcfg-ens32/etc/sysconfig/network-scripts/ifcfg-ens33
# 查看本机网络信息的命令ip a 或 ip address show (老版本的命令:ifconfig)# 重载网卡信息systemctl restart network或ifdown [网卡名称] && ifup [网卡名称]# 确认网卡配置是否正确vim /etc/sysconfig/network-scripts/ifcfg-eth0# 关闭网络管理器(因为已经有了network)systemctl stop NetworkManagersystemctl disable NetworkManager或systemctl disable --now NetworkManager
文件信息:/etc/resolv.conf # 临时dns配置文件nameserver 114.114.114.114# 判断SSH服务是否开启systemctl status sshd# 查看操作系统的DNS:[root@localhost sys]# cat /etc/resolv.conf nameserver 114.114.114.114# DNS可以修改,# vim /etc/resolv.conf# 多种DNS114.114.114.114 中国电信223.5.5.5/223.6.6.6中国阿里云8.8.8.8 谷歌
# 主机名称文件1、查看当前主机名称信息/临时修改查看:hostname临时修改:hostname baidu2、永久修改[root@baidu ~]# vim /etc/hostname# 需要重启生效[root@baidu ~]# hostnamectl set-hostname oldboy # 立即生效# 区别上3、ps:自定义系统登录用户信息PS1 环境变量[root@localhost ~]# echo $PS1[u@h W]$[root@localhost ~]# PS1='[u@h --- W]$'# 补充:通过域名查看ip地址,百度举例[root@localhost ~]# ping www.baidu.comPING www.a.shifen.com (112.80.248.75) 56(84) bytes of data.# 远程的ip地址:112.80.248.75
# 本地解析,可以在windows中的hosts文件中添加解析106.13.91.75 《==》 www.test.com# 这样通过ip地址或者映射后的域名都可以访问到服务器
[root@localhost /]# cat /etc/fstab ## /etc/fstab# Created by anaconda on Thu Dec 9 18:57:52 2021## Accessible filesystems, by reference, are maintained under '/dev/disk'# See man pages fstab(5), findfs(8), mount(8) and/or blkid(8) for more info#/dev/mapper/centos-root / xfs defaults 0 0UUID=046a66f5-d610-42fd-a0ec-c98793ff6320 /boot xfs defaults# 通过df -h 查看挂载信息[root@localhost /]# df -hFilesystem Size Used Avail Use% Mounted ondevtmpfs 475M 0 475M 0% /devtmpfs 487M 0 487M 0% /dev/shmtmpfs 487M 7.6M 479M 2% /runtmpfs 487M 0 487M 0% /sys/fs/cgroup/dev/mapper/centos-root 100G 2.2G 98G 3% //dev/sda1 509M 132M 378M 26% /boottmpfs 98M 0 98M 0% /run/user/0可以发现/boot和/的挂载信息是一样的
# 验证Linux中开机自启动示例# 在/etc/rc.local中加入执行语句vim /etc/rc.localecho 'hello' > test# 设置开机自启动权限chomd +x /etc/rc.d/rc.local# 重启系统reboot# 查看test文件是否写入了hellocat test
启动级别
级别对应命令
描述
0
shutdown.target
关机(不要设置,不然会一直关机)
1
emergency.target
单用户模式,root权限
2
rescure.target
多用户模式,没有NFS和网络支持
3
multi-user.target
完整的多用户文本模式,有NFS和网络,登录后进入控制台命令行模式
4
无
待定
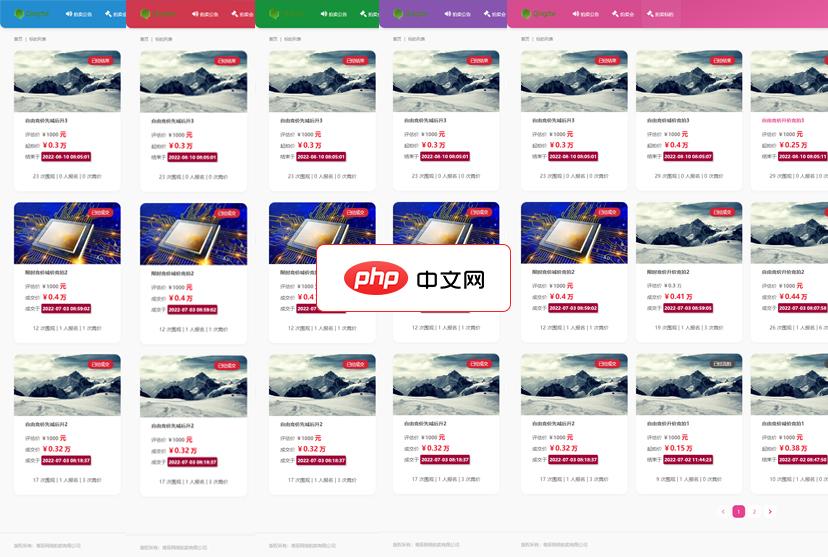
青辰智能网络拍卖管理系统NAS基于互联网BS架构,采用先进的HTML5技术作为前端开发,用户可通过PC、手机、平板等终端进行访问。拍卖公司通过后台建立标的信息,会员注册并登录后可通过前台标的目录进入详细页面,会员对感兴趣的标的可以进行关注和报名,报名分为需要认证及不认证竞拍,标的时间通过后台控制前台到时间后可进行自动进入竞拍,会员只需要出价,直到时间结束,支持延时竞拍。青辰智能网络拍卖管理系统NA
 0
0

5
graphical.target
图形化模式,登录后进入图形GUI模式
6
无
重启模式,默认运行级别不能设为6,否则不能正常启动。运行init6机器就会重启
参数
描述
get-default
取得当前的target
set-default
设置指定的target为默认的运行级别
isolate
切换到指定的运行级别
unit.target
上面列出的运行级别
# 修改或添加环境变量主要修改以下四个文件和目录内添加.shw# 修改下面两个文件 /etc/profile /etc/bashrc# 修改下面两个文件 ~/.bash_profile ~/.bashrc# 目录 /etc/profile.d/ # 在该目录下创建文件后要添加执行权限# 读取环境变量的几种情况,以及使用文件的先后顺序1、重启/etc/profile.d --> /etc/profile --> /etc/bashrc --> ~/.bashrc --> ~/.bash_profile2、切换用户/etc/profile.d --> /etc/bashrc --> ~/.bashrcps:useradd [用户名]su [用户名]3、重新登录用户1、su - [用户名]/etc/profile.d --> /etc/profile --> /etc/bashrc --> ~/.bashrc --> ~/.bash_profile2、ssh root@192.168.15.101/etc/profile.d --> /etc/profile --> /etc/bashrc --> ~/.bashrc --> ~/.bash_profile
# 登录之后提示小火龙图画,issue文件也是一样的[root@localhost ~]# vim /etc/motd / // |___/| / // \ /0 0 __ / // | / / /_/ // | @_^_@'/ /_ // | //_^_/ /_ // | ( //) | /// | ( / /) _|_ / ) // | _ ( // /) '/,_ _ _/ ( ; -. | _ _.-~ .-~~~^-. (( / / )) ,-{ _ `-.|.-~-. .~ `. (( // / )) '/ / ~-. _ .-~ .-~^-. (( /// )) `. { } / (( / )) .----~-. -' .~ `. ^-. ///.----..> _ -~ `. ^-` ^-_ ///-._ _ _ _ _ _ _}^ - - - - ~ ~-- ,.-~ /.-~# yum安装python:yum install python3
# 先查看5行吧,太多了占地[root@localhost log]# head -5 /var/log/messagesDec 12 16:13:02 localhost rsyslogd: [origin software="rsyslogd" swVersion="8.24.0-55.el7" x-pid="1470" x-info="http://www.rsyslog.com"] rsyslogd was HUPedDec 12 16:47:59 localhost systemd: Started Delayed Shutdown Service.Dec 12 16:47:59 localhost systemd-shutdownd: Shutting down at Sun 2021-12-12 16:57:59 CST (poweroff)...Dec 12 16:48:08 localhost systemd-shutdownd: Shutdown canceled.Dec 12 17:01:01 localhost systemd: Started Session 3 of user root.
[root@localhost proc]# lscpu或[root@localhost proc]# cat cpuinfoArchitecture: x86_64CPU op-mode(s): 32-bit, 64-bitByte Order: Little EndianCPU(s): 1On-line CPU(s) list: 0Thread(s) per core: 1Core(s) per socket: 1Socket(s): 1NUMA node(s): 1Vendor ID: GenuineIntelCPU family: 6Model: 158Model name: Intel(R) Core(TM) i5-8300H CPU @ 2.30GHzStepping: 10CPU MHz: 2303.999BogoMIPS: 4607.99Hypervisor vendor: VMwareVirtualization type: fullL1d cache: 32KL1i cache: 32KL2 cache: 256KL3 cache: 8192KNUMA node0 CPU(s): 0
[root@localhost proc]# head -5 /proc/meminfoMemTotal: 995676 kBMemFree: 689728 kBMemAvailable: 672864 kBBuffers: 2104 kBCached: 94548 kB# 用free看内存信息会更直观[root@localhost proc]# free -h total used free shared buff/cache availableMem: 972M 185M 673M 7.5M 113M 656MSwap: 0B 0B 0B
[root@localhost proc]# cat loadavg0.13 0.04 0.05 1/113 18390.13 :1分钟内CPU负载0.04 :5分钟内CPU负载0.05 :15分钟内CPU负载负载:当前系统的所有进程占用CPU的时间比[root@localhost proc]# w 19:19:11 up 1:55, 1 user, load average: 0.08, 0.04, 0.05USER TTY FROM LOGIN@ IDLE JCPU PCPU WHATroot pts/0 192.168.15.1 17:24 7.00s 0.10s 0.01s w# w命令的数据来源是/proc/loadavg
[root@localhost proc]# [root@localhost proc]# df -hFilesystem Size Used Avail Use% Mounted ondevtmpfs 475M 0 475M 0% /devtmpfs 487M 0 487M 0% /dev/shmtmpfs 487M 7.6M 479M 2% /runtmpfs 487M 0 487M 0% /sys/fs/cgroup/dev/mapper/centos-root 100G 2.2G 98G 3% //dev/sda1 509M 132M 378M 26% /boottmpfs 98M 0 98M 0% /run/user/0
以上就是Linux 目录结构及详细操作的详细内容,更多请关注php中文网其它相关文章!

每个人都需要一台速度更快、更稳定的 PC。随着时间的推移,垃圾文件、旧注册表数据和不必要的后台进程会占用资源并降低性能。幸运的是,许多工具可以让 Windows 保持平稳运行。

Copyright 2014-2025 https://www.php.cn/ All Rights Reserved | php.cn | 湘ICP备2023035733号


 214
214