windows terminal是微软推出的新一代终端,具有超高的可扩展性,用户可以自由定制终端的外观,比旧版cmd的黑色窗口更加美观且功能强大。
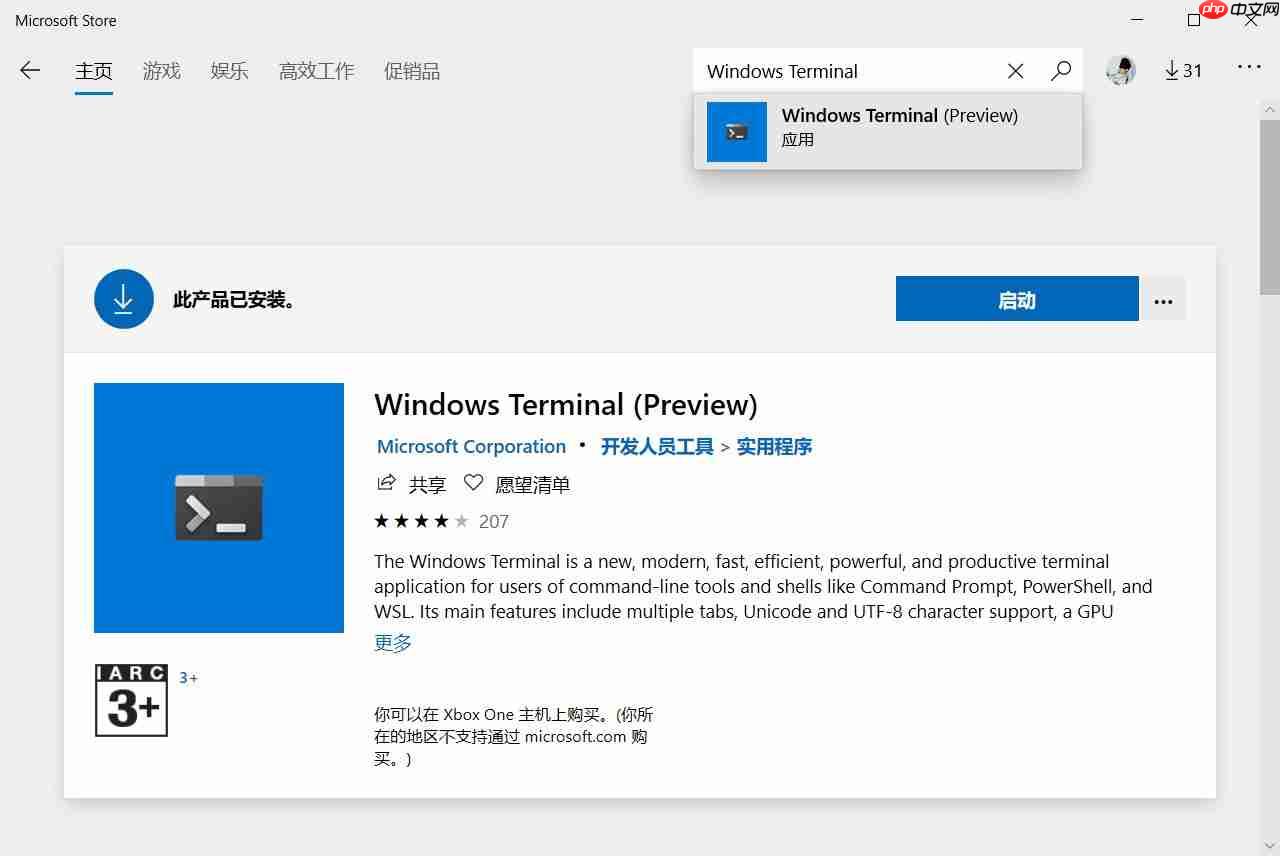
安装只需在Windows自带的应用商店中搜索Windows Terminal,点击安装即可。您也可以通过下载Microsoft/Terminal的源码进行自定义安装。

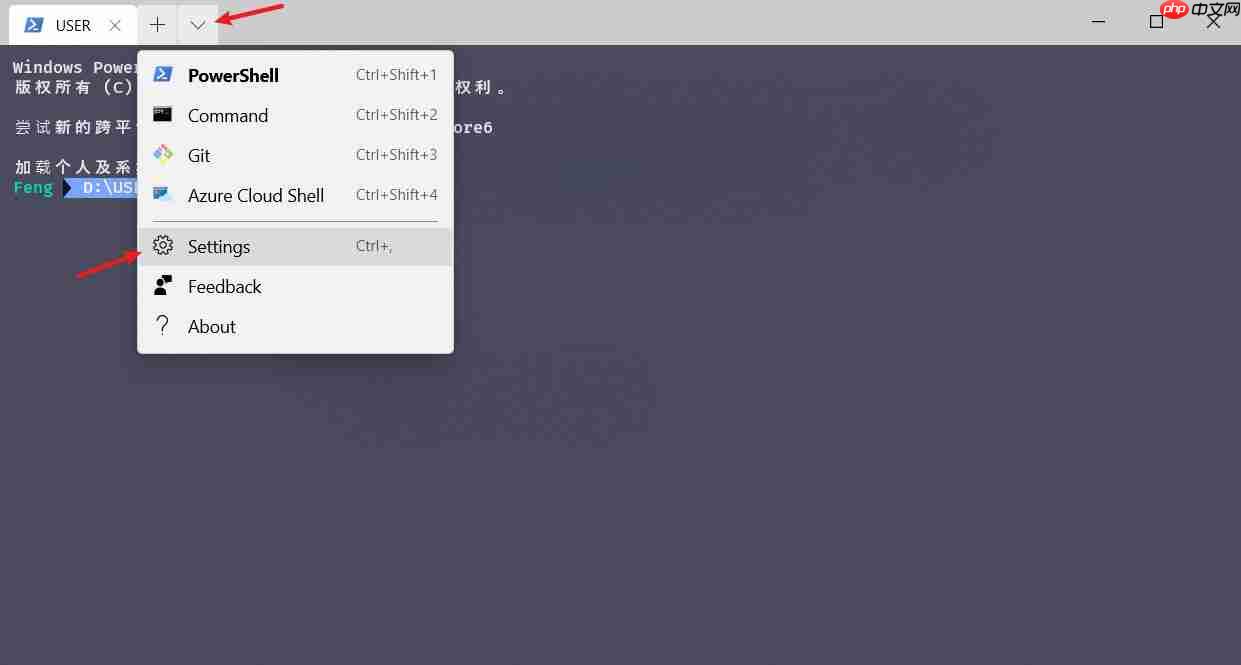
基本配置首先启动Windows Terminal终端,点击右下角的三角形图标,选择Settings以打开配置文件profiles.json。

以下是配置PowerShell和Cmd的示例,如需配置其他终端如GitBash,请参考下面的代码进行自定义设置。
"profiles":[
    {
        // PowerShell
        "guid": "{61c54bbd-c2c6-5271-96e7-009a87ff44bf}",  // 唯一ID
        "name": "PowerShell",
        "commandline": "powershell.exe", // 命令行所在位置
        "colorScheme" : "Campbell",      // 主题
        "useAcrylic": true,              // 毛玻璃
        "acrylicOpacity" : 0.8,          // 不透明度
        "fontSize": 10,                  // 字体大小
        "fontFace" : "Consolas",         // 字体
        "cursorShape" : "emptyBox",      // 光标形状,bar/emptyBox/filledBox/underscore/vintage
        "padding": "10, 10, 10, 10",     // 边距
        "closeOnExit": true,             // 关闭时退出终端
        "startingDirectory": "./",       // 当前目录打开
        "historySize": 9001,             // 上滚历史行数
        "hidden": false
    },
    {
        // Command
        "guid": "{0caa0dad-35be-5f56-a8ff-afceeeaa6101}",
        "name": "Command",
        "commandline": "cmd.exe",        // 命令行所在位置
        "colorScheme" : "Campbell",      // 主题
        "useAcrylic": true,              // 毛玻璃
        "acrylicOpacity" : 0.8,          // 不透明度
        "fontSize": 10,                  // 字体大小
        "fontFace" : "Consolas",         // 字体
        "cursorShape" : "emptyBox",      // 光标形状,bar/emptyBox/filledBox/underscore/vintage
        "padding": "10, 10, 10, 10",     // 边距
        "closeOnExit": true,             // 关闭时退出终端
        "startingDirectory": "./",       // 当前目录打开
        "hidden": false,
        "historySize": 9001
    }
],
美化方面,推荐使用Fira Code字体。访问Github仓库,点击releases下载FiraCode_2.zip,解压后进入tff文件夹,双击安装字体。安装后,在配置文件profiles.json中修改字体设置并保存。
"profiles":[
    {
        // PowerShell
        ...
        "fontFace" : "Fira Code",  // 字体
        ...
    }
]为了修改配色,访问终端配色开源库iTerm2-Color-Schemes,选择喜欢的配色方案。例如,这里选择rebecca,在配色库中找到rebecca.json,复制配色方案。
{
  "name": "rebecca",
  "black": "#12131e",
  "red": "#dd7755",
  "green": "#04dbb5",
  "yellow": "#f2e7b7",
  "blue": "#7aa5ff",
  "purple": "#bf9cf9",
  "cyan": "#56d3c2",
  "white": "#e4e3e9",
  "brightBlack": "#666699",
  "brightRed": "#ff92cd",
  "brightGreen": "#01eac0",
  "brightYellow": "#fffca8",
  "brightBlue": "#69c0fa",
  "brightPurple": "#c17ff8",
  "brightCyan": "#8bfde1",
  "brightWhite": "#f4f2f9",
  "background": "#292a44",
  "foreground": "#e8e6ed"
}在配置文件profiles.json中找到schemes列表,将复制的配色方案粘贴进去。
"schemes": [
    {
        "name": "rebecca",
        "black": "#12131e",
        "red": "#dd7755",
        "green": "#04dbb5",
        "yellow": "#f2e7b7",
        "blue": "#7aa5ff",
        "purple": "#bf9cf9",
        "cyan": "#56d3c2",
        "white": "#e4e3e9",
        "brightBlack": "#809699",
        "brightRed": "#ff92cd",
        "brightGreen": "#01eac0",
        "brightYellow": "#fffca8",
        "brightBlue": "#69c0fa",
        "brightPurple": "#c17ff8",
        "brightCyan": "#8bfde1",
        "brightWhite": "#f4f2f9",
        "background": "#292a44",
        "foreground": "#e8e6ed"
    }
]最后,在profiles列表中将相应终端的colorScheme属性设置为配色方案中的name值。
"profiles":[
    {
        // PowerShell
        ...
        "colorScheme" : "rebecca",       // 主题
        ...
    }
]
为了添加Emoji,由于Typecho编辑器不支持Emoji,这里提供了一个Emoji表情网站,供您自行选择使用。
使用管理员模式打开PowerShell,输入以下命令创建配置文件。
if (!(Test-Path -Path $PROFILE )) { New-Item -Type File -Path $PROFILE -Force }
# C:\Users\[用户名]\Documents\WindowsPowerShell\Microsoft.PowerShell_profile.ps1安装choco。
> iwr https://chocolatey.org/install.ps1 -UseBasicParsing | iex
# 报错的话应该是Powershell的执行策略问题
> Get-ExecutionPolicy  # 查看当前策略
> Set-ExecutionPolicy Unrestricted  # 设置为Unrestricted
# 等下全部配置完成后,再将执行策略设回前面查看策略时的值(更安全)
> choco                # 测试是否安装成功
使用choco安装ConEmu。

SmartB2B 是一款基于PHP、MySQL、Smarty的B2B行业电子商务网站管理系统,系统提供了供求模型、企业模型、产品模型、人才招聘模型、资讯模型等模块,适用于想在行业里取得领先地位的企业快速假设B2B网站,可以运行于Linux与Windows等多重服务器环境,安装方便,使用灵活。 系统使用当前流行的PHP语言开发,以MySQL为数据库,采用B/S架构,MVC模式开发。融入了模型化、模板
> choco install ConEmu
安装oh-my-posh和posh-git。
> Install-Module posh-git -Scope CurrentUser
> Install-Module oh-my-posh -Scope CurrentUser
> install-module posh-git
打开PowerShell配置文件,如果不知道文件路径可使用$PROFILE查看,打开后插入以下语句。
Import-Module posh-git
Import-Module oh-my-posh
Set-Theme Paradox  # 设置主题,具体可选主题可看后面
function prompt {"PS $pwd X >" } # X代表Emoji表情最后在PowerShell内输入配置文件路径来更新配置并重启PowerShell。
随机Emoji可以通过打开oh-my-posh主题配置文件目录来实现。
# 主题配置文件目录
C:\Users\[用户名]\Documents\WindowsPowerShell\Modules\oh-my-posh\2.0.332\Themes\
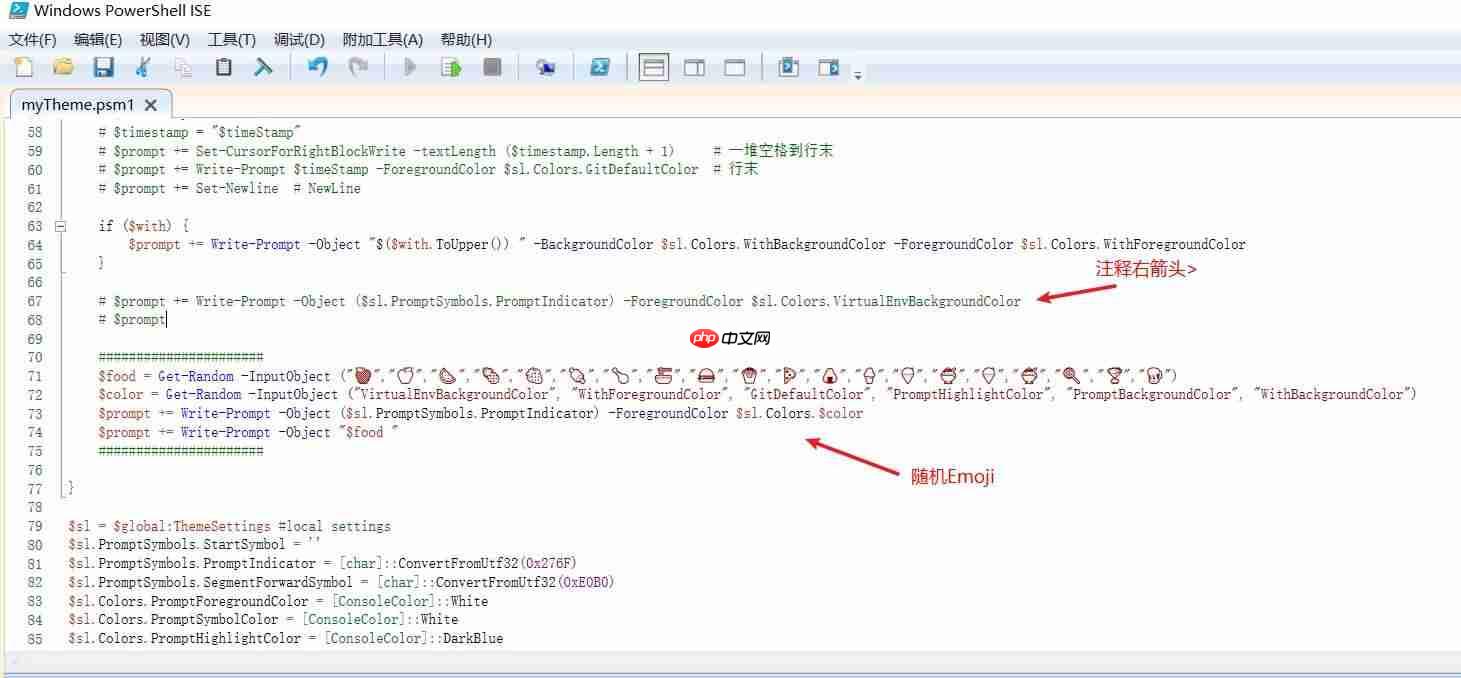
选择想修改的主题文件,复制一份重命名为myTheme.psm1,打开myTheme.psm1进行修改。找到以下表示右箭头>的语句,并在其前面加入#进行注释。
# $prompt += Write-Prompt -Object ($sl.PromptSymbols.PromptIndicator) -ForegroundColor $sl.Colors.VirtualEnvBackgroundColor
然后插入以下代码。
$food = Get-Random -InputObject ("X","X","X"....)  # X代表Emoji标签
$color = Get-Random -InputObject ("VirtualEnvBackgroundColor", "WithForegroundColor", "GitDefaultColor", "PromptHighlightColor", "PromptBackgroundColor", "WithBackgroundColor")
$prompt += Write-Prompt -Object ($sl.PromptSymbols.PromptIndicator) -ForegroundColor $sl.Colors.$color
$prompt += Write-Prompt -Object "$food "
最后打开PowerShell配置文件,应用myTheme主题。
Set-Theme myTheme # 设置主题
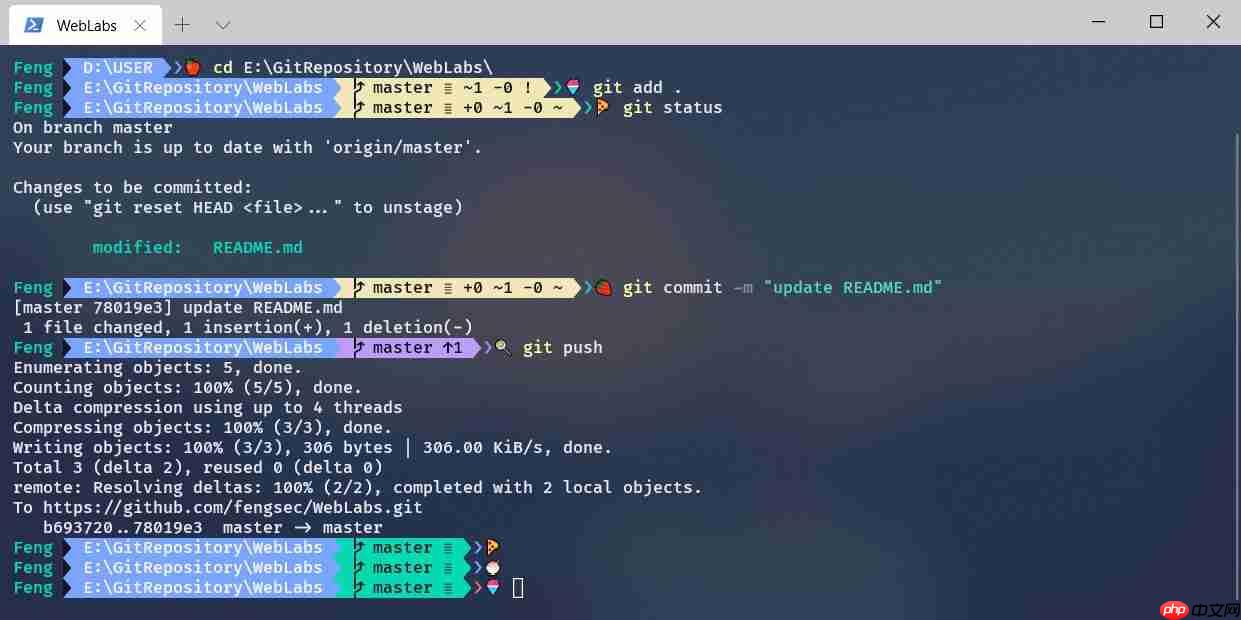
最终效果如下:

其它myTheme主题配置如下:
#requires -Version 2 -Modules posh-git
function Write-Theme {
    param(
        [bool]
        $lastCommandFailed,
        [string]
        $with
    )
    $lastColor = $sl.Colors.PromptBackgroundColor
    $prompt = Write-Prompt -Object $sl.PromptSymbols.StartSymbol -ForegroundColor $sl.Colors.PromptForegroundColor -BackgroundColor $sl.Colors.SessionInfoBackgroundColor
    #check the last command state and indicate if failed
    If ($lastCommandFailed) {
        $prompt += Write-Prompt -Object "$($sl.PromptSymbols.FailedCommandSymbol) " -ForegroundColor $sl.Colors.CommandFailedIconForegroundColor -BackgroundColor $sl.Colors.SessionInfoBackgroundColor
    }
    #check for elevated prompt
    If (Test-Administrator) {
        $prompt += Write-Prompt -Object "$($sl.PromptSymbols.ElevatedSymbol) " -ForegroundColor $sl.Colors.AdminIconForegroundColor -BackgroundColor $sl.Colors.SessionInfoBackgroundColor
    }
    $user = $sl.CurrentUser
    $computer = [System.Environment]::MachineName
    $path = Get-FullPath -dir $pwd
    if (Test-NotDefaultUser($user)) {
        # User@Hostname
        $prompt += Write-Prompt -Object "$user " -ForegroundColor $sl.Colors.GitDefaultColor -BackgroundColor $sl.Colors.SessionInfoBackgroundColor
        # $prompt += Write-Prompt -Object "$user@$computer " -ForegroundColor $sl.Colors.SessionInfoForegroundColor -BackgroundColor $sl.Colors.SessionInfoBackgroundColor
    }
    if (Test-VirtualEnv) {
        $prompt += Write-Prompt -Object "$($sl.PromptSymbols.SegmentForwardSymbol) " -ForegroundColor $sl.Colors.SessionInfoBackgroundColor -BackgroundColor $sl.Colors.VirtualEnvBackgroundColor
        $prompt += Write-Prompt -Object "$($sl.PromptSymbols.VirtualEnvSymbol) $(Get-VirtualEnvName) " -ForegroundColor $sl.Colors.VirtualEnvForegroundColor -BackgroundColor $sl.Colors.VirtualEnvBackgroundColor
        $prompt += Write-Prompt -Object "$($sl.PromptSymbols.SegmentForwardSymbol) " -ForegroundColor $sl.Colors.VirtualEnvBackgroundColor -BackgroundColor $sl.Colors.PromptBackgroundColor
    }
    else {
        $prompt += Write-Prompt -Object "$($sl.PromptSymbols.SegmentForwardSymbol) " -ForegroundColor $sl.Colors.SessionInfoBackgroundColor -BackgroundColor $sl.Colors.PromptBackgroundColor
    }
    # Writes the drive portion
    $prompt += Write-Prompt -Object "$path " -ForegroundColor $sl.Colors.PromptForegroundColor -BackgroundColor $sl.Colors.PromptBackgroundColor
    $status = Get-VCSStatus
    if ($status) {
        $themeInfo = Get-VcsInfo -status ($status)
        $lastColor = $themeInfo.BackgroundColor
        $prompt += Write-Prompt -Object $($sl.PromptSymbols.SegmentForwardSymbol) -ForegroundColor $sl.Colors.PromptBackgroundColor -BackgroundColor $lastColor
        $prompt += Write-Prompt -Object " $($themeInfo.VcInfo) " -BackgroundColor $lastColor -ForegroundColor $sl.Colors.GitForegroundColor
    }
    # Writes the postfix to the prompt
    $prompt += Write-Prompt -Object $sl.PromptSymbols.SegmentForwardSymbol -ForegroundColor $lastColor
    # Time
    # $timeStamp = Get-Date -UFormat %R
    # $timestamp = "$timeStamp"
    # $prompt += Set-CursorForRightBlockWrite -textLength ($timestamp.Length + 1)
    # 一堆空格到行末
    # $prompt += Write-Prompt $timeStamp -ForegroundColor $sl.Colors.GitDefaultColor  # 行末
    # $prompt += Set-Newline  # NewLine
    if ($with) {
        $prompt += Write-Prompt -Object "$($with.ToUpper()) " -BackgroundColor $sl.Colors.WithBackgroundColor -ForegroundColor $sl.Colors.WithForegroundColor
    }
    # $prompt += Write-Prompt -Object ($sl.PromptSymbols.PromptIndicator) -ForegroundColor $sl.Colors.VirtualEnvBackgroundColor
    # $prompt
    ######################
    $food = Get-Random -InputObject (“X”,“X”,“X”,“X”,“X”,)
    $color = Get-Random -InputObject ("VirtualEnvBackgroundColor", "WithForegroundColor", "GitDefaultColor", "PromptHighlightColor", "PromptBackgroundColor", "WithBackgroundColor")
    $prompt += Write-Prompt -Object ($sl.PromptSymbols.PromptIndicator) -ForegroundColor $sl.Colors.$color
    $prompt += Write-Prompt -Object "$food "
    ######################
}
$sl = $global:ThemeSettings #local settings
$sl.PromptSymbols.StartSymbol = ''
$sl.PromptSymbols.PromptIndicator = [char]::ConvertFromUtf32(0x276F)
$sl.PromptSymbols.SegmentForwardSymbol = [char]::ConvertFromUtf32(0xE0B0)
$sl.Colors.PromptForegroundColor = [ConsoleColor]::White
$sl.Colors.PromptSymbolColor = [ConsoleColor]::White
$sl.Colors.PromptHighlightColor = [ConsoleColor]::DarkBlue
$sl.Colors.GitForegroundColor = [ConsoleColor]::Black
$sl.Colors.WithForegroundColor = [ConsoleColor]::DarkRed
$sl.Colors.WithBackgroundColor = [ConsoleColor]::Magenta
$sl.Colors.VirtualEnvBackgroundColor = [System.ConsoleColor]::Red
$sl.Colors.VirtualEnvForegroundColor = [System.ConsoleColor]::White 


