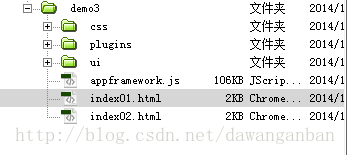
拷贝上面的/css目录、/plugins目录、/ui目录、/appframework.js文件,如下图所示。
如果需要也可以拷贝index.html,然后自己修改,比如上面我的index01.html和index02.html
接下来引入css与js文件
立即学习“前端免费学习笔记(深入)”;
<link href="css/af.ui.css" rel="stylesheet" type="text/css"/>
<link href="css/icons.css" rel="stylesheet" type="text/css"/>
<script src="appframework.js" type="text/javascript"></script>
<script src="ui/appframework.ui.js" type="text/javascript"></script>
index01.html
<!DOCTYPE html>
<html>
<head>
<meta charset="utf-8">
<title>jqMobi</title>
<link href="css/af.ui.css" rel="stylesheet" type="text/css"/>
<link href="css/icons.css" rel="stylesheet" type="text/css"/>
<script src="appframework.js" type="text/javascript"></script>
<script src="ui/appframework.ui.js" type="text/javascript"></script>
</head>
<body>
	<p id="afui">
    	<p id="content">
        	<p id="home" title="首页" class="panel" selected="true"
            	data-footer="custom_footer">

            </p>
            <p id="about" title="关于我们" class="panel"
            	data-footer="custom_footer">

           	</p>
            <header id="custom_header">
            	<h1>首页</h1>
            </header>
            <footer id="custom_footer">
            	<a href='#home' class='icon home'>首页</a>
                <a href='#about' class='icon info'>关于我们</a>
            </footer>
        </p>
    </p>
</body>
</html>上面代码说明:
1、UI container
<p id="afui">
这里面是写的内容
</p>
2、Content Area
<p id="afui">	<p id="content">		<!-- this is where your panels will go -->		这里写的是 panel	</p>
</p>
3、panels 是jqMobi的核心 可以有多个
<p id="afui">
<p id="content">
<p id="main" title="Welcome" class="panel" selected="true">			在这个里面写我们的对应内容		</p>
</p>
</p>
4、header与footer
(1)每个panel单独的header与footer
(2)公用的header和footer可以在多个panel中调用<p id="afui"> <p id="content"> <p id="main" title="Welcome" class="panel" selected="true"> <header> <h1>Welcome</h1> <a class="button" style="float:right;" class="icon home"></a> </header> 对应页面的内容 <footer> <a href='#about' class='icon info'>About</a> </footer> </p> </p> </p>登录后复制(3)另一种方法<p id="afui"> <p id="content"> <p id="main" title="Welcome" class="panel" selected="true" data-footer="custom_footer" data-header="custom_header">对应页面的内容</p> <header id="custom_header"> <h1>Welcome</h1> <a class="button" style="float:right;" class="icon home"></a> </header> <footer id="custom_footer"> <a href='#about' class='icon info'>About</a> </footer> </p> </p>登录后复制
<p id="header">
	<!-- any additional HTML you want can go here -->
	<a onclick="$.ui.toggleSideMenu();" class="button">Toggle Side Menu</a>
</p>
<p id="content">
	<!-- this is where your panels will go -->
	<p id="main" title="Welcome" class="panel" selected="true">
		内容
	</p>
	<p id="about" title="About" class="panel" data-nav="second_nav">
	<!-- by setting data-nav the "second_nav" will be shown on this panel -->
	</p>
</p>
	//底部
	<p id="navbar">
	<a target="#welcome" class="icon home">Home</a>
</p>
登录后复制
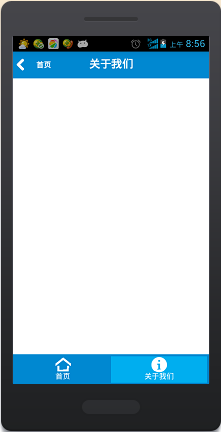
运行效果
以上就是小强的HTML5移动开发之路(37)——jqMobi快速入门的内容,更多相关内容请关注PHP中文网(www.php.cn)!

HTML怎么学习?HTML怎么入门?HTML在哪学?HTML怎么学才快?不用担心,这里为大家提供了HTML速学教程(入门课程),有需要的小伙伴保存下载就能学习啦!

Copyright 2014-2025 https://www.php.cn/ All Rights Reserved | php.cn | 湘ICP备2023035733号


 437
437