我之前使用的是xhprof+xhgui分析线上环境的性能,然而php版本升级到php 7之后,xhprof已经不可用,于是改用tideways+xhgui,这实际上也是php7下开源方案的唯一选择,有兴趣的可看下参考资料,有详细说明。
本文主要根据参考资料[1]配置,因此会有大量重复的地方,我主要其基础上根据实际生产环境的要求多添加了以下额外配置:
mongodb只绑定到本地
xhgui开启HTTP Basic认证
xhgui在mongodb中只保留最近14天的数据
立即学习“PHP免费学习笔记(深入)”;
CentOS 7.3 + nginx + mysql + php71
本文假设你的lnmp环境已经可以正常使用,并且是通过源码安装PHP,现在只是需要添加性能测试的功能。如果你不熟悉lnmp环境的配置,推荐使用https://lnmp.org/提供的一键安装包,本文的配置路径均基于该包的默认配置。
分成以下几个部分:
mongodb
tideways
xhgui
应用配置
安装
#yum install mongodb-server mongodb -y
#pecl install mongodb
启动mongodb服务
#mongod --bind_ip 127.0.0.1
git clone https://github.com/tideways/php-profiler-extension.git
cd php-profiler-extension
phpize
./configure --with-php-config=`which php-config`
make
sudo make install
编辑php.ini文件,添加:
extension=tideways.so
tideways.auto_prepend_library=0
重启php-fpm,执行以下命令看到tideways的输出表示有生效:
HTML医院网站系统基于PHP+MYSQL开发,在文章内容网站的基础上,预设了医院概况、新闻动态、环境设备、名医荟萃、专科介绍、就医指南、专家门诊值班表、网上挂号、医疗保健知识、在线咨询等医院网站常用的栏目和测试数据,采用适合医院网站的专用模版,增强了系统的针对性和易用性。系统具有文章、图文、下载、社区、表单、用户等基本系统模块和一系列网站辅助功能,用户也可根据自身特点任意创建和修改栏目,适合创建
 0
0

#php -m | grep tide
tideways
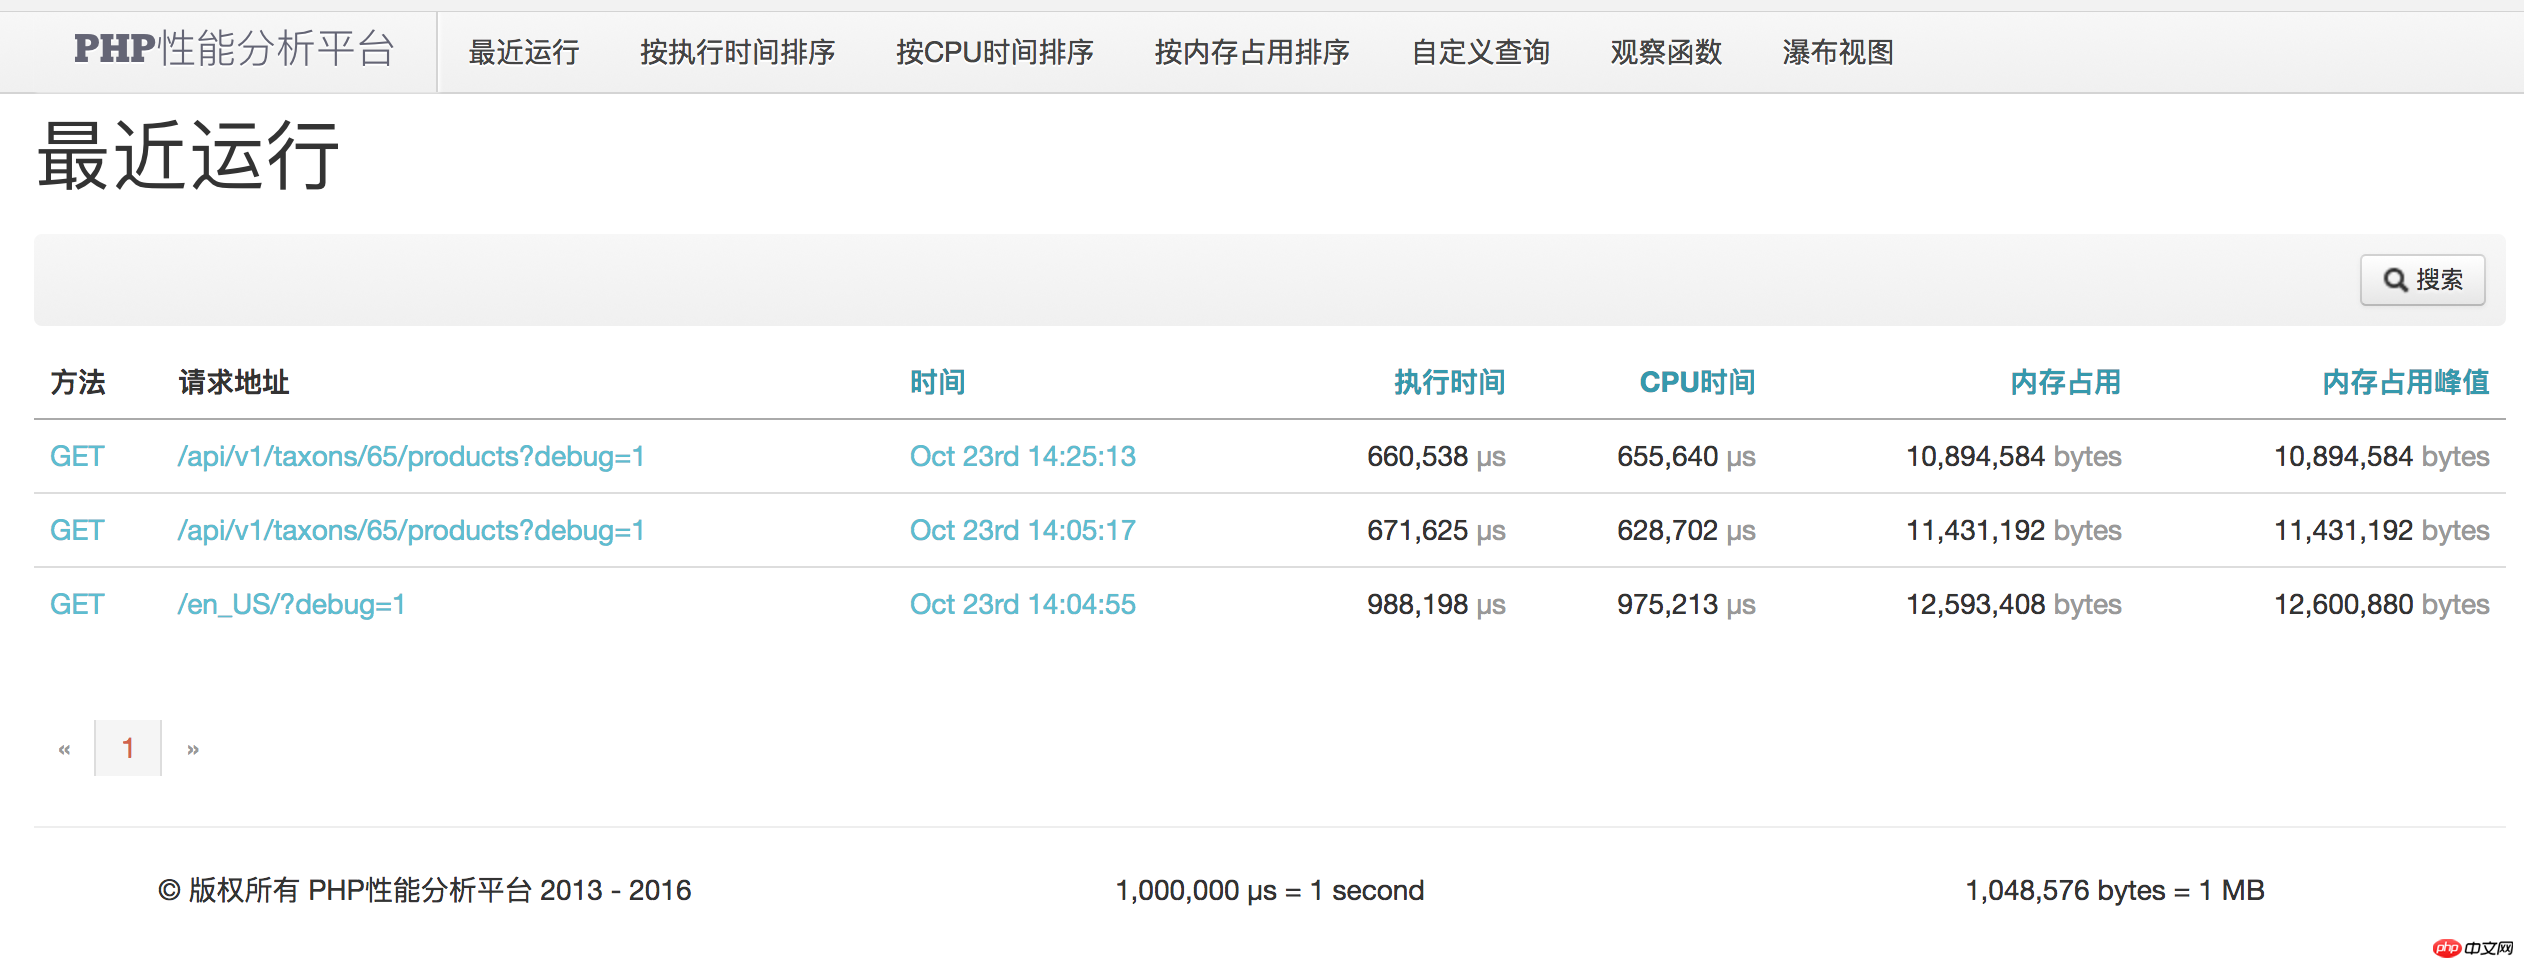
xhgui也是一个网站,最终需要通过web访问。官方版本是英文版,已经不更新了,有很多BUG,这里推荐使用中文版:https://github.com/maxincai/xhgui。
/home/wwwroot/目录下执行如下命令)$ git clone https://github.com/maxincai/xhgui.git $ cd xhgui $ php install.php
1.给数据库添加索引,非必须,但是强烈推荐:
$ mongo
 > use xhprof
 > db.results.ensureIndex( { 'meta.SERVER.REQUEST_TIME' : -1 } )
 > db.results.ensureIndex( { 'profile.main().wt' : -1 } )
 > db.results.ensureIndex( { 'profile.main().mu' : -1 } )
 > db.results.ensureIndex( { 'profile.main().cpu' : -1 } )
> db.results.ensureIndex( { 'meta.url' : 1 } )2.nginx配置(xhgui本身没有安全机制,它捕捉的数据中有敏感数据,因此开放到外网后必须开启HTTP Basic认证)
创建/usr/local/nginx/conf/vhost/xhgui.conf文件,内容如下:
server
{
    listen 8888; # 根据实际情况改成自己的端口
    server_name 127.0.0.1; #根据实际情况改成自己的域名
    index index.html index.htm index.php;
    root  /home/wwwroot/xhgui/webroot/;

    location ~ \.php
    {
        auth_basic "xhgui needs authentication"; # 开启HTTP Basic认证
        auth_basic_user_file htpasswd;  # 密码文件
        try_files $uri =404;
        fastcgi_pass  unix:/tmp/php-cgi.sock;
        fastcgi_index index.php;
        fastcgi_param SCRIPT_FILENAME $document_root$fastcgi_script_name;
        include fastcgi_params;
    }

    location / {
        try_files $uri $uri/ /index.php?$uri&$args;
    }

    location ~ .*\.(gif|jpg|jpeg|png|bmp|swf)$ {
        expires      30d;
    }

    location ~ .*\.(js|css)?$ {
        expires      30d;
    }

    access_log  /home/wwwlogs/xhgui.access.log;
    error_log  /home/wwwlogs/xhgui.error.log;
}开启HTTP Basic认证需要生成密码文件htpasswd。假设生成一个tester用户,密码为123456,则执行以下命令:
printf “tester:$(openssl passwd -crypt 123456)\n" >> /usr/local/nginx/conf/htpasswd
生成后记得检查下文件内容,格式内容应该类似如下:
$cat /usr/local/nginx/conf/htpasswd
tester:1qe8kAN82iOyo
完成配置重启,在浏览器中进入http://127.0.0.1:8888,应该能看到界面了,只是此时还没有数据。
3.进一步优化配置
xhgui 默认是按1%采集的,可是如果是排查问题时还是希望能够100%采集会比较方便。进入xhgui源码目录,修改config/config.default.php文件,平时仍然按1%的采样率采样,防止数据增长过快,当想调试时,就在URL中添加debug=1的参数即可。
在config/config.default.php中,找到profiler.enable这里,按如下修改:
'profiler.enable' => function() {
    // url 中包含debug=1则百分百捕获
    if(!empty($_GET['debug'])){
        return true;
    } else {
        // 1%采样
        return rand(1, 100) === 42;
    }
},如果不删除采集的数据,很快就会发现mongo数据库变得很大。因此推荐配置下mongo数据库,只保留最近14天的数据。
#mongo
> use xhprof
> db.results.ensureIndex( { "meta.request_ts" : 1 }, { expireAfterSeconds : 3600*24*14 } )如果想手动全部删除,则执行如下命令:
$ mongo
$ use xhprof;
$ db.dropDatabase();
让应用实现采集,需要修改对应的nginx配置文件,添加:
fastcgi_param TIDEWAYS_SAMPLERATE “100"; #是否采样取决于xhgui的随机数配置和这里的采样率配置,两者必须同时满足,这里简单设置成100,由xhgui去控制
fastcgi_param PHP_VALUE "auto_prepend_file=/home/wwwroot/xhgui/external/header.php";
完整的nginx示例配置文件如下:
server
{
    listen 80; #根据实际情况修改
    server_name test.dev; #根据实际情况修改
    index index.html index.htm index.php;
    root  /home/wwwroot/test/web/;

    location ~ \.php
    {
        fastcgi_pass  unix:/tmp/php-cgi.sock;
        fastcgi_index /index.php;
        fastcgi_param SCRIPT_FILENAME $document_root$fastcgi_script_name;
        fastcgi_param TIDEWAYS_SAMPLERATE "100”; # 此处为重点
        fastcgi_param PHP_VALUE "auto_prepend_file=/home/wwwroot/xhgui/external/header.php”; # 此处为重点
        include fastcgi_params;
    }

    try_files $uri $uri/ @rewrite;
    location @rewrite {
        rewrite ^/(.*)$ /index.php?_url=/$1;
    }

    location ~ .*\.(gif|jpg|jpeg|png|bmp|swf)$ {
        expires      30d;
    }

    location ~ .*\.(js|css)?$ {
        expires      30d;
    }

    access_log  /home/wwwlogs/test.access.log;
    error_log  /home/wwwlogs/test.error.log;
}

 广告
广告


Copyright 2014-2025 https://www.php.cn/ All Rights Reserved | php.cn | 湘ICP备2023035733号


 881
881


