首先要说明的是,我们的项目使用的表格大概只分为两类,一类是表头不固定,就是普通的表格,另一类是表头固定,tbody部分是可以滚动的。需要说明的是,表头固定的那种是需要用两个table去实现,做过的人应该也都明白。前者看起来比较简单,因为宽度是受thead里的th影响的,后者看起来就不好处理,因为你用两个table就会出现下面的情况:
emmm,这和我们想象的应该不一样,这可咋整,感觉处理起来很麻烦啊。想起看过element-ui中的表格,似乎有拖动表头的实现,先打开控制台看下结构吧: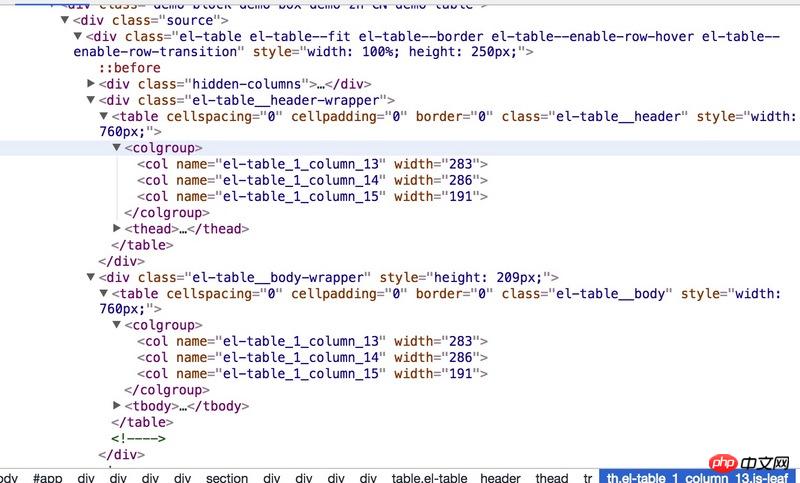
呃,话说长这么大我都没用过<colgroup>和<col>这两个标签,但仔细观察上面有个width,看到这大概也知道是怎么回事了,打开mdn看下相关属性的描述,和想的一样,width能控制当前列的宽度。
宽度的控制我们是解决了,还有一个问题,就是拖动后,其他列的宽度改怎么改变,如下:
| a | b | c | d |
|---|
如果我拖动a列,改变的宽度应该怎样分配到b,c,d上,我这里是这样处理的,b、c、d有个属性去表示该列是否已经被拖动过了,如果b、c、d都没拖动过,那么把a改变的宽度平分到b、c、d三列的宽度上,如果b、c、d都改变了话,那么只改变最后一列d的宽度。好了,思路已经有了,我们可以去实现了。
事实证明,如果按照上面的设计就太蠢了,已经改成只改变拖动列后面的列且这些列没有改变过宽度。
首先html结构大概是这样的:
<table>
  <thead>
    <tr>
      <th>a<th>
      <th>b<th>
    </tr>
  </thead>
  <tbody>
    <tr>
      <th>1<th>
      <th>2<th>
    </tr>
  </tbody>
</table>js方面
  constructor (id, options) {
    this._el = document.querySelector(`#${id}`);
    // 实际使用中需要对dom结构进行判断,这里就不做了
    this._tables = Array.from(this._el.querySelectorAll('table'));
    setTimeout(() => this._resolveDom());

    this.store = {
      dragging: false,                 //是否拖动
      draggingColumn: null,            //拖动的对象
      miniWidth: 30,                   //拖动的最小宽度
      startMouseLeft: undefined,       //鼠标点击时的clientX
      startLeft: undefined,            //th右离table的距离
      startColumnLeft: undefined,      //th左离table的距离
      tableLeft: undefined,            //table离页面左边的距离,
      HColumns: [],
      BColumns: [],
    };
};添加dom:
const [ THeader ] = this._tables;
let TBody;
const Tr = THeader.tHead.rows[0];
const columns = Array.from(Tr.cells);
const Bcolgroup = document.createElement('colgroup');
const cols = columns.map((item, index) => {
  const col = document.createElement('col');
  item.dataset.index = index;
  col.width = +item.offsetWidth;
  return col;
});
cols.reduce((newDom, item) => {
  newDom.appendChild(item);
  return newDom;
}, Bcolgroup);
const HColgroup = Bcolgroup.cloneNode(true);
THeader.appendChild(HColgroup);

//不管是一个table还是两个,都把header和body提出来
if (this._tables.length === 1) {
  const [ , tbody ] = Array.from(THeader.children);
  tbody.remove();
  TBody = THeader.cloneNode();
  TBody.appendChild(Bcolgroup);
  TBody.appendChild(tbody);
  this._el.appendChild(TBody);
} else {
  [ , TBody ] = this._tables;
  TBody.appendChild(Bcolgroup);
}

//拖动时的占位线
const hold = document.createElement('p');
hold.classList.add('resizable-hold');
this._el.appendChild(hold);上面这块就是添加节点的,对dom进行处理,为了复用,这里我们不管你是表头固定还是表头不固定,我们都拆分为两个table,这样处理起来也方便的多。
然后就是处理手指移到列右侧cursor的值设为col-resize:
handleMouseMove(evt) {
  //...
  if (!this.store.dragging) {
    const rect = target.getBoundingClientRect();
    const bodyStyle = document.body.style;
    if (rect.width > 12 && rect.right - event.pageX < 8) {
      bodyStyle.cursor = 'col-resize';
      target.style.cursor = 'col-resize';
      this.store.draggingColumn = target;
    } else {
      bodyStyle.cursor = '';
      target.style.cursor = 'pointer';
      this.store.draggingColumn = null;
    }
  }
};需要注意的是,getBoundingClientRect()获取的rigth是元素右侧距离页面左边缘的距离,不是离页面右边缘的距离。这里就是给thead的tr添加mousemove事件,当鼠标指针距离右边缘小于8的时候,改变指针形状,然后改变store里的状态,表示此时点击是可以拖动的了。
然后就是mousedown+mousemove+mouseup来处理拖动了:
const handleMouseDown = (evt) => {
  if (this.store.draggingColumn) {
    this.store.dragging = true;

    let { target } = evt;
    if (!target) return;

    const tableEle = THeader;
    const tableLeft = tableEle.getBoundingClientRect().left;
    const columnRect = target.getBoundingClientRect();
    const minLeft = columnRect.left - tableLeft + 30;
    target.classList.add('noclick');

    this.store.startMouseLeft = evt.clientX;
    this.store.startLeft = columnRect.right - tableLeft;
    this.store.startColumnLeft = columnRect.left - tableLeft;
    this.store.tableLeft = tableLeft;

    document.onselectstart = () => false;
    document.ondragstart = () => false;

    hold.style.display = 'block';
    hold.style.left = this.store.startLeft + 'px';

    const handleOnMouseMove = (event) => {
      const deltaLeft = event.clientX - this.store.startMouseLeft;
      const proxyLeft = this.store.startLeft + deltaLeft;

      hold.style.left = Math.max(minLeft, proxyLeft) + 'px';
    };

// 宽度是这样分配的,举个以上就是如何实现可拖动table表头的详细内容,更多请关注php中文网其它相关文章!

每个人都需要一台速度更快、更稳定的 PC。随着时间的推移,垃圾文件、旧注册表数据和不必要的后台进程会占用资源并降低性能。幸运的是,许多工具可以让 Windows 保持平稳运行。

Copyright 2014-2025 https://www.php.cn/ All Rights Reserved | php.cn | 湘ICP备2023035733号


 253
253