这次给大家带来使用vue.js实现编辑菜谱,使用vue.js实现编辑菜谱的注意事项有哪些,下面就是实战案例,一起来看一下。

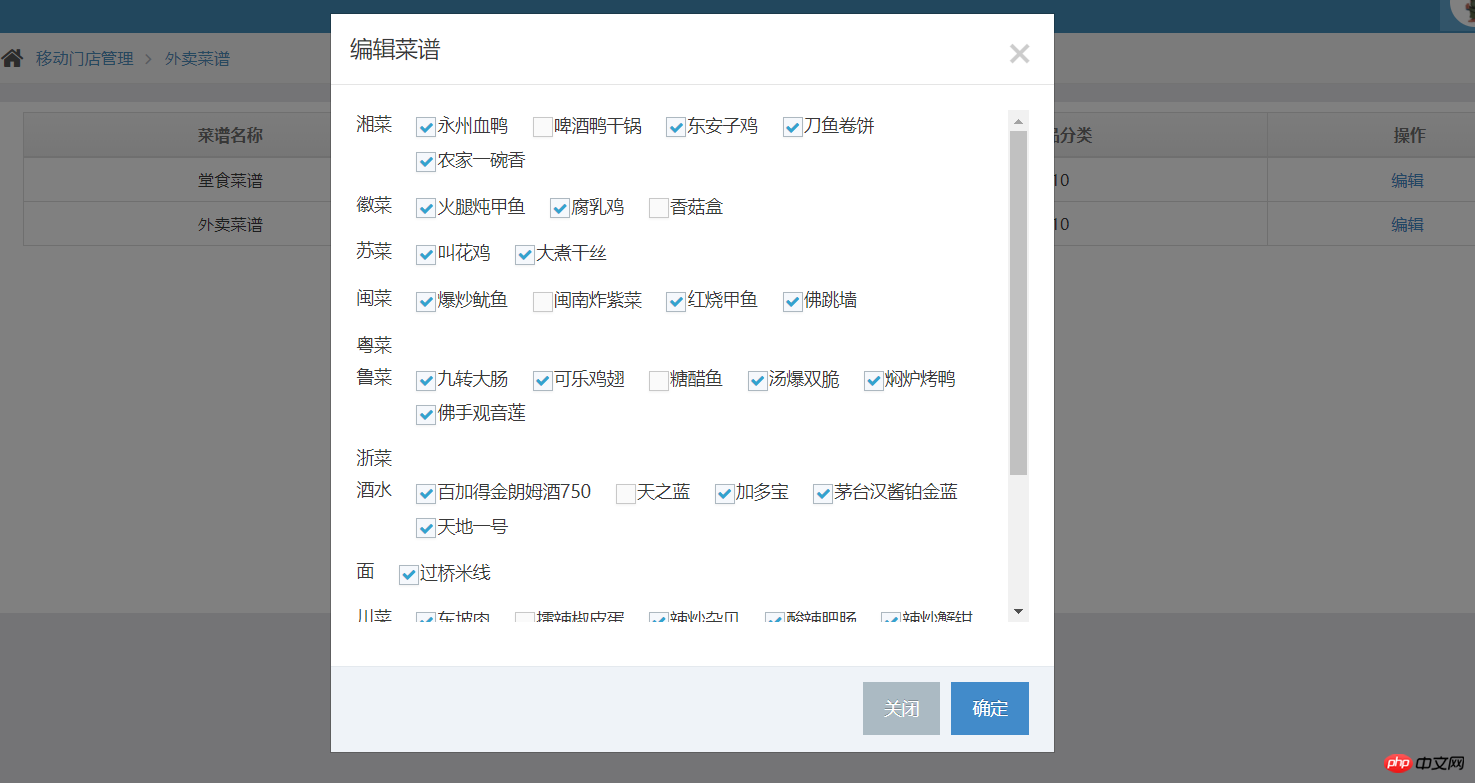
1、先获取门店下的所有菜品类型、菜品名称、菜品id(list),也就是最大数据量
this.$http.post(ceshiApi+'getCyFoodAndFoodTypeForShopId',{shopId:this.shopId},{emulateJSON:true,credentials: true}).then(function(res){
  if(res.data.type=='success'){
    this.foodList = res.data.data.cyFoodTypeList;
  }
});2、获取该菜谱已经拥有(勾选了哪些)的菜品id(list)
this.$http.post(ceshiApi+'getCyMenuFoodByMenuId',{'cyMenuId': id},{emulateJSON:true,credentials: true}).then(function(res){
  if(res.data.type=='success'){
    let data = res.data.data;
    let list = [];
    for(let i = 0; i < data.length; i++) {
      list.push(data[i].foodDefineId);
    }
    this.foodListId = list;
  }else {
    alertErrors(res.data.message);
  }
});3、在html页面使用vue对两数据进行对比,菜品id相同就打勾
<p class="modal-body">
  <p class="scroll_name ">
    <p class="newRecipe" style="overflow-y: scroll;height: 410px;">
      <p v-for="item in foodList" style="display: flex;flex-wrap: wrap;">
        <label style="margin-right: 20px;">{{ item.name }}</label>
        <p class="food-list">
          <p v-for="food in item.cyFoodDefineList">
            <label>
              <input class="ace check_son" type="checkbox" :value="food.id" v-model="foodListId">
              <span class="lbl">{{ food.name }}</span>
            </label>
          </p>
        </p>
      </p>
    </p>
  </p>
</p>相信看了本文案例你已经掌握了方法,更多精彩请关注php中文网其它相关文章!
推荐阅读:
以上就是使用vue.js实现编辑菜谱的详细内容,更多请关注php中文网其它相关文章!

每个人都需要一台速度更快、更稳定的 PC。随着时间的推移,垃圾文件、旧注册表数据和不必要的后台进程会占用资源并降低性能。幸运的是,许多工具可以让 Windows 保持平稳运行。

 广告
广告

Copyright 2014-2025 https://www.php.cn/ All Rights Reserved | php.cn | 湘ICP备2023035733号


 581
581


