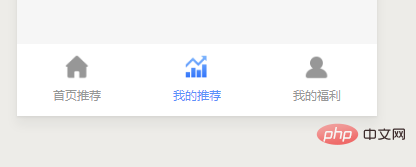
首先我们来看一下实现效果:

css代码:
*{
           margin: 0;
           padding: 0;
           text-decoration: none;
           list-style: none;

       }
       .foot {
           width: 100%;
           height: 68px;
           background: #FFFFFF;
           position: fixed;
           bottom: 0;
           display: flex;
           justify-content: space-around;
           z-index: 999;
           /*line-height: 20px;*/
       }

       .foot li {
           height: 100%;
       }

       .foot li a {
           display: block;
           width: 100%;
           height: 100%;
           /* color: #979797;*/
       }

       .foot li a img {
           /*display: block;*/
           width: 26px;
           height: 26px;
           margin-top: 10px;
       }

       .foot li a p {
           font-size: 12px;
           width: 100%;
           text-align: center;
           /* color: #979797;*/
           margin-top: 7px;
       }
       .botm-title{
           color: #979797;
       }

       .actives {
           color: #5C91FA;
       }
       .xz-img{
           text-align: center;
}html代码:
<%--底部tapbar--%>
   <ul class="foot">
       <li class="Imgbox" img="/images/tuiJianCus/index-wxz-icon.png" data-img="/images/tuiJianCus/index-xz-icon.png">
           <a href="/views/tuiJianCus/index.jsp">
               <div class="xz-img">
                   <img src="/images/tuiJianCus/index-wxz-icon.png" />
               </div>

               <p class="botm-title">首页推荐</p>
           </a>
       </li>
       <li class="Imgbox" img="/images/tuiJianCus/tuijiang-wxz-icon.png" data-img="/images/tuiJianCus/tuijiang-xz-icon.png">
           <a href="/views/tuiJianCus/tuijian_speed.jsp">
               <div class="xz-img">
                   <img src="/images/tuiJianCus/tuijiang-xz-icon.png" />
               </div>

               <p class="botm-title actives ">我的推荐</p>
           </a>
       </li>
       <li class="Imgbox" img="/images/tuiJianCus/my-wxz-icon.png" data-img="/images/tuiJianCus/my-xz-icon.png">
           <a href="/views/tuiJianCus/usercenter.jsp">
               <div class="xz-img">
                   <img src="/images/tuiJianCus/my-wxz-icon.png" />
               </div>

               <p class="botm-title ">我的福利</p>
           </a>
       </li>
</ul>推荐教程:CSS入门基础教程
立即学习“前端免费学习笔记(深入)”;
以上就是css如何实现底部tapbar栏效果的详细内容,更多请关注php中文网其它相关文章!

每个人都需要一台速度更快、更稳定的 PC。随着时间的推移,垃圾文件、旧注册表数据和不必要的后台进程会占用资源并降低性能。幸运的是,许多工具可以让 Windows 保持平稳运行。

Copyright 2014-2025 https://www.php.cn/ All Rights Reserved | php.cn | 湘ICP备2023035733号