用mysqli方法 实现以下功能(php7):
1、连接MySQL数据库服务器;
2、创建一个名为test的数据库;
3、在该数据库内创建一个名为“testTable”的数据表,数据表至少包含三个字段,字段名字、类型和属性自定;
4、为该数据库插入三条记录,并查询该数据表的所有数据;
5、修改其中的一条记录,并查询该数据表的所有数据;
6、删除其中的一条记录,并查询该数据表的所有数据;
立即学习“PHP免费学习笔记(深入)”;
<!DOCTYPE html>
<html>
<head>
<meta charset="UTF-8" >
<title>mysqli方法实现连接数据库,及增删查改</title>
</head>
<body>
<?php
$con = @mysqli_connect("localhost","root","15118595615");
if($con){
echo "数据库连接成功!</br>";
}
else{
echo "数据库连接失败!</br>";
}
$sql="CREATE DATABASE test";
if (mysqli_query($con,$sql)){
echo "数据库创建成功!</br>";
}else{
echo "数据库创建失败!</br>".mysqli_error($con)."</br>";
}
mysqli_select_db($con,"test");
$table="CREATE TABLE testTable(
student_id int(11) auto_increment primary key,
student_no char(10) not null unique,
student_name char(20) not null)";
if(mysqli_query($con,$table)){
echo "数据表创建成功!</br>";
}
else{
echo "数据表创建失败!</br>".mysqli_error($con)."</br>";
}
$mysqli=new mysqli("localhost","root","15118595615","test");
$query="select * from testTable";
$insertdatas=mysqli_query($con,"insert into testTable(student_id,student_no,student_name) values('null','20170001','张三')");
mysqli_free_result($insertdatas);
$insertdatas=mysqli_query($con,"insert into testTable(student_id,student_no,student_name) values('null','20170002','李四')");
mysqli_free_result($insertdatas);
$insertdatas=mysqli_query($con,"insert into testTable(student_id,student_no,student_name) values('null','20170003','王五')");
if($insertdatas){
echo "数据插入成功!</br>";
$result=$mysqli->query($query);
foreach($result as $row){
echo $row["student_id"].'  ';
echo $row["student_no"].'  ';
echo $row["student_name"]."</br>";
}
}
else{
echo "数据插入失败!</br>".mysqli_error($con)."</br>";
}
mysqli_free_result($insertdatas);
$up=mysqli_query($con,"update testTable set student_no='20180001' where student_name='张三'");
if($up){
echo "数据更新成功!</br>";
$result=$mysqli->query($query);
foreach($result as $row){
echo $row["student_id"].'  ';
echo $row["student_no"].'  ';
echo $row["student_name"]."</br>";
}
}
else{
echo "数据更新失败!</br>".mysqli_error($con)."</br>";
}
mysqli_free_result($up);
$del=mysqli_query($con,"delete from testTable where student_name='李四'");
if($del){
echo "数据删除成功!</br>";
$result=$mysqli->query($query);
foreach($result as $row){
echo $row["student_id"].'  ';
echo $row["student_no"].'  ';
echo $row["student_name"]."</br>";
}
}
else{
echo "数据删除失败!</br>".mysqli_error($con)."</br>";
}
mysqli_free_result($del);
mysqli_close($con);
?>
</body>
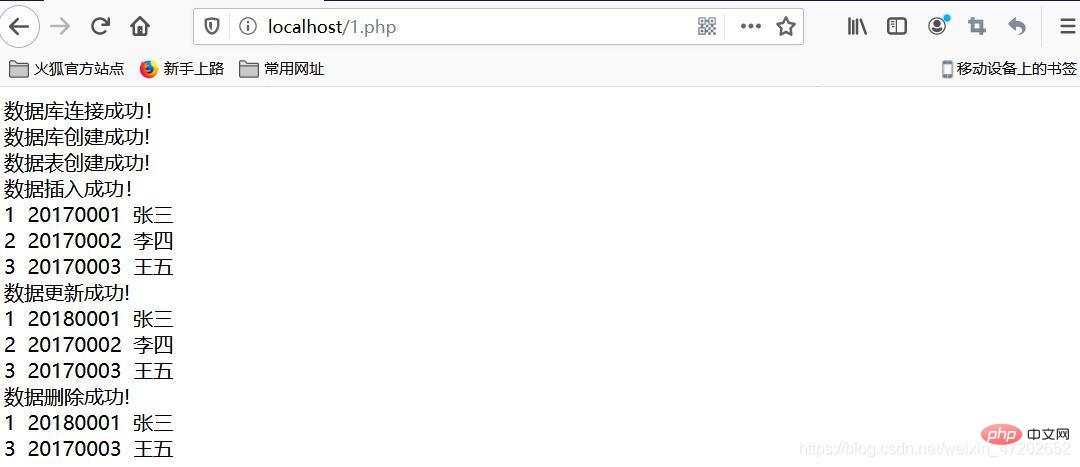
</html>最终效果如下:
写代码的时候要注意PHP7和PHP5的一些差别:
1、PHP7要将PHP5的mysql()换成mysqli();
2、PHP7的查询语句要写成mysqli(
c
o
n
n
e
c
t
,
connect,
connect,sql),PHP5的写法和PHP7的相反mysql(
s
q
l
,
sql,
sql,connect);
温馨提示:
每次查询完之后一定要用mysqli_free_result()函数释放资源!不然会报错,无法执行下一条查询语句!初学的时候走了不少弯路,血的教训,希望能给初学的朋友帮助,少走弯路!

主要功能如下: 一、系统管理:管理员管理,可以新增管理员及修改管理员密码;数据库备份,为保证您的数据安全本系统采用了数据库备份功能;上传文件管理,管理你增加产品时上传的图片及其他文件。 二、企业信息:可设置修改企业的各类信息及介绍。 三、产品管理:产品类别新增修改管理,产品添加修改以及产品的审核。 四、订单管理:查看订单的详细信息及订单处理。 五、会员管理:查看修改删除会员资料,及锁定解锁
 0
0

1、连接MySQL数据库服务器;
2、创建一个名为test的数据库;
3、在该数据库内创建一个名为“testTable”的数据表,数据表至少包含三个字段,字段名字、类型和属性自定;
4、为该数据库插入三条记录,并查询该数据表的所有数据;
5、修改其中的一条记录,并查询该数据表的所有数据;
6、删除其中的一条记录,并查询该数据表的所有数据;
立即学习“PHP免费学习笔记(深入)”;
<!DOCTYPE html><html><head><meta charset="UTF-8" ><title>mysqli方法实现连接数据库,及增删查改</title></head><body><?php
$con = @mysqli_connect("localhost","root","15118595615");
if($con){
echo "数据库连接成功!</br>";
}
else{
echo "数据库连接失败!</br>";
}
$sql="CREATE DATABASE test";
if (mysqli_query($con,$sql)){
echo "数据库创建成功!</br>";
}else{
echo "数据库创建失败!</br>".mysqli_error($con)."</br>";
}
mysqli_select_db($con,"test");
$table="CREATE TABLE testTable(
student_id int(11) auto_increment primary key,
student_no char(10) not null unique,
student_name char(20) not null)";
if(mysqli_query($con,$table)){
echo "数据表创建成功!</br>";
}
else{
echo "数据表创建失败!</br>".mysqli_error($con)."</br>";
}
$mysqli=new mysqli("localhost","root","15118595615","test");
$query="select * from testTable";
$insertdatas=mysqli_query($con,"insert into testTable(student_id,student_no,student_name) values('null','20170001','张三')");
mysqli_free_result($insertdatas);
$insertdatas=mysqli_query($con,"insert into testTable(student_id,student_no,student_name) values('null','20170002','李四')");
mysqli_free_result($insertdatas);
$insertdatas=mysqli_query($con,"insert into testTable(student_id,student_no,student_name) values('null','20170003','王五')");
if($insertdatas){
echo "数据插入成功!</br>";
$result=$mysqli->query($query);
foreach($result as $row){
echo $row["student_id"].'  ';
echo $row["student_no"].'  ';
echo $row["student_name"]."</br>";
}
}
else{
echo "数据插入失败!</br>".mysqli_error($con)."</br>";
}
mysqli_free_result($insertdatas);
$up=mysqli_query($con,"update testTable set student_no='20180001' where student_name='张三'");
if($up){
echo "数据更新成功!</br>";
$result=$mysqli->query($query);
foreach($result as $row){
echo $row["student_id"].'  ';
echo $row["student_no"].'  ';
echo $row["student_name"]."</br>";
}
}
else{
echo "数据更新失败!</br>".mysqli_error($con)."</br>";
}
mysqli_free_result($up);
$del=mysqli_query($con,"delete from testTable where student_name='李四'");
if($del){
echo "数据删除成功!</br>";
$result=$mysqli->query($query);
foreach($result as $row){
echo $row["student_id"].'  ';
echo $row["student_no"].'  ';
echo $row["student_name"]."</br>";
}
}
else{
echo "数据删除失败!</br>".mysqli_error($con)."</br>";
}
mysqli_free_result($del);
mysqli_close($con);
?></body></html>最终效果如下:
写代码的时候要注意PHP7和PHP5的一些差别:
1、PHP7要将PHP5的mysql()换成mysqli();
2、PHP7的查询语句要写成mysqli(
c
o
n
n
e
c
t
,
connect,
connect,sql),PHP5的写法和PHP7的相反mysql(
s
q
l
,
sql,
sql,connect);
温馨提示:
每次查询完之后一定要用mysqli_free_result()函数释放资源!不然会报错,无法执行下一条查询语句!初学的时候走了不少弯路,血的教训,希望能给初学的朋友帮助,少走弯路!
以上就是详解PHP7连接数据库以及增删查改(mysqli方法)的详细内容,更多请关注php中文网其它相关文章!

PHP怎么学习?PHP怎么入门?PHP在哪学?PHP怎么学才快?不用担心,这里为大家提供了PHP速学教程(入门到精通),有需要的小伙伴保存下载就能学习啦!

 广告
广告


Copyright 2014-2025 https://www.php.cn/ All Rights Reserved | php.cn | 湘ICP备2023035733号


 691
691