如何使用vue和canvas开发可编辑的矢量图形应用
引言:
近年来,矢量图形在设计领域的应用越来越广泛,有很多基于矢量图形的设计工具如Adobe Illustrator等。在Web开发中,我们也希望能够开发出可编辑的矢量图形应用,以满足用户对设计的自定义需求。本文将介绍如何使用vue和canvas开发可编辑的矢量图形应用,并提供详细的代码示例。
<template>
  <div>
    <canvas ref="canvas" @mousedown="onMouseDown" @mousemove="onMouseMove" @mouseup="onMouseUp"></canvas>
  </div>
</template>

<script>
export default {
  mounted() {
    this.canvas = this.$refs.canvas;
    this.ctx = this.canvas.getContext('2d');
  },
  methods: {
    onMouseDown(event) {
      // 按下鼠标事件
    },
    onMouseMove(event) {
      // 移动鼠标事件
    },
    onMouseUp(event) {
      // 松开鼠标事件
    },
  },
};
</script>
onMouseDown(event) {
  this.isDrawing = true;
  this.startX = event.offsetX;
  this.startY = event.offsetY;
},

onMouseMove(event) {
  if (!this.isDrawing) return;
  this.ctx.clearRect(0, 0, this.canvas.width, this.canvas.height);
  this.ctx.fillStyle = 'red';
  this.ctx.fillRect(this.startX, this.startY, event.offsetX - this.startX, event.offsetY - this.startY);
},

onMouseUp(event) {
  this.isDrawing = false;
},
首先,我们需要为图形元素创建一个数据模型,并将其存储在Vue组件的data中:
data() {
  return {
    shapes: [],
  };
},在onMouseDown方法中,我们创建一个新的Shape对象,并将其添加到shapes数组中:
onMouseDown(event) {
  this.isDrawing = true;
  this.startX = event.offsetX;
  this.startY = event.offsetY;
  this.selectedShape = new Shape(this.startX, this.startY, 0, 0, 'red');
  this.shapes.push(this.selectedShape);
},在onMouseMove方法中,我们绘制和更新图形的位置和大小:
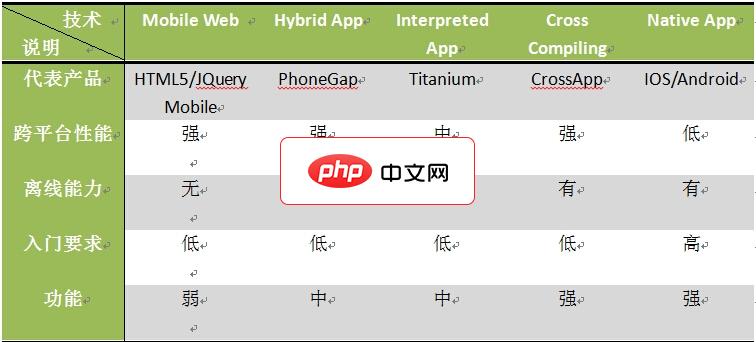
CrossApp是一款完全免费、开源、跨平台的移动app开发引擎,由9秒技术团队负责更新和维护。CrossApp拥有跨平台、整合部分第三方库、基于基于OpenGL ES 2.0、丰富的UI控件、提供CrossApp配套编辑器,以及CrossApp Style体系的支撑,所以开发者可以完全免费、毫无顾忌的使用CrossApp开发任何商业项目。CrossApp以C++作为开发语言,支持js,图形渲染基
 0
0

立即学习“前端免费学习笔记(深入)”;
onMouseMove(event) {
  if (!this.isDrawing) return;
  this.ctx.clearRect(0, 0, this.canvas.width, this.canvas.height);
  this.shapes.forEach((shape) => {
    shape.draw(this.ctx);
  });
  this.selectedShape.width = event.offsetX - this.selectedShape.x;
  this.selectedShape.height = event.offsetY - this.selectedShape.y;
  this.selectedShape.draw(this.ctx);
},最后,我们为图形添加编辑功能。在Canvas组件中添加以下代码:
created() {
  window.addEventListener('keydown', this.onKeyDown);
},
beforeDestroy() {
  window.removeEventListener('keydown', this.onKeyDown);
},
methods: {
  onKeyDown(event) {
    if (!this.selectedShape) return;
    switch (event.keyCode) {
      case 37: // 左箭头
        this.selectedShape.x -= 5;
        break;
      case 38: // 上箭头
        this.selectedShape.y -= 5;
        break;
      case 39: // 右箭头
        this.selectedShape.x += 5;
        break;
      case 40: // 下箭头
        this.selectedShape.y += 5;
        break;
      case 67: // C键
        this.selectedShape.color = 'blue';
        break;
      case 68: // D键
        this.selectedShape.color = 'green';
        break;
      case 46: // 删除键
        this.shapes.splice(this.shapes.indexOf(this.selectedShape), 1);
        this.selectedShape = null;
        break;
    }
    this.ctx.clearRect(0, 0, this.canvas.width, this.canvas.height);
    this.shapes.forEach((shape) => {
      shape.draw(this.ctx);
    });
  },
},希望本文对你了解如何使用vue和canvas开发可编辑的矢量图形应用有所帮助。祝你开发愉快!
以上就是如何使用Vue和Canvas开发可编辑的矢量图形应用的详细内容,更多请关注php中文网其它相关文章!

每个人都需要一台速度更快、更稳定的 PC。随着时间的推移,垃圾文件、旧注册表数据和不必要的后台进程会占用资源并降低性能。幸运的是,许多工具可以让 Windows 保持平稳运行。

 广告
广告


Copyright 2014-2025 https://www.php.cn/ All Rights Reserved | php.cn | 湘ICP备2023035733号


 514
514