虽然 opencart 的核心本身提供了许多有用的运输方法,但您总有可能需要创建自己的运输方法。另一方面,作为一名 web 开发人员,您将始终尝试探索您选择的框架,以了解如何创建您自己的自定义内容!
在本系列中,我们将在 OpenCart 中创建自定义运输方法模块。这将是一个由两部分组成的系列,在第一部分中,我们将为自定义运输方法创建一个后端配置表单。
要在 OpenCart 中创建新的自定义运输方法,需要按照 OpenCart 的约定实施文件。在后端,您需要提供一个配置表单,允许管理员配置价格、地理区域以及与运输方式相关的其他参数。在前端,您将实现所需的文件,以便在结账时选择您的自定义送货方式!
今天,我们将完成后端设置。我假设您使用的是最新版本的 OpenCart。在第二部分中,我们将探索前端对应部分,其中我们将看到前端文件设置和前端演示。
后端文件设置概览
让我们从后端所需的文件列表开始。我们将使用“custom”作为自定义送货方式的名称。
-
admin/controller/shipping/custom.php:这是一个控制器文件,我们将在其中设置配置表单所需的所有内容。 -
admin/language/english/shipping/custom.php:这是一个语言文件,我们将在其中定义表单的标签。 -
admin/view/template/shipping/custom.tpl:这是一个视图模板文件,其中包含我们的配置表单的 HTML 代码。
这就是后端设置的情况。
文件设置
让我们从控制器设置开始。
创建控制器文件
创建文件 admin/controller/shipping/custom.php 并将以下内容粘贴到该文件中。
load->language('shipping/custom');

    $this->document->setTitle($this->language->get('heading_title'));

    $this->load->model('setting/setting');

    if (($this->request->server['REQUEST_METHOD'] == 'POST') && $this->validate()) {
      $this->model_setting_setting->editSetting('custom', $this->request->post);

      $this->session->data['success'] = $this->language->get('text_success');

      $this->response->redirect($this->url->link('extension/shipping', 'token=' . $this->session->data['token'], 'SSL'));
    }

    $data['heading_title'] = $this->language->get('heading_title');

    $data['text_edit'] = $this->language->get('text_edit');
    $data['text_enabled'] = $this->language->get('text_enabled');
    $data['text_disabled'] = $this->language->get('text_disabled');
    $data['text_all_zones'] = $this->language->get('text_all_zones');
    $data['text_none'] = $this->language->get('text_none');

    $data['entry_cost'] = $this->language->get('entry_cost');
    $data['entry_tax_class'] = $this->language->get('entry_tax_class');
    $data['entry_geo_zone'] = $this->language->get('entry_geo_zone');
    $data['entry_status'] = $this->language->get('entry_status');
    $data['entry_sort_order'] = $this->language->get('entry_sort_order');

    $data['button_save'] = $this->language->get('button_save');
    $data['button_cancel'] = $this->language->get('button_cancel');

    if (isset($this->error['warning'])) {
      $data['error_warning'] = $this->error['warning'];
    } else {
      $data['error_warning'] = '';
    }

    $data['breadcrumbs'] = array();

    $data['breadcrumbs'][] = array(
      'text' => $this->language->get('text_home'),
      'href' => $this->url->link('common/dashboard', 'token=' . $this->session->data['token'], 'SSL')
    );

    $data['breadcrumbs'][] = array(
      'text' => $this->language->get('text_shipping'),
      'href' => $this->url->link('extension/shipping', 'token=' . $this->session->data['token'], 'SSL')
    );

    $data['breadcrumbs'][] = array(
      'text' => $this->language->get('heading_title'),
      'href' => $this->url->link('shipping/custom', 'token=' . $this->session->data['token'], 'SSL')
    );

    $data['action'] = $this->url->link('shipping/custom', 'token=' . $this->session->data['token'], 'SSL');

    $data['cancel'] = $this->url->link('extension/shipping', 'token=' . $this->session->data['token'], 'SSL');

    if (isset($this->request->post['custom_cost'])) {
      $data['custom_cost'] = $this->request->post['custom_cost'];
    } else {
      $data['custom_cost'] = $this->config->get('custom_cost');
    }

    if (isset($this->request->post['custom_tax_class_id'])) {
      $data['custom_tax_class_id'] = $this->request->post['custom_tax_class_id'];
    } else {
      $data['custom_tax_class_id'] = $this->config->get('custom_tax_class_id');
    }

    if (isset($this->request->post['custom_geo_zone_id'])) {
      $data['custom_geo_zone_id'] = $this->request->post['custom_geo_zone_id'];
    } else {
      $data['custom_geo_zone_id'] = $this->config->get('custom_geo_zone_id');
    }

    if (isset($this->request->post['custom_status'])) {
      $data['custom_status'] = $this->request->post['custom_status'];
    } else {
      $data['custom_status'] = $this->config->get('custom_status');
    }

    if (isset($this->request->post['custom_sort_order'])) {
      $data['custom_sort_order'] = $this->request->post['custom_sort_order'];
    } else {
      $data['custom_sort_order'] = $this->config->get('custom_sort_order');
    }

    $this->load->model('localisation/tax_class');
    $data['tax_classes'] = $this->model_localisation_tax_class->getTaxClasses();

    $this->load->model('localisation/geo_zone');
    $data['geo_zones'] = $this->model_localisation_geo_zone->getGeoZones();

    $data['header'] = $this->load->controller('common/header');
    $data['column_left'] = $this->load->controller('common/column_left');
    $data['footer'] = $this->load->controller('common/footer');

    $this->response->setOutput($this->load->view('shipping/custom.tpl', $data));
  }

  protected function validate() {
    if (!$this->user->hasPermission('modify', 'shipping/custom')) {
      $this->error['warning'] = $this->language->get('error_permission');
    }

    return !$this->error;
  }
}
这是一个重要的文件,定义了后端配置表单的大部分逻辑。我们将浏览控制器的 index 方法中的重要片段。根据约定,您需要定义类名 ControllerShippingCustom。
在 index 方法中,我们首先加载语言文件并设置页面标题。
接下来,我们加载 setting 模型并将设置保存到数据库中,作为配置表单的 POST 数据。在保存数据之前,我们使用该文件中定义的 validate 方法验证表单。
$this->load->model('setting/setting');

if (($this->request->server['REQUEST_METHOD'] == 'POST') && $this->validate()) {
  $this->model_setting_setting->editSetting('custom', $this->request->post);
  $this->session->data['success'] = $this->language->get('text_success');
  $this->response->redirect($this->url->link('extension/shipping', 'token=' . $this->session->data['token'], 'SSL'));
}
之后,我们将语言标签分配到 $data 数组中,以便我们可以在视图模板文件中访问这些标签。
接下来,有一个标准片段可以设置正确的面包屑链接。
$data['breadcrumbs'] = array();

$data['breadcrumbs'][] = array(
  'text' => $this->language->get('text_home'),
  'href' => $this->url->link('common/dashboard', 'token=' . $this->session->data['token'], 'SSL')
);

$data['breadcrumbs'][] = array(
  'text' => $this->language->get('text_shipping'),
  'href' => $this->url->link('extension/shipping', 'token=' . $this->session->data['token'], 'SSL')
);

$data['breadcrumbs'][] = array(
  'text' => $this->language->get('heading_title'),
  'href' => $this->url->link('shipping/custom', 'token=' . $this->session->data['token'], 'SSL')
);
接下来,我们设置 action 变量,以确保表单提交到我们的 index 方法。同样,如果用户点击 取消 按钮,就会返回送货方式列表。
$data['action'] = $this->url->link('shipping/custom', 'token=' . $this->session->data['token'], 'SSL');
$data['cancel'] = $this->url->link('extension/shipping', 'token=' . $this->session->data['token'], 'SSL');
此外,还有代码可以在添加或编辑模式下填充配置表单字段的默认值。
if (isset($this->request->post['custom_cost'])) {
  $data['custom_cost'] = $this->request->post['custom_cost'];
} else {
  $data['custom_cost'] = $this->config->get('custom_cost');
}

if (isset($this->request->post['custom_tax_class_id'])) {
  $data['custom_tax_class_id'] = $this->request->post['custom_tax_class_id'];
} else {
  $data['custom_tax_class_id'] = $this->config->get('custom_tax_class_id');
}

if (isset($this->request->post['custom_geo_zone_id'])) {
  $data['custom_geo_zone_id'] = $this->request->post['custom_geo_zone_id'];
} else {
  $data['custom_geo_zone_id'] = $this->config->get('custom_geo_zone_id');
}

if (isset($this->request->post['custom_status'])) {
  $data['custom_status'] = $this->request->post['custom_status'];
} else {
  $data['custom_status'] = $this->config->get('custom_status');
}

if (isset($this->request->post['custom_sort_order'])) {
  $data['custom_sort_order'] = $this->request->post['custom_sort_order'];
} else {
  $data['custom_sort_order'] = $this->config->get('custom_sort_order');
}
在下一部分中,我们从数据库加载税级和地理区域,这些数据将用作配置表单中的下拉选项。

BIZOSS-B2C是脱胎于贞龙B2B大型平台的网上商城系统、网上商店系统、网上购物系统的企业级B2C电子商务解决方案。系统设置:这里包含了网店的常用功能和全局配置的开关。包括 商店设置 、支付方式和配送方式 、邮件服务器设置、地区列表、友情链接、自定义导航栏、站点地图。商品管理:网店展示商品的核心。其中包括了 商品分类、商品类型、商品品牌、商品回收站、商品上下架等一些设置。促销管理:这个是我们网
$this->load->model('localisation/tax_class');
$data['tax_classes'] = $this->model_localisation_tax_class->getTaxClasses();

$this->load->model('localisation/geo_zone');
$data['geo_zones'] = $this->model_localisation_geo_zone->getGeoZones();
最后,我们分配视图的子模板和主模板。
$data['header'] = $this->load->controller('common/header');
$data['column_left'] = $this->load->controller('common/column_left');
$data['footer'] = $this->load->controller('common/footer');

$this->response->setOutput($this->load->view('shipping/custom.tpl', $data));
创建语言文件
创建文件 admin/language/english/shipping/custom.php 并将以下内容粘贴到该文件中。
文件的内容应该是不言自明的!
创建视图文件
创建文件
admin/view/template/shipping/custom.并将以下内容粘贴到该文件中。同样,这应该很容易理解。此模板文件的目的是为我们的自定义运输方法提供配置表单。它使用我们之前在控制器文件中设置的变量。
因此,就我们的自定义运输方法而言,后端文件设置就是这样。在下一节中,我们将了解如何启用自定义运输方式以及自定义配置表单的外观!
启用自定义运送方式
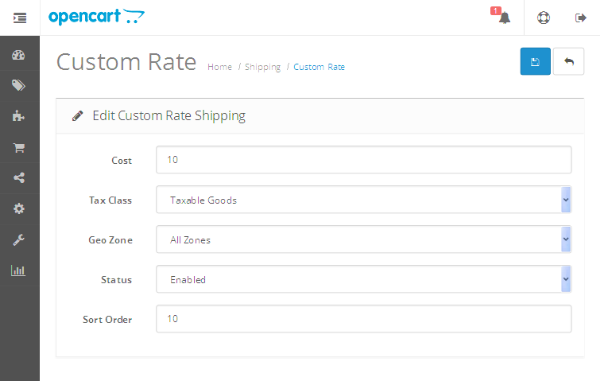
前往管理部分,然后转至 扩展 > 运送。您应该会看到我们的自定义送货方式被列为自定义费率。点击+符号安装我们的自定义送货方式。安装后,您应该能够看到编辑链接来打开配置表单。点击编辑链接,表单应如以下屏幕截图所示。
上述表单中的重要字段是税级和地理区域强>。
如果您除了成本字段中定义的金额之外还需要征收任何其他税款,则可以通过税级字段选择适当的选项。我们现在选择应税商品。
通过地理区域字段,您可以选择此方法适用的区域;为了简单起见,选择所有区域。另外,请确保将状态设置为已启用,否则不会在前端结账中列出。
填写完必要的数据后,点击保存按钮就可以了。今天的文章就到此为止,我将很快在下一部分中给您回复,其中将解释前端文件设置。
结论
今天,我们开始了一系列关于如何在 OpenCart 中创建自定义送货方式的系列。在第一部分中,我们浏览了后端部分并探讨了如何设置配置表单。如果有任何疑问和建议,请留言!