
在 angular 博客教程系列的上一部分中,您学习了如何创建 showpostcomponent 以在主页上显示博客文章列表。您使用创建的 rest api 端点获取了从 mongodb shell 插入的记录。
在本教程中,您将创建一个名为 AddPostComponent 的新组件,以提供向 MongoDB 数据库添加新博客文章的用户界面。
让我们开始克隆本教程系列前一部分的源代码。
git clone https://github.com/royagasthyan/ShowPost AddPost
导航到项目目录并安装所需的依赖项。
cd AddPost/client
npm install
cd  AddPost/server
npm install
安装依赖项后,重新启动客户端和服务器应用程序。
cd AddPost/client
npm start
cd  AddPost/server
node app.js
将浏览器指向 http://localhost:4200,应用程序应该正在运行。
让我们开始创建 AddPostComponent。在 src/app 文件夹中创建一个名为 add-post 的文件夹。在 add-post 文件夹中,创建一个名为 add-post.component.ts 的文件并添加以下代码:
import { Component } from '@angular/core';
import { Post } from '../models/post.model';

@Component({
  selector: 'app-add-post',
  templateUrl: './add-post.component.html',
  styleUrls: ['./add-post.component.css']
})
export class AddPostComponent {

  constructor() {

  }

}
创建一个名为 add-post.component.html 的文件和以下 HTML 代码:
<div class="modal fade" id="exampleModal" tabindex="-1" role="dialog" aria-labelledby="exampleModalLabel" aria-hidden="true">
<div class="modal-dialog" role="document">
<div class="modal-content">
<div class="modal-header">
<h5 class="modal-title" id="exampleModalLabel">Modal title</h5>
<button type="button" #closeBtn class="close" data-dismiss="modal" aria-label="Close">
<span aria-hidden="true">×</span>
</button>
</div>
<div class="modal-body">
<form>
<div class="form-group">
<label for="exampleInputEmail1">Title</label>
<input name="title" type="text" class="form-control" id="exampleInputEmail1" aria-describedby="emailHelp" placeholder="Enter title">
</div>
<div class="form-group">
<label for="exampleInputPassword1">Description</label>
<textarea name="description" class="form-control" id="exampleInputPassword1" placeholder="Password">
</textarea>
</div>
<button type="button" class="btn btn-primary">Add</button>
</form>
</div>
</div>
</div>
</div>
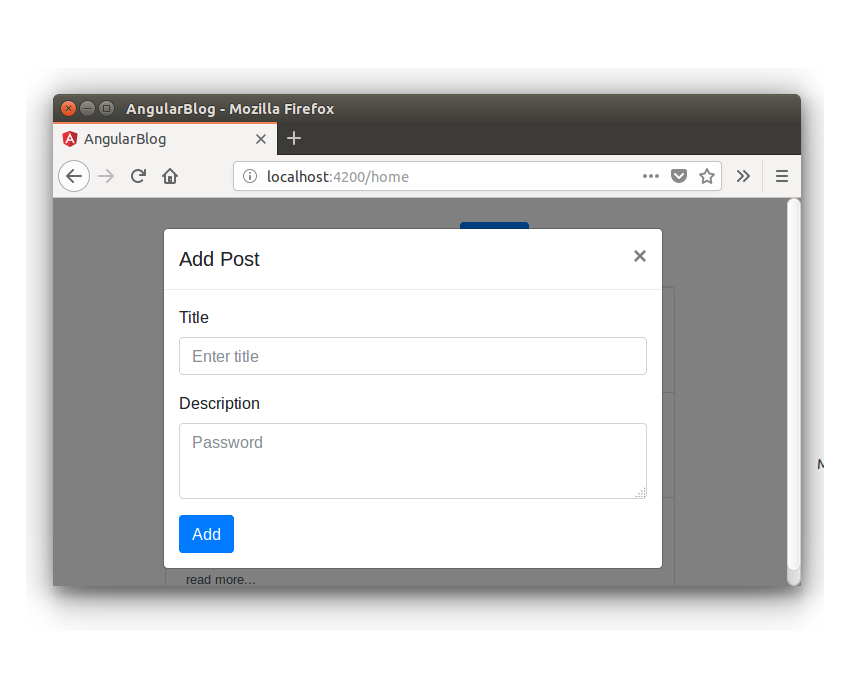
您将以弹出窗口的形式显示添加帖子组件。
现在您需要将 AddPostComponent 添加到 NgModule。在 app.module.ts 文件中导入 AddPostComponent。
import { AddPostComponent } from './add-post/add-post.component';
将该组件添加到 NgModule declarations 列表。其外观如下:
import { BrowserModule } from '@angular/platform-browser';
import { NgModule } from '@angular/core';
import { ROUTING } from './app.routing';
import { FormsModule } from '@angular/forms';
import { HttpClientModule } from '@angular/common/http';

import { RootComponent } from './root/root.component';
import { LoginComponent } from './login/login.component';
import { HomeComponent } from './home/home.component';
import { ShowPostComponent } from './show-post/show-post.component';
import { AddPostComponent } from './add-post/add-post.component';


@NgModule({
  declarations: [
    RootComponent,
    LoginComponent,
    HomeComponent,
    ShowPostComponent,
    AddPostComponent
  ],
  imports: [
    BrowserModule,
    ROUTING,
    FormsModule,
    HttpClientModule
  ],
  providers: [],
  bootstrap: [RootComponent]
})
export class AppModule { }
要触发添加帖子弹出窗口,您已经将 data-target 属性添加到 home.component.html 中的按钮。
<button type="button" class="btn btn-link" data-toggle="modal" data-target="#exampleModal">
  Add
</button>
保存上述更改并重新启动应用程序。登录应用程序并单击主页中的添加链接。您将看到 AddPostComponent 显示为弹出窗口。
将 ngModel 指令添加到 title 和 description 的输入元素。
<input name="title" type="text" [(ngModel)]="post.title" class="form-control" id="exampleInputEmail1" aria-describedby="emailHelp" placeholder="Enter title">
<textarea name="description" [(ngModel)]="post.description" class="form-control" id="exampleInputPassword1" placeholder="Password">
</textarea>
在按钮中添加 click 指令,用于调用保存博文的方法。
<button (click)="addPost()" type="button" class="btn btn-primary">Add</button>
从 add-post.component.ts 文件中的 src/app/models/post.model.ts 导入 Post 模型.
import { Post } from '../models/post.model';
在 add-post.component.ts 文件中定义 post 变量。
public post : Post;
在 add-post.component.ts 文件中定义 addPost 方法。在 addPost 方法中,您将验证输入的 title 和 description 并调用服务方法以调用 REST API。该方法如下所示:
addPost() {
  if(this.post.title && this.post.description){
  	// call the service method to add post
  } else {
  	alert('Title and Description required');
  }
}
让我们为组件 AddPostComponent 创建服务文件。创建一个名为 add-post.service.ts 的文件并添加以下代码:
import { Injectable } from '@angular/core';
import { HttpClient } from '@angular/common/http';
import { Post } from '../models/post.model';

@Injectable()
export class AddPostService {

    constructor(private http: HttpClient){

	}

}
在 AddPostService 内,创建一个名为 addPost 的方法来进行 REST API 调用。
addPost(post: Post){
	return this.http.post('/api/post/createPost',{
		title : post.title,
		description : post.description
	})
}
如上面的代码所示,您使用了 HttpClient 来进行 API 调用并返回 Observable。
在 add-post.component.ts 文件内的 addPost 方法中,您将从 addPost 方法class="inline">add-post.service.ts 文件。
this.addPostService.addPost(this.post).subscribe(res =>{
  	// response from REST API call
});
以下是 add-post.component.ts 文件的外观:
import { Component } from '@angular/core';
import { AddPostService } from './add-post.service';
import { Post } from '../models/post.model';

@Component({
  selector: 'app-add-post',
  templateUrl: './add-post.component.html',
  styleUrls: ['./add-post.component.css'],
  providers: [ AddPostService ]
})
export class AddPostComponent {

  public post : Post;

  constructor(private addPostService: AddPostService) {
      this.post = new Post();
  }

  addPost() {
  	if(this.post.title && this.post.description){
  		this.addPostService.addPost(this.post).subscribe(res =>{
  		    console.log('response is ', res)
  		});
  	} else {
  		alert('Title and Description required');
  	}
  }

}
让我们创建一个 REST API 端点,用于将博客文章添加到 MongoDB 数据库。在 server/app.js 文件中,创建一个 API 端点,如下所示:
app.post('/api/post/createPost', (req, res) => {
    // insert the details to MongoDB
})
首先,您需要使用 Mongoose 客户端连接到 MongoDB 数据库。
mongoose.connect(url, { useMongoClient: true }, function(err){
	if(err) throw err;
	console.log('connection established ');
});
建立连接后,您需要使用 Post 架构(在 server/model/post.js 文件中定义)创建模型对象。
const post = new Post({
	title: req.body.title,
	description: req.body.description
})
如上面的代码所示,您使用从请求 req 对象传入的 title 和 description 创建了 Post 对象。
在 Post 对象上调用 save 方法将条目保存到 MongoDB。
post.save((err, doc) => {
	if(err) throw err;
	return res.status(200).json({
		status: 'success',
		data: doc
	})
})
如上面的代码所示,一旦调用 save 方法回调且没有错误,它将返回 success 消息以及返回的对象 doc。
以下是 REST API 端点的最终外观:
app.post('/api/post/createPost', (req, res) => {
    mongoose.connect(url, { useMongoClient: true }, function(err){
		if(err) throw err;
		const post = new Post({
			title: req.body.title,
			description: req.body.description
		})
		post.save((err, doc) => {
			if(err) throw err;
			return res.status(200).json({
				status: 'success',
				data: doc
			})
		})
	});
})
保存上述更改并重新启动 Angular 和 Node 服务器。登录应用程序并尝试添加新的博客文章。单击添加按钮后,检查浏览器控制台,您将记录成功响应。
当博客文章详细信息成功添加到数据库后,您需要关闭弹出窗口。为了关闭弹出窗口,您需要以编程方式单击一个关闭按钮。
您将使用 @ViewChild 装饰器来访问关闭按钮。
在 AddPostComponent 中导入 ViewChild 和 ElementRef。
import { Component, ViewChild, ElementRef } from '@angular/core';
在 AddPostComponent 内,定义以下变量:
@ViewChild('closeBtn') closeBtn: ElementRef;
使用以下代码启动 closeBtn 单击:
this.closeBtn.nativeElement.click();
将上述代码添加到addPost方法的成功回调中。这是 addPost 方法,来自 add-post.component.ts。
addPost() {
  if(this.post.title && this.post.description){
  	this.addPostService.addPost(this.post).subscribe(res =>{
  		this.closeBtn.nativeElement.click();
  	});
  } else {
  	alert('Title and Description required');
  }
}
保存更改并重新启动客户端服务器。登录应用程序并尝试添加新的博客文章。成功保存博客文章详细信息后,弹出窗口将关闭。
需要注意的一件事是,新添加的博客文章不会显示在博客文章列表中。所以需要添加一个触发器来通知何时更新ShowPostComponent。您将使用通用服务在两个组件之间进行通信。
在 src/app 文件夹中创建一个名为 service 的文件夹。使用以下代码创建一个名为 common.service.ts 的文件:
import { Injectable } from '@angular/core';
import { Subject }    from 'rxjs/Subject';

@Injectable()
export class CommonService {

    public postAdded_Observable = new Subject();

	constructor(){

	}

	notifyPostAddition(){
		this.postAdded_Observable.next();
	}

}
如上面的代码所示,您已声明一个名为 postAdded_Observable 的 Subject 来跟踪添加到数据库中的新博客文章。每当新的博客文章添加到数据库时,您将调用 notifyPostAddition 方法,该方法将通知订阅者有关更新的信息。
在 app.module.ts 中导入 CommonService 并将其包含在 NgModule 提供商列表中。其外观如下:
import { BrowserModule } from '@angular/platform-browser';
import { NgModule } from '@angular/core';
import { ROUTING } from './app.routing';
import { FormsModule } from '@angular/forms';
import { HttpClientModule } from '@angular/common/http';

import { RootComponent } from './root/root.component';
import { LoginComponent } from './login/login.component';
import { HomeComponent } from './home/home.component';
import { ShowPostComponent } from './show-post/show-post.component';
import { AddPostComponent } from './add-post/add-post.component';
import { CommonService } from './service/common.service';


@NgModule({
  declarations: [
      RootComponent,
    LoginComponent,
    HomeComponent,
    ShowPostComponent,
    AddPostComponent
  ],
  imports: [
    BrowserModule,
    ROUTING,
    FormsModule,
    HttpClientModule
  ],
  providers: [CommonService],
  bootstrap: [RootComponent]
})
export class AppModule { }
在 show-post.component.ts 文件中导入 CommonService 并在构造方法中初始化。
import { CommonService } from '../service/common.service';
constructor(private showPostService: ShowPostService, private commonService: CommonService) {

}
在 ngOnInit 方法内,订阅 postAdded_Observable 变量并加载 getAllPost 方法。以下是 ngOnInit 方法的外观:
ngOnInit(){
    this.getAllPost();

    this.commonService.postAdded_Observable.subscribe(res => {
      this.getAllPost();
    });
}
在 add-post.component.ts 文件中导入 CommonService,并在添加博客文章后调用 notifyPostAddition 方法。以下是 AddPostComponent 中的 addPost 方法的外观:
addPost() {
  if(this.post.title && this.post.description){
  	this.addPostService.addPost(this.post).subscribe(res =>{
  	this.closeBtn.nativeElement.click();
    this.commonService.notifyPostAddition();
  	});
  } else {
  	alert('Title and Description required');
  }
}
保存以上更改并重新启动客户端服务器。登录到应用程序并添加新的博客文章。添加后,博客文章列表将更新为新的博客文章。
在本教程中,您创建了 AddPostComponent 以将博客文章详细信息添加到 MongoDB 数据库。您使用 Mongoose 客户端创建了 REST API,用于将博客文章保存到 MongoDB 数据库。
在本系列的下一部分中,您将实现编辑和更新博客文章详细信息的功能。
本教程的源代码可在 GitHub 上获取。
到目前为止您的体验如何?请在下面的评论中告诉我您的宝贵建议。
以上就是Angular 和 MongoDB:向博客应用程序添加帖子的详细内容,更多请关注php中文网其它相关文章!

每个人都需要一台速度更快、更稳定的 PC。随着时间的推移,垃圾文件、旧注册表数据和不必要的后台进程会占用资源并降低性能。幸运的是,许多工具可以让 Windows 保持平稳运行。

Copyright 2014-2025 https://www.php.cn/ All Rights Reserved | php.cn | 湘ICP备2023035733号


 745
745


