


什么是数字海洋?
Digital Ocean 是增长最快的网络主机之一,部分原因在于其基于 SSD 的快速服务器和每月 5 美元的廉价托管计划。在 Digital Ocean 上启动实例进行测试或长期使用是快速、简单且经济实惠的。
在 Digital Ocean 构建用于转售的应用程序映像中,我向您介绍了如何启动 WordPress(或其他应用程序)实例并为客户重复克隆它。在本教程中,我将指导您使用 Digital Ocean API 以编程方式管理我们的实例(也称为 Droplet),并自动执行常见任务。我还将提供一个示例代码库,用于运行在 Yii Framework for PHP 中编写的非常基本的 API 操作;您可以在 Github 上获取代码。
数字海洋 API
Digital Ocean API 允许您使用 HTTP 请求以简单的编程方式管理 Droplet 和资源。您在 Digital Ocean 控制面板中熟悉的所有功能也可以通过 API 获得,从而使您能够根据您的情况需要编写复杂操作的脚本。
在本教程中,我们将把开发人员 Antoine Corcy 的 Digital Ocean V2 PHP API 库集成到基于 Yii 的控制台应用程序中。您不需要了解 Yii 即可使用该应用程序,但您可以在此处了解更多信息:Yii 框架简介。
Digital Ocean API 通过 OAuth 验证您的帐户,由近十几个高级区域组成:
- 帐户:提供有关您的 Digital Ocean 帐户的基本信息。
- 操作:您帐户中 Droplet 的操作历史日志。
- 域名和域名记录:允许您管理帐户中 Droplet 上使用的域名以及与其关联的 DNS 记录。
- Droplet 和 Droplet 操作:允许您为 Droplet 创建、关闭、重新启动、快照等。
- 图像和图像操作:允许您枚举和管理您帐户中为 Droplet 拍摄的快照图像。
- SSH 密钥:允许您在创建 Droplet 时注册要安装的 SSH 密钥,这样就不需要密码安全性。
- 区域:枚举可以在其中创建数字海洋水滴的地理区域。
- 尺寸:枚举创建液滴时可以使用的液滴尺寸。
现在您已经了解了一些 API,让我们深入了解我们自己的应用程序。
设置访问密钥
为了使用 API,您需要为您的帐户激活个人访问令牌。登录您的帐户并访问设置应用程序页面:https://cloud.digitalocean.com/settings/applications。点击生成新令牌,如下图:

记下下面您的访问令牌 - Digital Ocean 只会向您显示一次:

现在,让我们转到示例控制台应用程序。
我们的控制台应用程序
在本教程中,我们将探索我构建的一个小型控制台应用程序,该应用程序执行一些与管理 Droplet 相关的任务。您可以从 Tuts+ GitHub 存储库自行安装应用程序,并自定义或扩展它以实现您想要的其他 API 功能。我已经在我的网站上发布了控制台应用程序的详细安装指南。您还可以浏览我的 Digital Ocean 应用通用安装指南。
配置 API 访问
我们再次使用 Antoine Corcy 的 Digital Ocean V2 PHP API 库来访问 API。
我们构建了一个名为 Ocean.php 的组件,它充当使用他的库的模型。它位于 /app/protected/components/Ocean.php。
Yii 从 Ocean.ini 文件加载您的访问令牌(如《数字海洋控制台应用程序安装指南》中所述),并实例化 digitalOcean API 对象。
adapter = new BuzzAdapter(Yii::app()->params['ocean']['access_key']);
     // create a digital ocean object with the previous adapter
     $this->digitalOcean = new DigitalOceanV2($this->adapter);
  }
获取 Droplet

现在,让我们获取活跃 Droplet 的列表。在 /app/protected/models/Droplet.php 中,我们的 sync 方法调用 Ocean 组件并获取 Droplet:
    public function sync() {
    $ocean = new Ocean();
    $droplets = $ocean->getDroplets();
    foreach ($droplets as $d) {
      $droplet_id = $this->add($d);
    }
  }
Ocean getDroplets 方法如下所示:
  public function getDroplets() {
    // return the action api
    $action  = $this->digitalOcean->droplet();
    // return a collection of Action entity
    $actions = $action->getAll();
    return $actions;
  }
注意:基本控制台应用程序仅对我们的 Droplet 列表进行单向下载同步。您可以自己实现更多功能,包括删除已在云端删除的水滴。
这是我们的 Droplet 模型的 add 函数。如果 Droplet 已经存在,我们只需更新记录:
public function add($droplet) {
     $d = Droplet::model()->findByAttributes(array('droplet_id'=>$droplet->id));
    if (empty($d)) {
      $d = new Droplet;
    }
    $d->user_id = Yii::app()->user->id;
      $d->droplet_id = $droplet->id;
      $d->name = $droplet->name;
      $d->vcpus = $droplet->vcpus;
      $d->memory = $droplet->memory;
      $d->disk = $droplet->disk;
      $d->status = $droplet->status;
      $d->active =1;
     $d->created_at = $d->created_at;
     $d->modified_at =new CDbExpression('NOW()');
     $d->save();
    return $d->id;
   }
如果您希望扩展模型的功能,Digital Ocean 提供了各种 Droplet API 操作,Corcy 在此列出了清晰的示例。
获取图像
接下来,我们将使用 API 来获取当前图像的列表。映像是快照,本质上是备份,是在给定时间点从服务器实例获取的。

我们的 Snapshot.php 模型有一个 sync 操作,它会请求图像列表并添加将它们分别写入数据库:
   public function sync() {
     $ocean = new Ocean();
     $snapshots = $ocean->getSnapshots();
     foreach ($snapshots as $i) {
       $image_id = $this->add($i);
       if ($image_id!==false) {
         echo $image_id;lb();
         pp($i);
       }
     }
   }
这是海洋组件 getSnapshots 代码:

  public function getSnapshots() {
    // return the action api
    $action  = $this->digitalOcean->image();
    // return a collection of Action entity
    $actions = $action->getAll();
    return $actions;
  }
这是快照模型 add 代码 - 我们忽略 Digital Ocean 的库存应用程序映像,这些映像被区分为公共:
   public function add($snapshot) {
      $i = Snapshot::model()->findByAttributes(array('image_id'=>$snapshot->id));
     if (empty($i)) {
       $i = new Snapshot;
       $i->created_at =new CDbExpression('NOW()');
     }
     if (isset($snapshot->public) and $snapshot->public ==1) {
       return false; // no need to save public images right now
     } else
       $i->user_id = Yii::app()->user->id;
       $i->image_id = $snapshot->id;
       $i->name = $snapshot->name;
       $i->region = $snapshot->regions[0];
       $i->active =1;
       $i->modified_at =new CDbExpression('NOW()');
      $i->save();
    return $i->id;
    }
自动化快照
正如我们在构建要在 Digital Ocean 进行转售的应用映像中所讨论的那样,自动创建可传输给客户和顾客的快照非常有用。遗憾的是,目前无法通过引用克隆或传输图像;每次您将快照转移到另一个帐户时,它就会消失。
由于 Digital Ocean 要求您将图像实例化为 Droplet,并在拍摄新快照之前将其关闭,因此重复创建快照是一个耗时的手动过程。 Digital Ocean 在拍摄快照后再次启动水滴并没有什么帮助,这只会减慢进程。
由于 API 在其他操作挂起时不接受请求,因此我们必须构建一个表来跟踪后台操作并使用 cron 作业来重复断电、快照操作。其工作原理如下:
访问图像页面,然后单击您想要克隆的快照的查看。然后,单击右侧的复制菜单选项。

这将创建一个 Droplet 并使用此 image_id 和droplet_id。 end_stage 是一个常量,您可以设置它来指示要创建的重复项的数量。

这是 Snapshot 模型的 replicate() 方法:
    public function replicate($id) {
        // look up image_id
      $snapshot = Snapshot::model()->findByAttributes(array('id'=>$id));
  	  // create the droplet
      $ocean = new Ocean();
      $droplet_id = $ocean->launch_droplet($snapshot->name,$snapshot->region,$snapshot->image_id);
  	  // add command to action table with droplet_id and image_id
      $a = new Action();
      $a->droplet_id = $droplet_id;
      $a->snapshot_id = $snapshot->image_id;
      $a->action = Action::ACTION_SNAPSHOT;
      $a->status = Action::STATUS_ACTIVE;
      $a->stage = 0;
    // user settable constant for number of replications to make
      $a->end_stage = Snapshot::NUMBER_REPLICATIONS;
      $a->last_checked = 0;
      $a->modified_at =new CDbExpression('NOW()');
      $a->created_at =new CDbExpression('NOW()');
      $a->save();
    }
cron 任务将 ping http://ocean.yourdomain.com/daemon/index 以定期处理操作表。任何未完成的逾期项目都将请求另一个快照。
这是 Action 模型的 process() 方法:
    public function process() {
	  set_time_limit(0);
	  // look for overdue actions
	  $todo = Action::model()->overdue()->findAllByAttributes(array('status'=>self::STATUS_ACTIVE));
	  foreach ($todo as $item) {
	    if ($item->action == self::ACTION_SNAPSHOT) {
          $result = Snapshot::model()->take($item->id);
	    }
	  }
	}
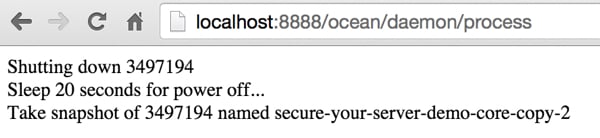
快照过程将关闭 Droplet,暂停 20 秒等待 Droplet 关闭,并请求快照。
这是 Snapshot 模型的 take() 方法:
 public function take($action_id) {
    $result = false;
      $a = Action::model()->findByPk($action_id);
    $snapshot = Snapshot::model()->findByAttributes(array('image_id'=>$a->snapshot_id));
    $ocean = new Ocean();
    // attempt shutdown
    // take snapshot
    $result = $ocean->snapshot($a->stage,$a->droplet_id,$snapshot->name,$snapshot->region,$snapshot->image_id);
    // if snapshot was successful
    if ($result) {
      // increment stage
      $a->stage+=1;
      // if last snapshot replication complete, end action
      if ($a->stage >= $a->end_stage)
        $a->status = Action::STATUS_COMPLETE;
    }
	  // either way, update last_checked
    $a->last_checked = time();
    $a->save();
	  return $result;
  }
以下是 Ocean 组件中用于实际进行 API 调用的代码:
public function snapshot($stage,$droplet_id,$name,$region,$image_id,$begin=1,$count=3,$size='512mb') {
    $no_sleep = false;
    $name = str_replace("_","-",$name);
    $droplet  = $this->digitalOcean->droplet();
      try {
        echo 'Shutting down '.$droplet_id;lb();
        $shutdown = $droplet->shutdown($droplet_id);
      } catch (Exception $e) {
          $err = $e->getMessage();
          echo 'Caught exception: ',  $e->getMessage(), "\n";
          if (stristr ( $err , 'already powered off')===false)
            return false;
          else
            $no_sleep = true;
      }
    if (!$no_sleep) {
      echo 'Sleep 20 seconds for power off...';lb();
      sleep(20);
    }
    echo 'Take snapshot of '.$droplet_id.' named '.$name.'-copy-'.$stage;lb();
    try {
      $snapshot = $droplet->snapshot($droplet_id, $name.'-copy-'.$stage);
    } catch (Exception $e) {
        echo 'Caught exception: ',  $e->getMessage(), "\n";
        return false;
    }
    // shutdown and snapshot successful
    return true;
  }
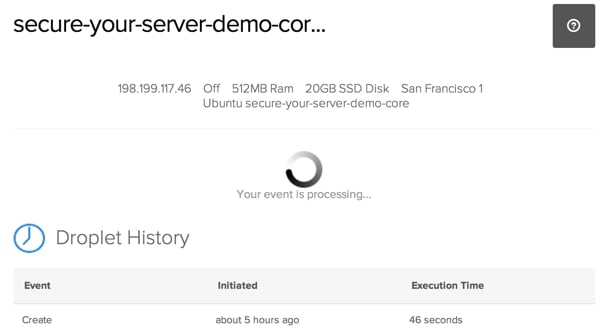
如果您访问 Digital Ocean 网站查看 Droplet,您将看到正在进行的操作:
如果快照成功,则返回Snapshot模型以递增阶段。当阶段复制完成后,操作完成。
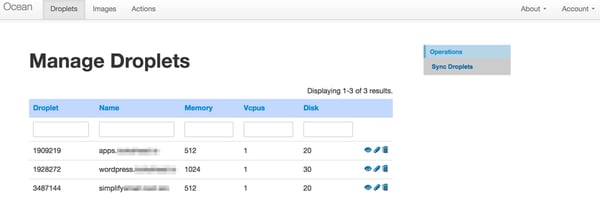
您可以访问 Digital Ocean 网站的图像页面来查看复制的快照:

创建图像后,您可以手动删除 Droplet,或者您可以扩展代码以在 STATUS_COMPLETE 已达到。如果您不删除 Droplet,我们将向您收取费用。
请注意,目前 API 不提供将快照传输到电子邮件地址的功能,因此您需要继续通过网络界面手动执行此操作。
下一步是什么?
我希望您喜欢本教程,并发现 Digital Ocean 是您的工具和托管提供商组合中的一项有用服务。在下一个教程中,我们将探索 Digital Ocean DNS 服务。
请随时在下面发表您的问题和评论。您也可以通过 Twitter @reifman 联系我或直接给我发电子邮件。请关注我的 Tuts+ 讲师页面,查看本系列后续文章。
相关链接
- 数字海洋 API
- Digital Ocean V2 PHP API 库
- 数字海洋控制台应用程序安装指南


