在网站上显示数据时,重要的是提供使用户更轻松地浏览数据的功能。其中一项功能就是能够对数据进行排序。
对数据进行排序是指将数据按照指定的值,按升序或降序排列。我们可以使用 JavaScript 在网站的客户端手动处理数据排序。如果您正在开发静态网站或消除服务器中数据排序的负担,这尤其有用。
在本教程中,我们将使用 JavaScript 将模拟 JSON 响应中的数据显示到 HTML 表中。我们还将包含使表格可根据表标题中的值进行排序的功能。
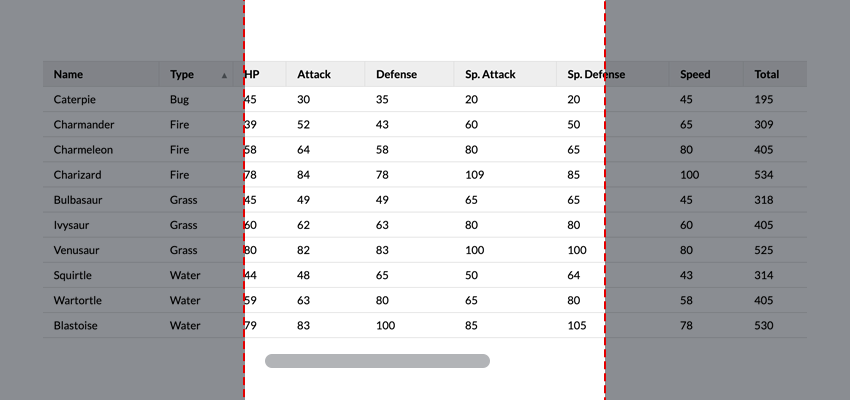
这是成品。单击任意表格标题即可对表格进行相应排序。
1. 用 HTML 放置内容
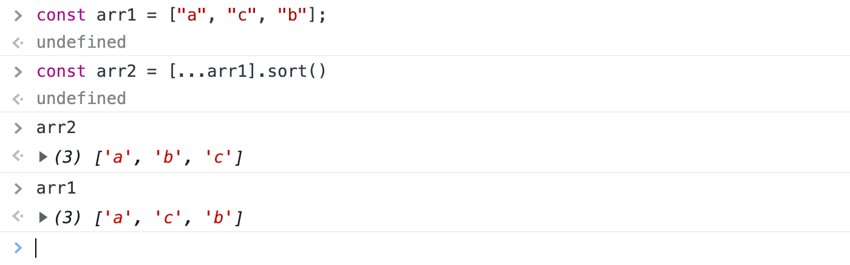
立即学习“Java免费学习笔记(深入)”; 我们的表将包含表头、 使用 HTML 表格的更常见问题之一是缺乏响应能力。该表格可能存在单元格重叠问题或超出整页的边界。 我们可以通过将表格放置在具有溢出滚动属性的整页宽度的表格容器中来解决这些问题。这样,表格始终只与整页一样宽,并且由于可滚动溢出而无需缩小单元格。我们还将在表格单元格中包含最小宽度属性,以避免文本换行。 这是使我们的表格可滚动所需的 CSS: 然后我们可以添加其余的样式: 对于此示例,我们将使用模拟解析的 JSON 响应。这就是我们的数据: 我们将把数据放在 行内容将基于 在此函数中,我们使用 一旦我们获得了对象键的数组,我们就使用 在此映射函数中,我们为数组中的每个项目创建一个新单元格,并将单元格的 innerHTML 设置为相应的对象键值。 最后,我们使用 现在我们有了行创建函数,我们将定义一个函数来循环 千博购物系统.Net能够适合不同类型商品,为您提供了一个完整的在线开店解决方案。千博购物系统.Net除了拥有一般网上商店系统所具有的所有功能,还拥有着其它网店系统没有的许多超强功能。千博购物系统.Net适合中小企业和个人快速构建个性化的网上商店。强劲、安全、稳定、易用、免费是它的主要特性。系统由C#及Access/MS SQL开发,是B/S(浏览器/服务器)结构Asp.Net程序。多种独创的技术使 我们会将 现在我们已经创建了表格,让我们添加排序功能。在我们的 HTML 中,我们在标题单元格中包含了按钮,这些按钮以对象键作为其 id。现在让我们定位这些按钮: 我们希望根据单击的按钮对数据进行排序,并且还包含一个在单击按钮时切换排序方向(升序或降序)的功能。 我们可以使用 来源:MDN 关于排序方法需要注意的另一件事是它会改变它所操作的原始数组。这意味着它改变了我们原始数组的值。 我们可以通过使用扩展语法来避免改变原始数组[...] 现在我们可以创建排序函数了。这就是我们的排序函数的逻辑: 我们的排序函数需要三个参数: 我们通过将innerHTML 设置为空白字符串来清除tableContent 元素中的内容。然后,我们使用 最后,我们将 现在,我们将排序函数传递到表格按钮的单击事件侦听器中,并处理切换排序方向。 在此函数中,我们通过在按钮上设置 我们不想让图标显示在所有以前单击的按钮上,因此我们将定义一个 我们会将该函数传递到按钮事件侦听器中,以便在单击新按钮时重置以前的按钮 这样,我们就完成了!我们仅使用普通 JavaScript 创建了一个可排序的表格! 标签是用于在网页上显示数据的语义 HTML 标签。我们将把
标签放置在表容器 div 中,这将允许我们在 CSS 中包含一些响应式样式。
thead 和表内容、tbody 标签。在表头中,我们将在每个 th 单元格中包含按钮,这些按钮将用于处理排序功能。表格内容的单元格将使用我们的 JSON 响应中的数据通过 JavaScript 添加。
2.用CSS制作响应式表格
.table-container {
width: 100%;
overflow: scroll;
}
table {
width: 100%;
}
.table-container {
margin: auto;
max-width: 1200px;
min-height: 100vh;
overflow: scroll;
width: 100%;
}
table {
border-collapse: collapse;
width: 100%;
}
thead tr {
border-bottom: 1px solid #ddd;
border-top: 1px solid #ddd;
height: 1px;
}
th {
font-weight: bold;
height: inherit;
padding: 0;
}
th:not(:first-of-type) {
border-left: 1px solid #ddd;
}
th button {
background-color: #eee;
border: none;
cursor: pointer;
display: block;
font: inherit;
height: 100%;
margin: 0;
min-width: max-content;
padding: 0.5rem 1rem;
position: relative;
text-align: left;
width: 100%;
}
tbody tr {
border-bottom: 1px solid #ddd;
}
td {
padding: 0.5rem 1rem;
text-align: left;
}
3. 将 JSON 数据放入 HTML 表
const response = {
"pokedata": [
{
"name": "Bulbasaur",
"type": "Grass",
"hp": 45,
"attack": 49,
"defense": 49,
"spAttack": 65,
"spDefense": 65,
"speed": 45,
"total": 318
},
...
]
}
标记中,以便我们在 JavaScript 中定位该元素;
const tableContent = document.getElementById("table-content")
response.pokedata 中的每个对象。让我们定义一个函数来根据对象数据创建新行:const createRow = (obj) => {
const row = document.createElement("tr");
const objKeys = Object.keys(obj);
objKeys.map((key) => {
const cell = document.createElement("td");
cell.setAttribute("data-attr", key);
cell.innerHTML = obj[key];
row.appendChild(cell);
});
return row;
};
Object.keys() 方法以数组形式获取对象键。返回值如下所示: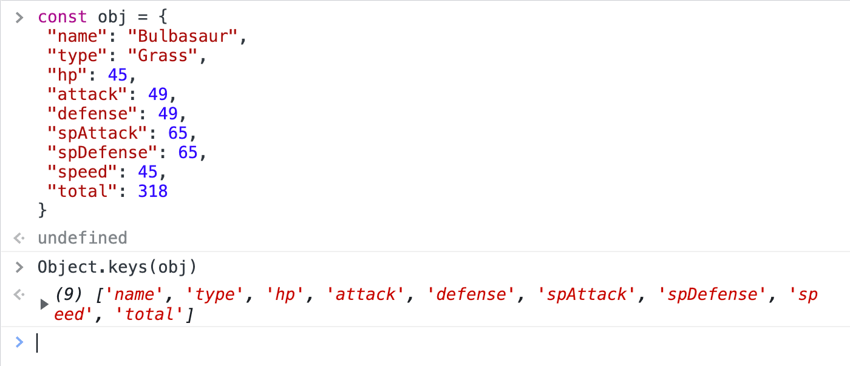
.map() 方法循环遍历每个键。 map 方法对数组中的每个项目执行我们传递给它的函数。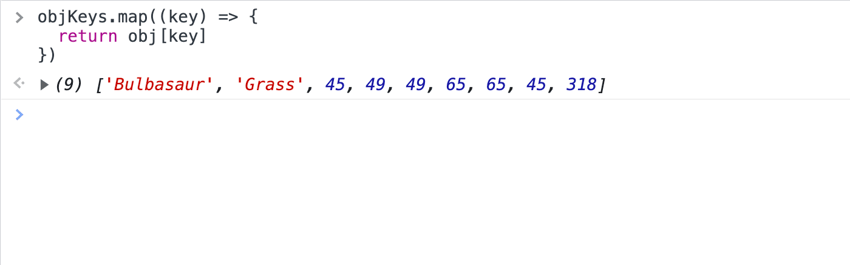
.appendChild() 方法将创建的单元格附加到函数开头定义的行。response.pokedata 数组并将每个新行附加到我们的 tableContent 元素。
const getTableContent = (data) => {
data.map((obj) => {
const row = createRow(obj);
tableContent.appendChild(row);
});
};
getTableContent 函数传递到事件侦听器中,以便在页面加载后将内容添加到表中。window.addEventListener("load", () => {
getTableContent(response.pokedata);
});
4. 使用 JavaScript 对数据进行排序
const tableButtons = document.querySelectorAll("th button");
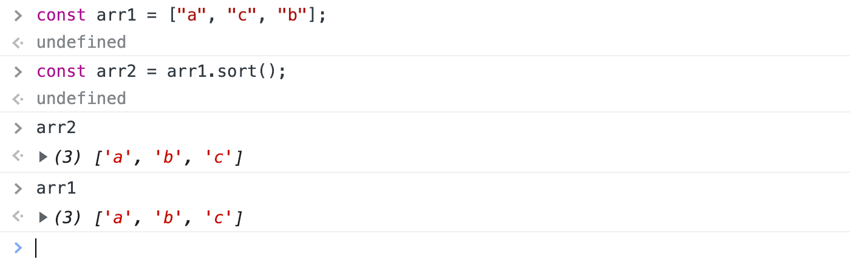
.sort() 方法来处理 response.pokedata 数组中的数据排序。 sort 方法接受一个比较两个不同参数的函数,并根据函数响应对它们进行排序:
compareFunction(a, b) 返回值
排序顺序
> 0
排序
a 之后 b
将
a 排序在 b 之前
=== 0
保持
a 和 b 的原始顺序
getTableContent 函数将排序后的数据附加到我们的 tableContentconst sortData = (data, param, direction = "asc") => {
tableContent.innerHTML = '';
const sortedData =
direction == "asc"
? [...data].sort(function (a, b) {
if (a[param] < b[param]) {
return -1;
}
if (a[param] > b[param]) {
return 1;
}
return 0;
})
: [...data].sort(function (a, b) {
if (b[param] < a[param]) {
return -1;
}
if (b[param] > a[param]) {
return 1;
}
return 0;
});
getTableContent(sortedData);
};
data:待排序的数组param:用于对数组进行排序的值direction:按升序或降序对数组进行排序。默认参数值设置为“asc”。.sort() 方法和 direction 参数来确定数据应如何排序。我们反转比较函数以便按降序排序。通过这种方式使用比较函数,我们可以对数据进行排序,而不管值的类型(字符串、整数、浮点数等)sortedData 作为表内容中的新值传递。window.addEventListener("load", () => {
getTableContent(response.pokedata);
[...tableButtons].map((button) => {
button.addEventListener("click", (e) => {
if (e.target.getAttribute("data-dir") == "desc") {
sortData(response.pokedata, e.target.id, "desc");
e.target.setAttribute("data-dir", "asc");
} else {
sortData(response.pokedata, e.target.id, "asc");
e.target.setAttribute("data-dir", "desc");
}
});
});
});
data-dir 属性来处理切换以确定排序方向。我们还将更新 CSS 以根据排序方向在按钮旁边显示一个图标:th button::after {
position: absolute;
right: 0.5rem;
}
th button[data-dir="asc"]::after {
content: url("data:image/svg+xml,%3Csvg xmlns='https://www.w3.org/2000/svg' width='8' height='8'%3E%3Cpolygon points='0, 0 8,0 4,8 8' fill='%23818688'/%3E%3C/svg%3E");
}
th button[data-dir="desc"]::after {
content: url("data:image/svg+xml,%3Csvg xmlns='http://www.w3.org/2000/svg' width='8' height='8'%3E%3Cpolygon points='4 0,8 8,0 8' fill='%23818688'/%3E%3C/svg%3E");
}
resetButtons 函数,该函数删除任何未单击的按钮上的 data-dir 属性。const resetButtons = (event) => {
[...tableButtons].map((button) => {
if (button !== event.target) {
button.removeAttribute("data-dir");
}
});
};
window.addEventListener("load", () => {
getTableContent(response.pokedata);
[...tableButtons].map((button) => {
button.addEventListener("click", (e) => {
resetButtons(e);
if (e.target.getAttribute("data-dir") == "desc") {
sortData(response.pokedata, e.target.id, "desc");
e.target.setAttribute("data-dir", "asc");
} else {
sortData(response.pokedata, e.target.id, "asc");
e.target.setAttribute("data-dir", "desc");
}
});
});
});
结论