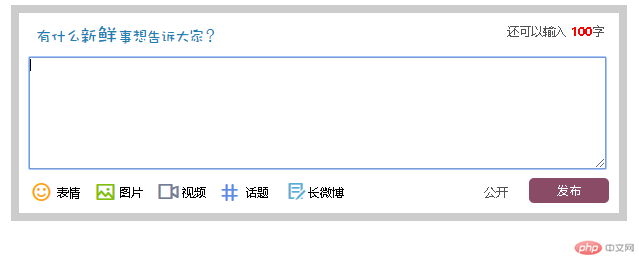
摘要:<!DOCTYPE html> <html> <head> <meta charset="UTF-8"> <title>Document</title> <style type="text/css"> *{margin:0px;padding:
<!DOCTYPE html>
<html>
<head>

<meta charset="UTF-8">
<title>Document</title>
<style type="text/css">
*{margin:0px;padding: 0px;font-size: 11px;}

.box{height: 200px;width: 600px;border:8px solid #ccc;margin:10px auto;}
.imge{float: left;margin-left: 15px;margin-top: 10px;}
.box1{float: right;margin-right: 15px;margin-top: 10px;color: #525252;}
.box2{color:red;font-weight: bold;}
#text{width: 575px;height: 110px;margin:10px 10px;}
.box #sp1,#sp2,#sp3,#sp4,#sp5,#sp6{float: left;width:36px;height: 20px;line-height: 20px;padding-left:27px;}
#sp1{background: url(img/an5.png) no-repeat left center;margin-left:10px}
#sp2{background: url(img/an4.png) no-repeat left center;}
#sp3{background: url(img/an3.png) no-repeat left center;}
#sp4{background: url(img/an2.png) no-repeat left center;}
#sp5{background: url(img/an1.png) no-repeat left center;}
#sp6{color:#525252;padding-left: 140px;}
#button{border:none;background-color: #8A4B66;width: 80px;height: 25px;float: right;margin-right: 10px;margin-top: -5px;color: #fff;border-radius: 5px;}

</style>
</head>
<body>
<div>
<img  src="img/12.png" alt="">
<div>还可以输入 <span>100</span>字</div>
<textarea id="text"></textarea>
<span id="sp1">表情</span>
<span id = "sp2">图片</span>
<span id = "sp3">视频</span>
<span id = "sp4">话题</span>
<span id = "sp5">长微博</span>
<span id = "sp6">公开</span>

<input type="button" id="button" value="发布">
</div>
</body>
</html>
通过本案例对前面章节布局知识练习,发现自己平时只是单一的设置id或class 。background也只是填充颜色,学会了像此类对id样式批量设置和背景图设置很实用 、往后布局得灵活运用起来.
box #sp1,#sp2,#sp3,#sp4,#sp5,#sp6{float: left;width:36px;height: 20px;line-height: 20px;padding-left:27px;}
{background: url(img/an3.png) no-repeat left center;}


