
本节内容将详细介绍如何使用hal库通过硬件spi dma在cubemx中配置及相关注意事项,以及如何使用spi dma驱动lcd显示屏并移植lvgl v8.3。
源码地址:https://www.php.cn/link/d466c07ceb8f2e0704c4da35f9bd11c9
或者关注公众号,在后台回复“SPI DMA”即可获取本章节的源码。
配置SPI DMA在CubeMX中非常简单,只需将SPI1的TX配置为DMA模式,并选择正常模式即可。请注意,不要使用循环模式,否则可能导致LVGL显示异常。
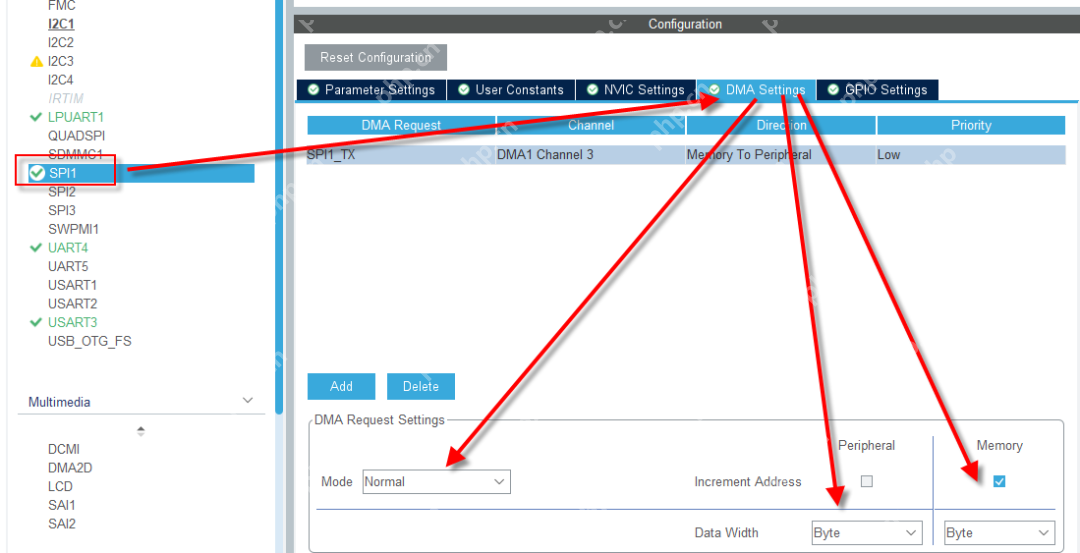
接下来,让我们详细解析配置生成的代码,主要关注DMA的模式配置参数。
/* SPI1 DMA Init */
/* SPI1_TX Init */
hdma_spi1_tx.Instance = DMA1_Channel3;
hdma_spi1_tx.Init.Request = DMA_REQUEST_1;
hdma_spi1_tx.Init.Direction = DMA_MEMORY_TO_PERIPH;
hdma_spi1_tx.Init.PeriphInc = DMA_PINC_DISABLE;
hdma_spi1_tx.Init.MemInc = DMA_MINC_ENABLE;
hdma_spi1_tx.Init.PeriphDataAlignment = DMA_PDATAALIGN_BYTE;
hdma_spi1_tx.Init.MemDataAlignment = DMA_MDATAALIGN_BYTE;
hdma_spi1_tx.Init.Mode = DMA_NORMAL;
hdma_spi1_tx.Init.Priority = DMA_PRIORITY_LOW;
if (HAL_DMA_Init(&hdma_spi1_tx) != HAL_OK)
{
  Error_Handler();
}
__HAL_LINKDMA(spiHandle,hdmatx,hdma_spi1_tx);继续介绍SPI DMA的接口:
HAL_StatusTypeDef HAL_SPI_Transmit_DMA(SPI_HandleTypeDef *hspi, uint8_t *pData, uint16_t Size);
HAL_StatusTypeDef HAL_SPI_Receive_DMA(SPI_HandleTypeDef *hspi, uint8_t *pData, uint16_t Size);
HAL_StatusTypeDef HAL_SPI_TransmitReceive_DMA(SPI_HandleTypeDef *hspi, uint8_t *pTxData, uint8_t *pRxData, uint16_t Size);
HAL_StatusTypeDef HAL_SPI_DMAPause(SPI_HandleTypeDef *hspi);
HAL_StatusTypeDef HAL_SPI_DMAResume(SPI_HandleTypeDef *hspi);
HAL_StatusTypeDef HAL_SPI_DMAStop(SPI_HandleTypeDef *hspi);
这些接口主要用于发送、接收,以及暂停、恢复和停止DMA传输。本次驱动LCD主要使用的是DMA发送函数,它包含三个参数:
/**
 * @brief  Transmit an amount of data in non-blocking mode with DMA.
 * @param  hspi pointer to a SPI_HandleTypeDef structure that contains
 *               the configuration information for SPI module.
 * @param  pData pointer to data buffer
 * @param  Size amount of data to be sent
 * @retval HAL status
 */
HAL_StatusTypeDef HAL_SPI_Transmit_DMA(SPI_HandleTypeDef *hspi, uint8_t *pData, uint16_t Size);
在上一章节中,我们使用的是SPI驱动的LCD,本章节将对驱动函数进行改造,加入DMA驱动。只需将SPI发送函数改为DMA发送函数即可,以下几个函数也需要进行相应的修改:
// ST7789写函数
static HAL_StatusTypeDef lcd_st7789_write(int is_cmd, uint8_t data)
{
  uint8_t pData[2] = { 0 };
  assert_param(NULL != hspi_lcd);
  pData[0] = data;
  if (is_cmd)
    HAL_GPIO_WritePin(LCD_DC_GPIO_Port, LCD_DC_Pin, GPIO_PIN_RESET);
  else
    HAL_GPIO_WritePin(LCD_DC_GPIO_Port, LCD_DC_Pin, GPIO_PIN_SET);
  // return HAL_SPI_Transmit(hspi_lcd, pData, 1, HAL_MAX_DELAY);
  return HAL_SPI_Transmit_DMA(hspi_lcd, pData, 1);
}/********************************************************************
*
* LcdWriteReg
*
* Function description:
* Sets display register
*/
void lcd_st7789_write_reg(uint8_t Data)
{
HAL_GPIO_WritePin(LCD_DC_GPIO_Port, LCD_DC_Pin, GPIO_PIN_RESET);
// HAL_SPI_Transmit(&hspi1, &Data, 1, 10);
HAL_SPI_Transmit_DMA(&hspi1, &Data, 1);
}/********************************************************************
*
* LcdWriteData
*
* Function description:
* Writes a value to a display register
*/
void lcd_st7789_write_data(uint8_t Data)
{
HAL_GPIO_WritePin(LCD_DC_GPIO_Port, LCD_DC_Pin, GPIO_PIN_SET);
HAL_SPI_Transmit_DMA(&hspi1, &Data, 1);
//HAL_SPI_Transmit(&hspi1, &Data, 1, 10);
}/********************************************************************
*
* lcd_st7789_write_data_multiple
*
* Function description:
* Writes multiple values to a display register.
*/
extern uint8_t g_spi_dma_tc;
void lcd_st7789_write_data_multiple(uint8_t *pData, int NumItems)
{
if (g_spi_dma_tc) {
g_spi_dma_tc = 0;
HAL_GPIO_WritePin(LCD_DC_GPIO_Port, LCD_DC_Pin, GPIO_PIN_SET);
//HAL_SPI_Transmit(&hspi1, pData, NumItems, 10);
HAL_SPI_Transmit_DMA(&hspi1, pData, NumItems);
}
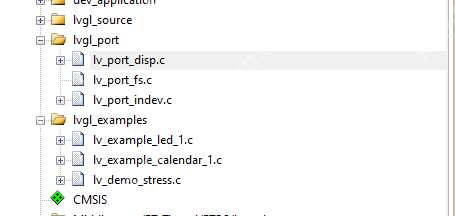
}本次移植的是LVGL V8.3,源码可在LVGL官方GitHub上下载。如果不想自己下载,可以通过关注公众号并在后台回复“SPI DMA”获取源码。
LVGL的移植过程不再详细描述,网上有大量教程可供参考。我们直接使用提供的源码即可。以下是几个关键的移植点:
lv_tick_inc(1),为LVGL提供心跳,周期为10ms。void HAL_TIM_PeriodElapsedCallback(TIM_HandleTypeDef *htim)
{
/**timer for lvgl,period 1ms*/
if (htim->Instance == TIM3)
{
lv_tick_inc(1);
}
if (htim->Instance == TIM15)
{
// if(RT_EOK==rt_sem_take(sem_uart_rec,RT_WAITING_NO))
// {
if (embedded_get_uart_rec_flag())
{
/*100ms*/
if (embedded_get_uart_timeout_cnt() > 9)
{
// lv_tick_inc(1);
embedded_set_uart_rec_flag(RT_FALSE);
rt_sem_release(sem_uart_timeout);
}
}
// }
}
}void lv_port_disp_init(void)
{
/*-------------------------
* Initialize your display
* -----------------------*/
disp_init();
/*-----------------------------
* Create a buffer for drawing
*----------------------------*/
/**
* LVGL requires a buffer where it internally draws the widgets.
* Later this buffer will passed to your display driver's `flush_cb` to copy its content to your display.
* The buffer has to be greater than 1 display row
*
* There are 3 buffering configurations:
* 1. Create ONE buffer:
* LVGL will draw the display's content here and writes it to your display
*
* 2. Create TWO buffer:
* LVGL will draw the display's content to a buffer and writes it your display.
* You should use DMA to write the buffer's content to the display.
* It will enable LVGL to draw the next part of the screen to the other buffer while
* the data is being sent form the first buffer. It makes rendering and flushing parallel.
*
* 3. Double buffering
* Set 2 screens sized buffers and set disp_drv.full_refresh = 1.
* This way LVGL will always provide the whole rendered screen in `flush_cb`
* and you only need to change the frame buffer's address.
*/
/* Example for 1) */
static lv_disp_draw_buf_t draw_buf_dsc_1;
static lv_color_t buf_1[MY_DISP_HOR_RES * 10]; /*A buffer for 10 rows*/
lv_disp_draw_buf_init(&draw_buf_dsc_1, buf_1, NULL, MY_DISP_HOR_RES * 10); /*Initialize the display buffer*/
/* Example for 2) */
static lv_disp_draw_buf_t draw_buf_dsc_2;
static lv_color_t buf_2_1[MY_DISP_HOR_RES * 10]; /*A buffer for 10 rows*/
static lv_color_t buf_2_2[MY_DISP_HOR_RES * 10]; /*An other buffer for 10 rows*/
lv_disp_draw_buf_init(&draw_buf_dsc_2, buf_2_1, buf_2_2, MY_DISP_HOR_RES * 10); /*Initialize the display buffer*/
/* Example for 3) also set disp_drv.full_refresh = 1 below*/
static lv_disp_draw_buf_t draw_buf_dsc_3;
static lv_color_t buf_3_1[MY_DISP_HOR_RES * MY_DISP_VER_RES]; /*A screen sized buffer*/
static lv_color_t buf_3_2[MY_DISP_HOR_RES * MY_DISP_VER_RES]; /*Another screen sized buffer*/
lv_disp_draw_buf_init(&draw_buf_dsc_3, buf_3_1, buf_3_2, MY_DISP_VER_RES * MY_DISP_VER_RES); /*Initialize the display buffer*/
/*-----------------------------------
* Register the display in LVGL
*----------------------------------*/
static lv_disp_drv_t disp_drv; /*Descriptor of a display driver*/
lv_disp_drv_init(&disp_drv); /*Basic initialization*/
/*Set up the functions to access to your display*/
/*Set the resolution of the display*/
disp_drv.hor_res = MY_DISP_HOR_RES;
disp_drv.ver_res = MY_DISP_VER_RES;
/*Used to copy the buffer's content to the display*/
disp_drv.flush_cb = disp_flush;
/*Set a display buffer*/
disp_drv.draw_buf = &draw_buf_dsc_2;
disp_drv_p = &disp_drv;
/*Required for Example 3)*/
// disp_drv.full_refresh = 1;
/* Fill a memory array with a color if you have GPU.
* Note that, in lv_conf.h you can enable GPUs that has built-in support in LVGL.
* But if you have a different GPU you can use with this callback.*/
// disp_drv.gpu_fill_cb = gpu_fill;
/*Finally register the driver*/
lv_disp_drv_register(&disp_drv);
}刷新函数:
/*Flush the content of the internal buffer the specific area on the display
 *You can use DMA or any hardware acceleration to do this operation in the background but
 *'lv_disp_flush_ready()' has to be called when finished.*/
static void disp_flush(lv_disp_drv_t *disp_drv, const lv_area_t *area, lv_color_t *color_p)
{
    if (disp_flush_enabled)
    {
        // /*The most simple case (but also the slowest) to put all pixels to the screen one-by-one*/
        //        int32_t x;
        //        int32_t y;
        //        for (y = area->y1; y y2; y++)
        //        {
        //            for (x = area->x1; x x2; x++)
        //            {
        //                /*Put a pixel to the display. For example:*/
        //                /*put_px(x, y, *color_p)*/
        //                lcd_st7789_write_pixel(x, y, color_p->full);
        //                color_p++;
        //            }
        //        }
        // int32_t y;
        // lcd_st7789_set_addr_win(area->x1, area->y1, area->x2, area->y2); // 指定填充区域
        //                                                                  // 一行一行 DMA
        // for (y = area->y1; y y2; y++)
        // {
        //     lcd_st7789_write_data_multiple((uint8_t *)color_p, (uint16_t)(area->x2 - area->x1 + 1) * 2);
        //     color_p += (area->x2 - area->x1 + 1);
        // }
        unsigned int size = (area->x2 - area->x1 + 1) * (area->y2 - area->y1 + 1) * 2;
        lcd_st7789_set_addr_win(area->x1, area->y1, area->x2, area->y2); // 指定填充区域
        lcd_st7789_write_data_multiple((uint8_t *)color_p, size);
    }
    /*IMPORTANT!!!
     *Inform the graphics library that you are ready with the flushing*/
    //    lv_disp_flush_ready(disp_drv);
}
/**
 * @function lcd menu thread
 * @author:小飞哥玩嵌入式-小飞哥
 * @TODO: LED控制线程
 * @param:
 * @return: NULL
 */
static void rt_lcd_menu_entry(void *parameter)
{
  uint8_t s_cnt = 0;
  key_para_t key_para = { 0 };
  clock_time_t clock_time = { 0 };
  lcd_st7789_init();
  lcd_st7789_clear(LCD_DISP_WHITE);
  rt_thread_mdelay(2);
  lcd_st7789_fill_area(10, 10, 40, 40, LCD_DISP_BLUE);
  embedded_tim_start_init();
  // clock_time.hour = 11;
  // clock_time.minute = 50;
  // menu_main_window();
  // lcd_menu_key_init();
  lv_init(); // lvgl 系统初始化
  lv_port_disp_init(); // lvgl 显示接口初始化,放在 lv_init()的后面
  lv_port_indev_init(); // lvgl 输入接口初始化,放在 lv_init()的后面
  // lv_example_btn_1();
  // lv_example_led_1();
  // lv_example_calendar_1();
  lv_demo_stress();
  for (;;) {
    //    s_cnt++;
    //    {
    //      if (s_cnt > 2)
    //        s_cnt = 0;
    //      clock_time.second++;
    //    }
    //    if (clock_time.second > 59)
    //    {
    //      clock_time.second = 0;
    //      clock_time.minute++;
    //      if (clock_time.minute > 59)
    //      {
    //        clock_time.minute = 0;
    //        clock_time.hour++;
    //        if (clock_time.hour > 12)
    //        {
    //          clock_time.hour = 1;
    //        }
    //      }
    //    }
    //    lcd_menu_keyvalue_get(&key_para, 20);
    //    lcd_menu_handler(&key_para);
    //    menu_clock_run(&clock_time);
    lv_task_handler();
    rt_thread_mdelay(5);
  }
}实现效果不再展示,大家可以拿起手里的开发板,动手实践一下。
以上就是06-HAL库硬件SPI DMA驱动LCD并移植LVGL 8.3的详细内容,更多请关注php中文网其它相关文章!

 广告
广告Copyright 2014-2025 https://www.php.cn/ All Rights Reserved | php.cn | 湘ICP备2023035733号


 868
868