
本文介绍了如何使用 Pygame 结合 SDL2 渲染像素。通过将 Pygame Surface 转换为 SDL2 纹理,并使用 `renderer.copy()` 方法,可以实现高效且灵活的像素渲染。同时,提供了详细的代码示例和注意事项,帮助开发者避免常见错误,顺利完成渲染任务。
在使用 Pygame 进行游戏开发时,有时需要利用 SDL2 提供的底层渲染能力,以获得更高的性能和更多的控制选项。 本文将重点介绍如何使用 Pygame 的 SDL2 接口来渲染单个像素。
将 Surface 转换为 Texture
使用 SDL2 渲染时,renderer.blit() 方法不能直接使用 pygame.Surface 对象作为源。你需要将 pygame.Surface 转换为 SDL2 纹理(texture)。
下面的代码展示了如何将 pygame.Surface 转换为 SDL2 纹理:
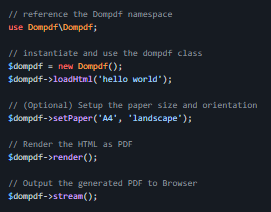
dompdf是一个HTML到PDF转换器。在其核心,dompdf是一个(大部分)符合CSS 2.1标准的HTML布局和渲染引擎,使用PHP编写。它是一个以样式驱动的渲染器,它会下载并读取外部样式表,内联样式标签和单个HTML元素的样式属性。它还支持大多数表现性HTML属性。PDF渲染目前由PDFLib或由Wayne Munro编写的捆绑版本的R&OS CPDF类提供。(对R&OS类进行了一些重要的更改,但是)。为了使用dompdf与PDFLib,需要安装PDFLib PECL扩展。使用PD
 5
5

import pygame
import pygame._sdl2

SCREEN_W = 800
SCREEN_H = 800

pygame.init()

pygame_screen = pygame.display.set_mode((SCREEN_W, SCREEN_H), vsync=0, flags=pygame.SCALED)
window = pygame._sdl2.Window.from_display_module()

renderer = pygame._sdl2.Renderer.from_window(window)
renderer.draw_color = (0, 255, 0, 255)  # Set the draw color to green

clock = pygame.time.Clock()

scale_factor = 1

# Create a green surface
green_pixel = pygame.Surface((scale_factor, scale_factor))
green_pixel.fill((0, 255, 0, 255))

# Convert the surface to a texture
green_pixel_texture = renderer.create_texture_from_surface(green_pixel)

use_sdl2 = True

while True:
    msec = clock.tick(60)
    pygame_screen.fill((0, 0, 0))

    for event in pygame.event.get():
        if event.type == pygame.QUIT:
            pygame.quit()
            quit()

    if use_sdl2:
        renderer.clear()
        dest_rect = pygame.rect.Rect(100, 100, scale_factor, scale_factor)
        renderer.copy(green_pixel_texture, dstrect=dest_rect)  # Use copy instead of blit
        renderer.present()
    else:
        dest_rect = pygame.rect.Rect(100, 100, scale_factor, scale_factor)
        pygame_screen.blit(green_pixel, dest_rect)
pygame.display.flip()代码解释:
注意事项:
总结:
通过将 pygame.Surface 转换为 SDL2 纹理,并使用 renderer.copy() 方法,可以轻松地使用 Pygame 和 SDL2 渲染像素。 这种方法可以与其他 SDL2 渲染技术结合使用,以实现更复杂和高性能的渲染效果。
以上就是使用 Pygame 和 SDL2 渲染像素的详细内容,更多请关注php中文网其它相关文章!

每个人都需要一台速度更快、更稳定的 PC。随着时间的推移,垃圾文件、旧注册表数据和不必要的后台进程会占用资源并降低性能。幸运的是,许多工具可以让 Windows 保持平稳运行。

 广告
广告Copyright 2014-2025 https://www.php.cn/ All Rights Reserved | php.cn | 湘ICP备2023035733号


 982
982