本文围绕基于参考图的线稿上色展开,剖析相关论文后,以512大小图片在A100上训练模型,重点检验对色彩参考图进行模糊处理的效果。通过对比不同模糊参数、是否遮盖等实验,展示了模糊操作能有效去除纹理信息,还呈现了loss、代码及测试效果等内容。
☞☞☞AI 智能聊天, 问答助手, AI 智能搜索, 免费无限量使用 DeepSeek R1 模型☜☜☜

事先说清楚啊,这个我的V2线稿上色差距还是有的,我可不是水项目啊
基于论文的名称:MANGAN: ASSISTING COLORIZATION OF MANGA CHARACTERS CONCEPT ART USING CONDITIONAL GAN,嗯,该论文我找不到代码,但是问题不大,老规矩,跟着我的视角进行剖析,然后实验,论文已经放在项目里面,方便想进一步看原版的同学。
注意,特别强调,本项目为了玩的尽兴,于是使用的图片都是512大小的图片,毕竟V2版本256大小的我觉得有的小玩的不爽,使用A100训练8h左右(或许6h?反正差不多),A100真好用,40GB显存真是Nice起飞。
论文的描述:
在文献中没有关于漫画线稿着色的特定数据集(线条艺术和彩色艺术的配对),相关的工作数据集也无法使用,这就要求我们需要建立一个数据集来测试我们的方法。我们已经爬过“safebooru”网站,那里有大量的彩色漫画/动漫人物艺术。通过删除重复的和未着色的图像来清理数据集之后,我们最终得到了13,000张图像。
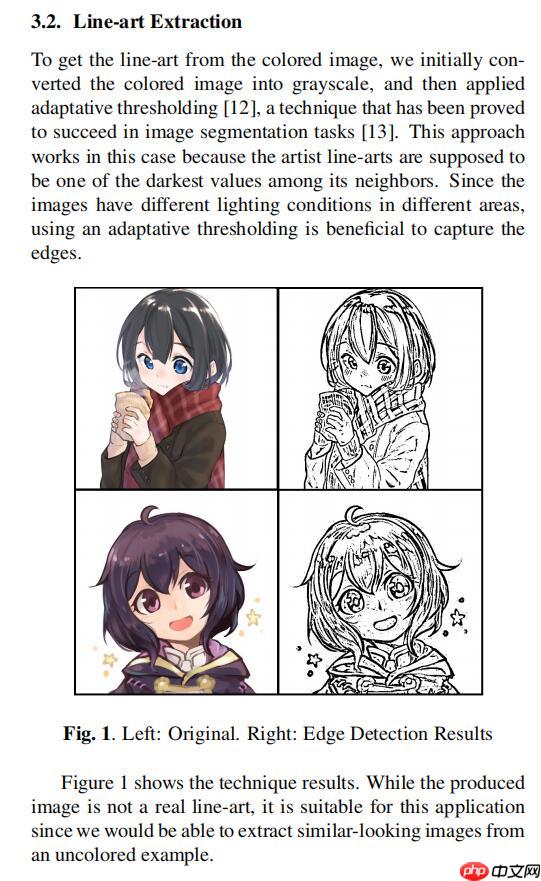
为了从彩色图像中获得线稿图,我们首先将彩色图像转换为灰度图,然后应用自适应阈值分割(adaptative thresholding)[12],这一技术已被证明在图像分割任务[13]中是成功的。这种方法在线稿提取下也很有效,因为艺术家的线条应该是它周围像素中最黑的。由于图像在不同的区域有不同的lighting条件,因此使用自适应阈值法有利于捕捉边缘。
我们可以看到,Hint颜色提示几乎不能描述动漫图像的颜色应该是什么样子的。特别是它不能被用来发现小而复杂的区域的确切颜色。这个特性对于我们的应用程序特别有用,因为我们不想指定要在每个区域中使用的颜色,这将非常耗时。
论文也没啥其他值得学习的地方了,散会。
这行吗,这不行。于是我打算试一试这个色彩信息的提示方式咋样,正好我SCFT线稿上色已经训练好啦,那个项目参考图扭曲比较多,这次换成本论文的色彩提示处理方式试试看,let's go.
注意啊,本项目重点在于尝试这个对于色彩参考图进行模糊的这步操作好用性的一个检验。至于论文实际的网络框架我看都不看,哈哈哈,因为它没给代码,也没有任何详细描述,于是我就用SCFT替换掉了,然后本项目实际代码,也使用了更多的技巧,我会随着代码进行分析讲解,要好好看哦。
# 解压数据集,只需执行一次import osif not os.path.isdir("./data/d"):
    os.mkdir("./data/d")
! unzip -qo data/data128161/archive.zip -d ./data/d因为一般情况下,这个人物在图像左右中间,于是下面这个代码块randx设置的极具用心,然后随机召唤30个白方块进行遮盖,最后进行blur模糊,然后再给加点扭曲,我不相信这下它可以过拟合。
import cv2import matplotlib.pyplot as pltimport numpy as npfrom random import randint
file_name = "data/d/data/train/10007.png"cimg = cv2.cvtColor(cv2.imread(file_name,1),cv2.COLOR_BGR2RGB)
cimg = cimg[:,:512,:]for i in range(30):
    randx = randint(50,400)
    randy = randint(0,450)
    cimg[randx:randx+50,randy:randy+50] = 255 #将像素设置成255,为白色blur = cv2.blur(cimg,(100,100))
plt.figure(figsize=(40,20))
plt.axis("off")
plt.subplot(131)
plt.imshow(cimg)
plt.title("img1")
plt.subplot(132)
plt.imshow(blur)
plt.title("img2")
cimg.shape(512, 512, 3)
为啥有了模糊操作还不够,还想来点扭曲呢?因为我是个谨慎的男人,如果光只有模糊,这个色彩参考图还有Ground Truth大致的空间位置结构信息,因此为了更好的避免,我直接在训练的时候就考虑岂不美哉?
def AffineTrans(img):
    randx0 = randint(-5,5)
    randx1 = randint(-5,4)
    randy1 = randint(-5,5)
    randx2 = randint(-5,4)
    randy2 = randint(0,4)
    rows, cols = img.shape[:-1]

    pts1 = np.float32([[20+randx0, 20], [30+randx1, 20], [20, 0+randy2]])  # 源图像中的三角形顶点坐标
    pts2 = np.float32([[20, 20], [30, 20+randy1], [25+randx2, 0]])  # 目标图像中的三角形顶点坐标
    M = cv2.getAffineTransform(pts1, pts2)  # 计算出仿射变换矩阵
    dst = cv2.warpAffine(img, M, (cols, rows),borderValue =(255,255,255))  # 应用仿射变换
    return dstimport cv2import matplotlib.pyplot as pltimport numpy as npfrom random import randint
file_name = "data/d/data/train/10007.png"cimg = cv2.cvtColor(cv2.imread(file_name,1),cv2.COLOR_BGR2RGB)
cimg = cimg[:,:512,:]for i in range(30):
    randx = randint(50,400)
    randy = randint(0,450)
    cimg[randx:randx+50,randy:randy+50] = 255 #将像素设置成255,为白色affine_img = AffineTrans(cimg)
plt.figure(figsize=(40,20))
plt.axis("off")
plt.subplot(131)
plt.imshow(cimg)
plt.title("img1")
plt.subplot(132)
plt.imshow(affine_img)
plt.title("img2")
cimg.shape(512, 512, 3)
<Figure size 2880x1440 with 2 Axes>
import cv2import matplotlib.pyplot as pltimport numpy as npfrom random import randint
file_name = "data/d/data/train/10007.png"cimg = cv2.cvtColor(cv2.imread(file_name,1),cv2.COLOR_BGR2RGB)
cimg = cimg[:,:512,:]for i in range(30):
    randx = randint(50,400)
    randy = randint(0,450)
    cimg[randx:randx+50,randy:randy+50] = 255 #将像素设置成255,为白色affine_img = AffineTrans(cimg)
blur = cv2.blur(affine_img,(100,100))
plt.figure(figsize=(40,20))
plt.axis("off")
plt.subplot(131)
plt.imshow(cimg)
plt.title("img1")
plt.subplot(132)
plt.imshow(blur)
plt.title("img2")
cimg.shape(512, 512, 3)
<Figure size 2880x1440 with 2 Axes>
相当于消融实验对比,实际证明了模糊操作的NB之处,模糊可以直接让色彩参考图失去纹理信息,这是一个无参的方式,但却如此好用,我们不需要通过网络去提取一张色彩参考原图的色彩信息然后把纹理信息忽视,现在我直接给网络的色彩参考图就没有结构信息,这给网络减少了多少负担?这就是简单且好用的方法。
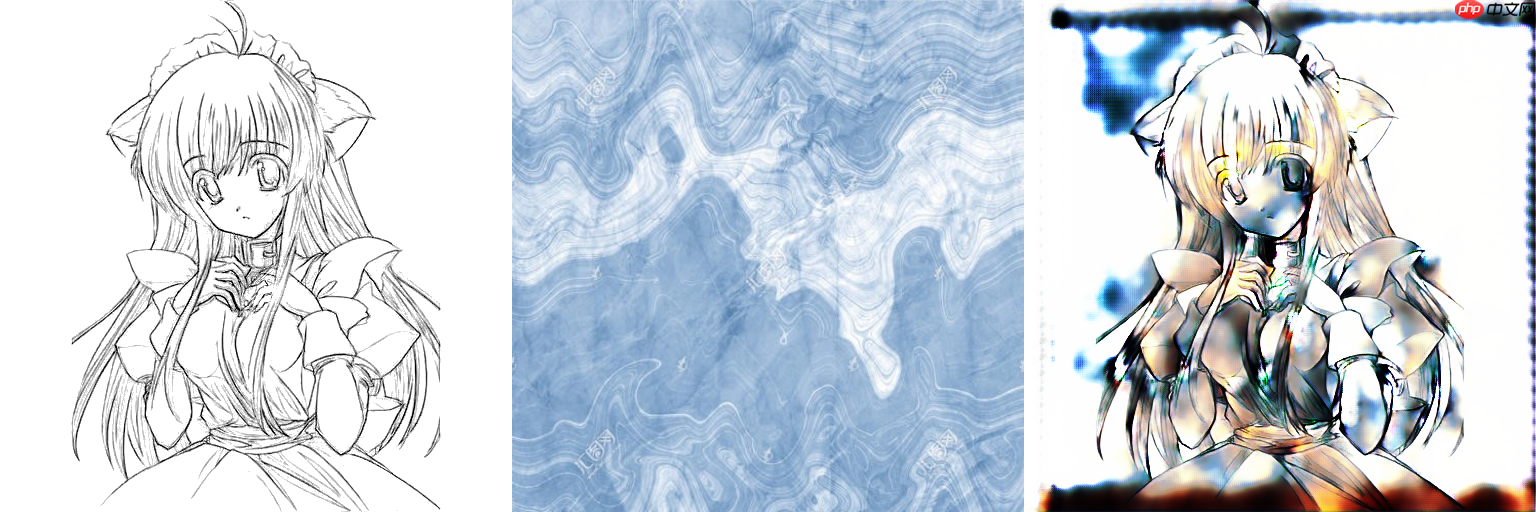
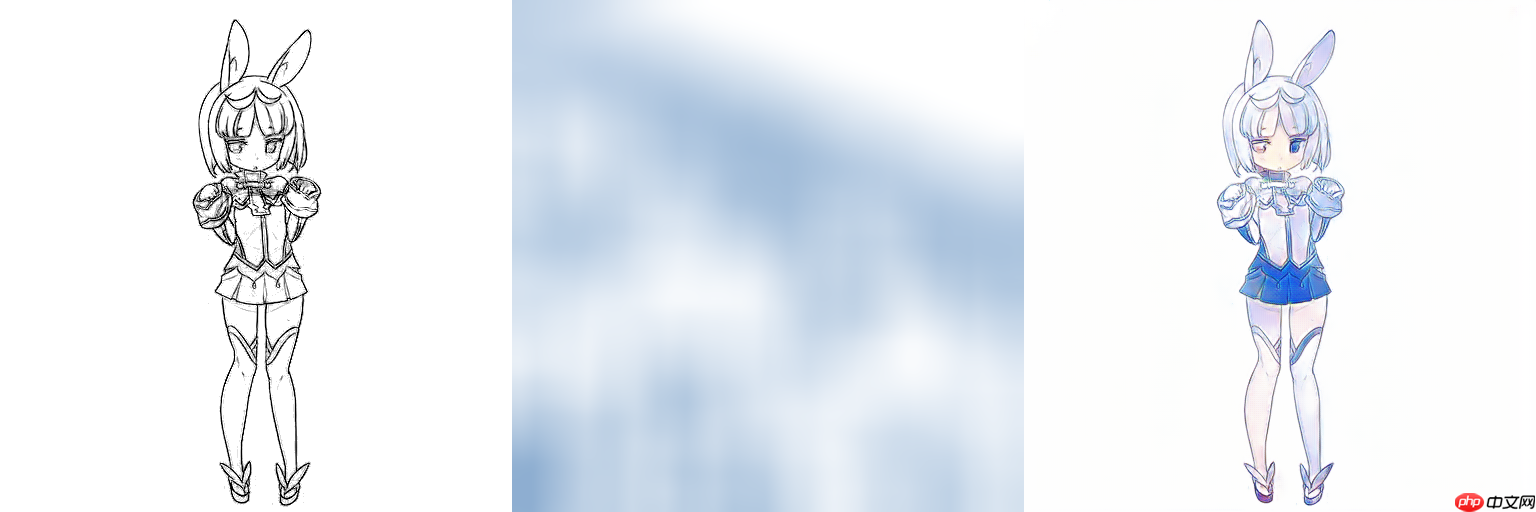
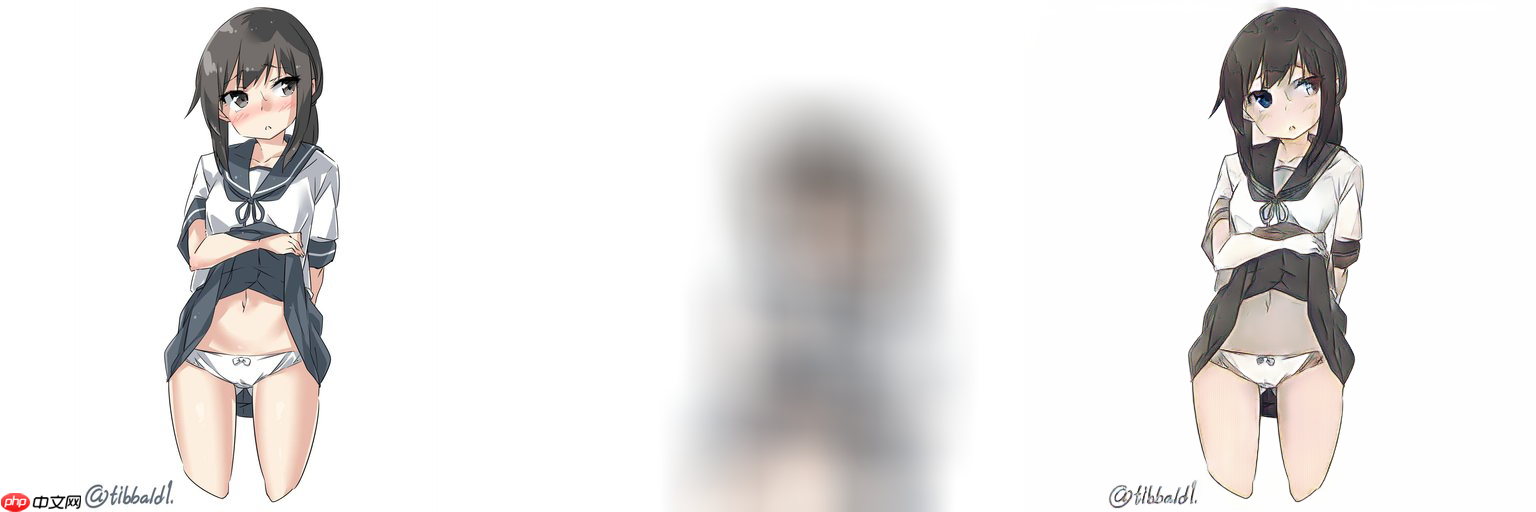
从左往右,分别为线稿,颜色参考图,Ground Truth 注意我参考图是经过cv2.blur(img,(smooth_size,smooth_size))模糊过的,下面三行效果分别smooth_size为 50,100,150,这三行的色彩参考图都没有用50*50大小的方块进行遮盖过


下面这一行的效果是cv2.blur(img,(smooth_size =100,smooth_size =100)),并且随机把30个50*50区域方块像素变白
然后这个是假设线稿是已经被先验上色过的效果展示,很明显效果像有点地方像叠加一样,但是基本还行
下面这两个是正常的效果,一个经过了块状像素填充白色,一个没有经过填充,smooth_size都为100

接下来给大家展示的是色彩参考图原直接为普通纹理贴图的情况,smooth_size为100,50,0:

 也就是说这个模糊的操作,很好的把色彩参考图的纹理线条信息给抹除掉了,这个操作简单且实用哦。
最后就随便给大家展示一下吧


以下是训练的时候图片
直接一键运行到底,然后最后一个代码块就是测试代码块,为了方便大家玩,我写了主要代码的注释
import cv2from PIL import Imagefrom paddle.vision.transforms import CenterCrop,Resizefrom paddle.vision.transforms import RandomRotation
'''
V2版本我这里ResBlock的归一层使用的是BN,当时忘了改成IN了
'''import paddleimport paddle.nn as nnclass ResBlock(nn.Layer):
    def __init__(self, in_channels, out_channels, stride=1):
        super(ResBlock, self).__init__()
        def block(in_channels, out_channels, kernel_size=3, stride=1, padding=1, bias=False):
            layers = []
            layers += [nn.Conv2D(in_channels=in_channels, out_channels=out_channels,
                                 kernel_size=kernel_size, stride=stride, padding=padding,
                                 bias_attr =bias)]
            layers += [nn.InstanceNorm2D(num_features=out_channels)]

            layers += [nn.ReLU()]
            layers += [nn.Conv2D(in_channels=out_channels, out_channels=out_channels,
                                 kernel_size=kernel_size, stride=stride, padding=padding,
                                 bias_attr =bias)]
            layers += [nn.InstanceNorm2D(num_features=out_channels)]

            cbr = nn.Sequential(*layers)            return cbr

        self.block_1 = block(in_channels,out_channels)
        self.block_2 = block(out_channels,out_channels)
        self.block_3 = block(out_channels,out_channels)
        self.block_4 = block(out_channels,out_channels)

        self.relu = nn.ReLU()
    def forward(self, x):

        # block 1
        residual = x
        out = self.block_1(x)
        out = self.relu(out)
        # block 2
        residual = out
        out = self.block_2(out)
        out += residual
        out = self.relu(out)
        # block 3
        residual = out
        out = self.block_3(out)
        out += residual
        out = self.relu(out)
        # block 4
        residual = out
        out = self.block_4(out)
        out += residual
        out = self.relu(out)
        return out

x = paddle.randn([4,3,256,256])
ResBlock(3,7)(x).shapeW0423 10:58:03.596845 10634 device_context.cc:447] Please NOTE: device: 0, GPU Compute Capability: 7.0, Driver API Version: 10.1, Runtime API Version: 10.1 W0423 10:58:03.602501 10634 device_context.cc:465] device: 0, cuDNN Version: 7.6.
[4, 7, 256, 256]
import paddleimport paddle.nn as nnclass Encoder(nn.Layer):

    def __init__(self, in_channels = 3):
        super(Encoder, self).__init__()
        def CL2d(in_channels, out_channels, kernel_size=3, stride=1, padding=1, bias=True, LR_negative_slope=0.2):
            layers = []
            layers += [nn.Conv2D(in_channels=in_channels, out_channels=out_channels,
                                kernel_size=kernel_size, stride=stride, padding=padding,
                                bias_attr = bias)]
            layers += [nn.LeakyReLU(LR_negative_slope)]
            cbr = nn.Sequential(*layers)            return cbr
        # conv_layer
        self.conv1 = CL2d(in_channels,16)
        self.conv2 = CL2d(16,16)
        self.conv3 = CL2d(16,32,stride=2)
        self.conv4 = CL2d(32,32)
        self.conv5 = CL2d(32,64,stride=2)
        self.conv6 = CL2d(64,64)
        self.conv7 = CL2d(64,128,stride=2)
        self.conv8 = CL2d(128,128)
        self.conv9 = CL2d(128,256,stride=2)
        self.conv10 = CL2d(256,256)
        # downsample_layer
        self.downsample1 = nn.AvgPool2D(kernel_size=16, stride=16)
        self.downsample2 = nn.AvgPool2D(kernel_size=8, stride=8)
        self.downsample3 = nn.AvgPool2D(kernel_size=4, stride=4)
        self.downsample4 = nn.AvgPool2D(kernel_size=2, stride=2)
    def forward(self, x):

        f1 = self.conv1(x)
        f2 = self.conv2(f1)
        f3 = self.conv3(f2)
        f4 = self.conv4(f3)
        f5 = self.conv5(f4)
        f6 = self.conv6(f5)
        f7 = self.conv7(f6)
        f8 = self.conv8(f7)
        f9 = self.conv9(f8)
        f10 = self.conv10(f9)

        F = [f9, f8, f7, f6, f5, f4, f3, f2 ,f1]

        v1 = self.downsample1(f1)
        v2 = self.downsample1(f2)
        v3 = self.downsample2(f3)
        v4 = self.downsample2(f4)
        v5 = self.downsample3(f5)
        v6 = self.downsample3(f6)
        v7 = self.downsample4(f7)
        v8 = self.downsample4(f8)

        V = paddle.concat((v1,v2,v3,v4,v5,v6,v7,v8,f9,f10), axis=1)
        h,w = V.shape[2],V.shape[3]
        V = paddle.reshape(V,(V.shape[0],V.shape[1],h*w))
        V = paddle.transpose(V,[0,2,1])
        return V,F,(h,w)
x = paddle.randn([4,3,256,256])
a,b,_ = Encoder()(x)print(a.shape)[4, 256, 992]
class UNetDecoder(nn.Layer):
    def __init__(self):
        super(UNetDecoder, self).__init__()        def CBR2d(in_channels, out_channels, kernel_size=3, stride=1, padding=1, bias=True):
            layers = []
            layers += [nn.Conv2D(in_channels=in_channels, out_channels=out_channels,
                                 kernel_size=kernel_size, stride=stride, padding=padding,
                                 bias_attr=bias)]            # layers += [nn.BatchNorm2D(num_features=out_channels)]
            layers += [nn.InstanceNorm2D(num_features=out_channels)]
            layers += [nn.ReLU()]

            cbr = nn.Sequential(*layers)            return cbr


        self.dec5_1 = CBR2d(in_channels=992+992, out_channels=256)
        self.unpool4 = nn.Conv2DTranspose(in_channels=512, out_channels=512,
                                          kernel_size=2, stride=2, padding=0, bias_attr=True)

        self.dec4_2 = CBR2d(in_channels=512+128, out_channels=128)
        self.dec4_1 = CBR2d(in_channels=128+128, out_channels=128)
        self.unpool3 = nn.Conv2DTranspose(in_channels=128, out_channels=128,
                                          kernel_size=2, stride=2, padding=0, bias_attr=True)

        self.dec3_2 = CBR2d(in_channels=128+64, out_channels=64)
        self.dec3_1 = CBR2d(in_channels=64+64, out_channels=64)
        self.unpool2 = nn.Conv2DTranspose(in_channels=64, out_channels=64,
                                          kernel_size=2, stride=2, padding=0, bias_attr=True)

        self.dec2_2 = CBR2d(in_channels=64+32, out_channels=32)
        self.dec2_1 = CBR2d(in_channels=32+32, out_channels=32)
        self.unpool1 = nn.Conv2DTranspose(in_channels=32, out_channels=32,
                                          kernel_size=2, stride=2, padding=0, bias_attr=True)

        self.dec1_2 = CBR2d(in_channels=32+16, out_channels=16)
        self.dec1_1 = CBR2d(in_channels=16+16, out_channels=16)

        self.fc = nn.Conv2D(in_channels=16, out_channels=3, kernel_size=1, stride=1, padding=0, bias_attr=True)    def forward(self, x, F):

        dec5_1 = self.dec5_1(x)
        unpool4 = self.unpool4(paddle.concat((dec5_1,F[0]),axis=1))

        dec4_2 = self.dec4_2(paddle.concat((unpool4,F[1]),axis=1))
        dec4_1 = self.dec4_1(paddle.concat((dec4_2,F[2]),axis=1))
        unpool3 = self.unpool3(dec4_1)

        dec3_2 = self.dec3_2(paddle.concat((unpool3,F[3]),axis=1))
        dec3_1 = self.dec3_1(paddle.concat((dec3_2,F[4]),axis=1))
        unpool2 = self.unpool2(dec3_1)

        dec2_2 = self.dec2_2(paddle.concat((unpool2,F[5]),axis=1))
        dec2_1 = self.dec2_1(paddle.concat((dec2_2,F[6]),axis=1))
        unpool1 = self.unpool1(dec2_1)

        dec1_2 = self.dec1_2(paddle.concat((unpool1,F[7]),axis=1))
        dec1_1 = self.dec1_1(paddle.concat((dec1_2, F[8]),axis=1))

        x = self.fc(dec1_1)
        x = nn.Tanh()(x)
return ximport mathimport paddle.nn.functional as Fclass SCFT(nn.Layer):
def __init__(self, sketch_channels, reference_channels, dv=992):
super(SCFT, self).__init__()
self.dv = paddle.to_tensor(dv).astype("float32")
self.w_q = nn.Linear(dv,dv)
self.w_k = nn.Linear(dv,dv)
self.w_v = nn.Linear(dv,dv)
def forward(self, Vs, Vr,shape):
h,w = shape
quary = self.w_q(Vs)
key = self.w_k(Vr)
value = self.w_v(Vr)
c = paddle.add(self.scaled_dot_product(quary,key,value), Vs)
c = paddle.transpose(c,[0,2,1])
c = paddle.reshape(c,(c.shape[0],c.shape[1],h,w))
return c, quary, key, value def masked_fill(self,x, mask, value):
y = paddle.full(x.shape, value, x.dtype) return paddle.where(mask, y, x) # https://www.quantumdl.com/entry/11%EC%A3%BC%EC%B0%A82-Attention-is-All-You-Need-Transformer
def scaled_dot_product(self, query, key, value, mask=None, dropout=None):
"Compute 'Scaled Dot Product Attention'"
d_k = query.shape[-1] # print(key.shape)
scores = paddle.matmul(query, key.transpose([0,2, 1])) \
/ math.sqrt(d_k) if mask is not None:
scores = self.masked_fill(scores,mask == 0, -1e9)
p_attn = F.softmax(scores, axis = -1) if dropout is not None:
p_attn = nn.Dropout(0.2)(p_attn) return paddle.matmul(p_attn, value)import paddleimport paddle.nn as nnclass Generator(nn.Layer):
def __init__(self, sketch_channels=1, reference_channels=3, LR_negative_slope=0.2):
super(Generator, self).__init__()
self.encoder_sketch = Encoder(sketch_channels)
self.encoder_reference = Encoder(reference_channels)
self.scft = SCFT(sketch_channels, reference_channels)
self.resblock = ResBlock(992, 992)
self.unet_decoder = UNetDecoder()
def forward(self, sketch_img, reference_img):
# encoder
Vs, F,shape = self.encoder_sketch(sketch_img)
Vr, _ ,_= self.encoder_reference(reference_img)
# scft
c, quary, key, value = self.scft(Vs,Vr,shape)
# resblock
c_out = self.resblock(c)
# unet decoder
I_gt = self.unet_decoder(paddle.concat((c,c_out),axis=1), F) return I_gt, quary, key, value'''
注意,这里我使用了谱归一化(对于判别器),为了GAN训练更加稳定,谱归一化的介绍请看https://aistudio.baidu.com/aistudio/projectdetail/3438954这个项目
'''import paddleimport paddle.nn as nnfrom Normal import build_norm_layer
SpectralNorm = build_norm_layer('spectral')# https://github.com/meliketoy/LSGAN.pytorch/blob/master/networks/Discriminator.py# LSGAN Discriminatorclass Discriminator(nn.Layer):
def __init__(self, ndf, nChannels):
super(Discriminator, self).__init__() # input : (batch * nChannels * image width * image height)
# Discriminator will be consisted with a series of convolution networks
self.layer1 = nn.Sequential( # Input size : input image with dimension (nChannels)*64*64
# Output size: output feature vector with (ndf)*32*32
SpectralNorm(nn.Conv2D(
in_channels = nChannels,
out_channels = ndf,
kernel_size = 4,
stride = 2,
padding = 1,
bias_attr = False
)),
nn.BatchNorm2D(ndf),
nn.LeakyReLU(0.2)
)
self.layer2 = nn.Sequential( # Input size : input feature vector with (ndf)*32*32
# Output size: output feature vector with (ndf*2)*16*16
SpectralNorm(nn.Conv2D(
in_channels = ndf,
out_channels = ndf*2,
kernel_size = 4,
stride = 2,
padding = 1,
bias_attr = False
)),
nn.BatchNorm2D(ndf*2),
nn.LeakyReLU(0.2)
)
self.layer3 = nn.Sequential( # Input size : input feature vector with (ndf*2)*16*16
# Output size: output feature vector with (ndf*4)*8*8
SpectralNorm(nn.Conv2D(
in_channels = ndf*2,
out_channels = ndf*4,
kernel_size = 4,
stride = 2,
padding = 1,
bias_attr = False
)),
nn.BatchNorm2D(ndf*4),
nn.LeakyReLU(0.2)
)
self.layer4 = nn.Sequential( # Input size : input feature vector with (ndf*4)*8*8
# Output size: output feature vector with (ndf*8)*4*4
SpectralNorm(nn.Conv2D(
in_channels = ndf*4,
out_channels = ndf*8,
kernel_size = 4,
stride = 2,
padding = 1,
bias_attr = False
)),
nn.BatchNorm2D(ndf*8),
nn.LeakyReLU(0.2)
)
self.layer5 = nn.Sequential( # Input size : input feature vector with (ndf*8)*4*4
# Output size: output probability of fake/real image
SpectralNorm(nn.Conv2D(
in_channels = ndf*8,
out_channels = 1,
kernel_size = 4,
stride = 1,
padding = 0,
bias_attr = False
)), # nn.Sigmoid() -- Replaced with Least Square Loss
) def forward(self, x):
out = self.layer1(x)
out = self.layer2(out)
out = self.layer3(out)
out = self.layer4(out)
out = self.layer5(out) return out
x = paddle.randn([4,3,256,256])
Discriminator(64,3)(x).shape/opt/conda/envs/python35-paddle120-env/lib/python3.7/site-packages/paddle/nn/layer/norm.py:653: UserWarning: When training, we now always track global mean and variance. "When training, we now always track global mean and variance.")
[4, 1, 13, 13]
from VGG_Model import VGG19import paddle
VGG = VGG19()
x = paddle.randn([4,3,256,256])
b = VGG(x)for i in b:    print(i.shape)
[4, 64, 256, 256]
[4, 128, 128, 128]
[4, 256, 64, 64]
[4, 512, 32, 32]
[4, 512, 16, 16]
/opt/conda/envs/python35-paddle120-env/lib/python3.7/site-packages/paddle/tensor/creation.py:130: DeprecationWarning: `np.object` is a deprecated alias for the builtin `object`. To silence this warning, use `object` by itself. Doing this will not modify any behavior and is safe.
Deprecated in NumPy 1.20; for more details and guidance: https://numpy.org/devdocs/release/1.20.0-notes.html#deprecations
  if data.dtype == np.object:
from visualdl import LogWriter
log_writer = LogWriter("./log/gnet")from paddle.vision.transforms import CenterCrop,Resize
transform = Resize((512,512))#构造datasetIMG_EXTENSIONS = [ '.jpg', '.JPG', '.jpeg', '.JPEG', '.png', '.PNG', '.ppm', '.PPM', '.bmp', '.BMP',
]import paddleimport cv2import osdef data_maker(dir):
images = [] assert os.path.isdir(dir), '%s is not a valid directory' % dir
for root, _, fnames in sorted(os.walk(dir)): for fname in fnames: if is_image_file(fname) and ("outfit" not in fname):
path = os.path.join(root, fname)
images.append(path) return sorted(images)def is_image_file(filename):
return any(filename.endswith(extension) for extension in IMG_EXTENSIONS)class AnimeDataset(paddle.io.Dataset):
"""
"""
def __init__(self):
super(AnimeDataset,self).__init__()
self.anime_image_dirs =data_maker("data/d/data/train")
self.size = len(self.anime_image_dirs) # cv2.imread直接读取为GBR,把通道换成RGB @staticmethod
def loader(path):
return cv2.cvtColor(cv2.imread(path, flags=cv2.IMREAD_COLOR),
cv2.COLOR_BGR2RGB) def __getitem__(self, index):
img = AnimeDataset.loader(self.anime_image_dirs[index])
img_a = img[:,:512,:]
img_a =transform(img_a)
img_b = img[:,512:,:]
img_b = transform(img_b)
appearance_img = img_a
sketch_img = img_b
affine_img = AffineTrans(img_a)
reference_img = cv2.blur(affine_img,(100,100))
return appearance_img,sketch_img,reference_img def __len__(self):
return self.sizefor a,b,c in AnimeDataset(): print(a.shape,b.shape,c.shape) break
(512, 512, 3) (512, 512, 3) (512, 512, 3)
batch_size = 16datas = AnimeDataset()
data_loader =  paddle.io.DataLoader(datas,batch_size=batch_size,shuffle =True,drop_last=True,num_workers=16)for input_img,sketch_img,reference_img in data_loader:    print(input_img.shape,reference_img.shape)    break
[16, 512, 512, 3] [16, 512, 512, 3]
generator = Generator()
discriminator = Discriminator(16,7)
scheduler_G = paddle.optimizer.lr.StepDecay(learning_rate=1e-4, step_size=3, gamma=0.9, verbose=True)
scheduler_D = paddle.optimizer.lr.StepDecay(learning_rate=2e-4, step_size=3, gamma=0.9, verbose=True)

optimizer_G = paddle.optimizer.Adam(learning_rate=scheduler_G,parameters=generator.parameters(),beta1=0.5, beta2 =0.999)
optimizer_D = paddle.optimizer.Adam(learning_rate=scheduler_D,parameters=discriminator.parameters(),beta1=0.5, beta2 =0.999)
Epoch 0: StepDecay set learning rate to 0.0001.
Epoch 0: StepDecay set learning rate to 0.0002.
# # model和discriminator参数文件导入# M_path ='model_params/Mmodel_state3.pdparams'# layer_state_dictm = paddle.load(M_path)# generator.set_state_dict(layer_state_dictm)# D_path ='discriminator_params/Dmodel_state3.pdparams'# layer_state_dictD = paddle.load(D_path)# discriminator.set_state_dict(layer_state_dictD)
EPOCHEES = 30i = 0save_dir_model = "model_params"save_dir_Discriminator = "discriminator_params"
def gram(x):
    b, c, h, w = x.shape
    x_tmp = x.reshape((b, c, (h * w)))
    gram = paddle.matmul(x_tmp, x_tmp, transpose_y=True)    return gram / (c * h * w)def style_loss(fake, style):

gram_loss = nn.L1Loss()(gram(fake), gram(style)) return gram_lossdef scaled_dot_product(query, key, mask=None, dropout=None):
"Compute 'Scaled Dot Product Attention'"
d_k = query.shape[-1]
scores = paddle.matmul(query, key.transpose([0,2, 1])) \
/ math.sqrt(d_k) return scores
triplet_margin = 12def similarity_based_triple_loss(anchor, positive, negative):
distance = scaled_dot_product(anchor, positive) - scaled_dot_product(anchor, negative) + triplet_margin
loss = paddle.mean( paddle.maximum(distance, paddle.zeros_like(distance))) return lossfrom tqdm import tqdm
以下就是训练代码,这里我直接注释了,这样大家就可以一键运行,直接测试了
这里训练代码也是有细节的,相比V2([fake_I_gt,sketch_img])我给判别器输入的是[fake_I_gt,sketch_img,reference_img]就是多了一个色彩信息,这里是我根据colorgan改的,因为这里conditional gan的角度说,我需要判别器去判别生成出的图片色彩和线稿架构是否合理,也就是说给判别器色彩先验信息,这样更加合理。
# # 训练代码,如果想训练就取消注释# adversarial_loss = paddle.nn.MSELoss()# l1_loss = nn.L1Loss()# step =0# for epoch in range(EPOCHEES):# # if(step >1000):# # break# for appearance_img, sketch_img,reference_img in tqdm(data_loader):# # try:# # if(step >1000):# # break# # print(input_img.shape,mask.shape)# appearance_img =paddle.transpose(x=appearance_img.astype("float32")/127.5-1,perm=[0,3,1,2])# # color_noise = paddle.tanh(paddle.randn(shape = appearance_img.shape))# # appearance_img += color_noise# # appearance_img = paddle.tanh(appearance_img)# sketch_img = paddle.max( paddle.transpose(x=sketch_img.astype("float32")/255,perm=[0,3,1,2]),axis=1,keepdim=True)# reference_img = paddle.transpose(x=reference_img.astype("float32")/127.5-1,perm=[0,3,1,2])# # ---------------------# # Train Generator# # ---------------------# fake_I_gt, quary, key, value = generator(sketch_img,reference_img)# fake_output = discriminator(paddle.concat((fake_I_gt,sketch_img,reference_img), axis=1))# g_adversarial_loss = adversarial_loss(fake_output,paddle.ones_like(fake_output))# g_l1_loss = l1_loss(fake_I_gt, appearance_img)*20# g_triplet_loss = similarity_based_triple_loss(quary, key, value)# g_vggloss = paddle.to_tensor(0.)# g_style_loss= paddle.to_tensor(0.)# rates = [1.0 / 32, 1.0 / 16, 1.0 / 8, 1.0 / 4, 1.0]# # _, fake_features = VGG( paddle.multiply (img_fake,loss_mask))# # _, real_features = VGG(paddle.multiply (input_img,loss_mask))# fake_features = VGG(fake_I_gt)# real_features = VGG(appearance_img)# for i in range(len(fake_features)):# a,b = fake_features[i], real_features[i]# # if i ==len(fake_features)-1:# # a = paddle.multiply( a,F.interpolate(loss_mask,a.shape[-2:]))# # b = paddle.multiply( b,F.interpolate(loss_mask,b.shape[-2:]))# g_vggloss += rates[i] * l1_loss(a,b)# g_style_loss += rates[i] * style_loss(a,b)
# g_vggloss /=30# g_style_loss/=10# # print(step,"g_adversarial_loss",g_adversarial_loss.numpy()[0],"g_triplet_loss",g_triplet_loss.numpy()[0],"g_vggloss",g_vggloss.numpy()[0],"g_styleloss", \# # g_style_loss.numpy()[0],"g_l1_loss",g_l1_loss.numpy()[0],"g_loss",g_loss.numpy()[0])# g_loss = g_l1_loss + g_triplet_loss + g_adversarial_loss + g_style_loss + g_vggloss
# g_loss.backward()# optimizer_G.step()# optimizer_G.clear_grad()
# # ---------------------# # Train Discriminator# # ---------------------# fake_output = discriminator(paddle.concat((fake_I_gt.detach(),sketch_img,reference_img), axis=1))# real_output = discriminator(paddle.concat((appearance_img,sketch_img,reference_img), axis=1))# d_real_loss = adversarial_loss(real_output, paddle.ones_like(real_output))# d_fake_loss = adversarial_loss(fake_output, paddle.zeros_like(fake_output))# d_loss = d_real_loss+d_fake_loss
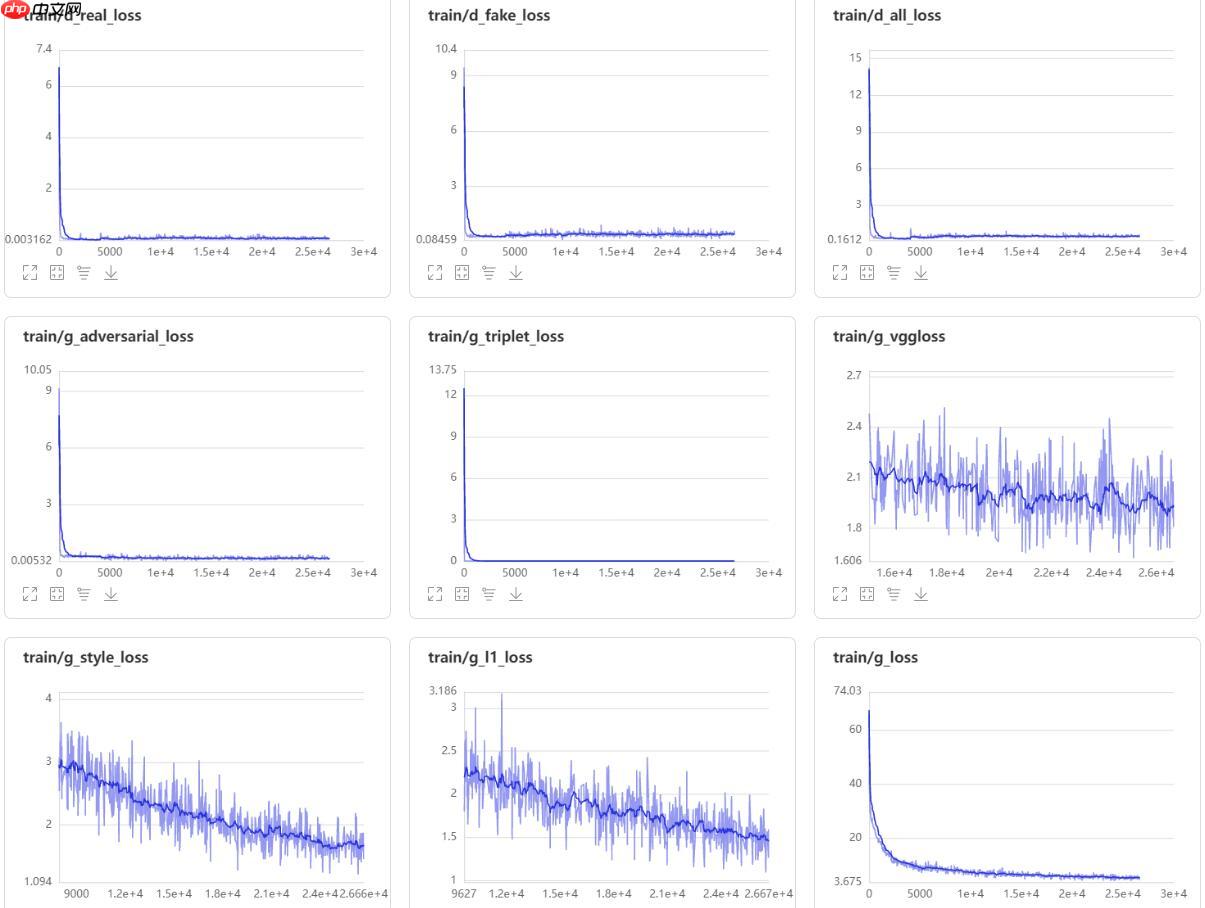
# d_loss.backward()# optimizer_D.step()# optimizer_D.clear_grad()# if step%2==0:# log_writer.add_scalar(tag='train/d_real_loss', step=step, value=d_real_loss.numpy()[0])# log_writer.add_scalar(tag='train/d_fake_loss', step=step, value=d_fake_loss.numpy()[0])
# log_writer.add_scalar(tag='train/d_all_loss', step=step, value=d_loss.numpy()[0])
# # log_writer.add_scalar(tag='train/col_loss', step=step, value=col_loss.numpy()[0])# log_writer.add_scalar(tag='train/g_adversarial_loss', step=step, value=g_adversarial_loss.numpy()[0])# log_writer.add_scalar(tag='train/g_triplet_loss', step=step, value=g_triplet_loss.numpy()[0])# log_writer.add_scalar(tag='train/g_vggloss', step=step, value=g_vggloss.numpy()[0])# log_writer.add_scalar(tag='train/g_style_loss', step=step, value=g_style_loss.numpy()[0])# log_writer.add_scalar(tag='train/g_l1_loss', step=step, value=g_l1_loss.numpy()[0])# log_writer.add_scalar(tag='train/g_loss', step=step, value=g_loss.numpy()[0])# step+=1# # print(i)# if step%100 == 3:# print(step,"g_adversarial_loss",g_adversarial_loss.numpy()[0],"g_triplet_loss",g_triplet_loss.numpy()[0],"g_vggloss",g_vggloss.numpy()[0],"g_styleloss", \# g_style_loss.numpy()[0],"g_l1_loss",g_l1_loss.numpy()[0],"g_loss",g_loss.numpy()[0])# print(step,"dreal_loss",d_real_loss.numpy()[0],"dfake_loss",d_fake_loss.numpy()[0],"d_all_loss",d_loss.numpy()[0])# # img_fake = paddle.multiply (img_fake,loss_mask)# appearance_img = (appearance_img+1)*127.5# reference_img = (reference_img+1)*127.5# fake_I_gt = (fake_I_gt+1)*127.5# g_output = paddle.concat([appearance_img,reference_img,fake_I_gt],axis = 3).detach().numpy() # tensor -> numpy# g_output = g_output.transpose(0, 2, 3, 1)[0] # NCHW -> NHWC# g_output = g_output.astype(np.uint8)# cv2.imwrite(os.path.join("./result", 'epoch'+str(step).zfill(3)+'.png'),cv2.cvtColor(g_output,cv2.COLOR_RGB2BGR))# # generator.train()
# if step%100 == 3:# # save_param_path_g = os.path.join(save_dir_generator, 'Gmodel_state'+str(step)+'.pdparams')# # paddle.save(model.generator.state_dict(), save_param_path_g)# save_param_path_d = os.path.join(save_dir_Discriminator, 'Dmodel_state'+str(3)+'.pdparams')# paddle.save(discriminator.state_dict(), save_param_path_d)# # save_param_path_e = os.path.join(save_dir_encoder, 'Emodel_state'+str(1)+'.pdparams')# # paddle.save(model.encoder.state_dict(), save_param_path_e)# save_param_path_m = os.path.join(save_dir_model, 'Mmodel_state'+str(3)+'.pdparams')# paddle.save(generator.state_dict(), save_param_path_m)# # break# # except:# # pass# # break# scheduler_G.step()# scheduler_D.step()'''
测试代码,这次我会讲解的更加详细,数据集的详细介绍我已经在V2介绍过了
'''model = Generator()
M_path ='Mmodel_state3.pdparams'layer_state_dictm = paddle.load(M_path)
model.set_state_dict(layer_state_dictm)'''
构造色彩参考图
'''path2 ="data/d/data/train/2539033.png"path2 = "test/纹理1.jpg"img_a = cv2.cvtColor(cv2.imread(path2, flags=cv2.IMREAD_COLOR),cv2.COLOR_BGR2RGB)from paddle.vision.transforms import CenterCrop,Resize
transform = Resize((512,512))# img_a = img_a[:,:512,:] #如果输入的色彩图是训练集的GT,那就把这行取消注释,如果是其他自己找的就保持注释img_a =transform(img_a)##设置30个50*50为白色,如果觉得有的色彩泄露就把23到26行代码取消注释可以一定情况下缓解。# for i in range(30):# randx = randint(50,400)# randy = randint(0,450)# img_a[randx:randx+50,randy:randy+50] = 255 #将像素设置成255,为白色# img_a = AffineTrans(img_a) #测试的时候不需要进行仿射变换了img_a = cv2.blur(img_a,(100,100)) #关键模糊步骤reference_img =paddle.transpose(x=paddle.to_tensor(img_a).unsqueeze(0).astype("float32")/127.5-1,perm=[0,3,1,2]) #style'''
构造线稿图
'''path2 ="data/d/data/train/2537028.png"img = cv2.cvtColor(cv2.imread(path2, flags=cv2.IMREAD_COLOR),cv2.COLOR_BGR2RGB)
img_b = img[:,512:,:]
img_b = transform(img_b)
sketch_img0 =paddle.transpose(x=paddle.to_tensor(img_b).unsqueeze(0).astype("float32"),perm=[0,3,1,2])#contentsketch_img = paddle.max( sketch_img0/255,axis=1,keepdim=True)
img_fake,_,_,_= model(sketch_img,reference_img)print('img_fake',img_fake.shape)
img_fake = img_fake.transpose([0, 2, 3, 1])[0].numpy() # NCHW -> NHWCprint(img_fake.shape)
img_fake = (img_fake+1) *127.5reference_img = (reference_img+1)*127.5sketch_img0 = sketch_img0.transpose([0, 2, 3, 1])[0].numpy()
reference_img = reference_img.transpose([0, 2, 3, 1])[0].numpy()
g_output = np.concatenate((sketch_img0,reference_img,img_fake),axis =1)
g_output = g_output.astype(np.uint8)
cv2.imwrite(os.path.join("./test", " 10000.png"), cv2.cvtColor(g_output,cv2.COLOR_RGB2BGR))img_fake [1, 3, 512, 512] (512, 512, 3)
True
以上就是线稿上色V3(比V2差别在于这个参考图的处理方式),并且更好用哦的详细内容,更多请关注php中文网其它相关文章!

每个人都需要一台速度更快、更稳定的 PC。随着时间的推移,垃圾文件、旧注册表数据和不必要的后台进程会占用资源并降低性能。幸运的是,许多工具可以让 Windows 保持平稳运行。

 C++高性能并发应用_C++如何开发性能关键应用
 Java AI集成Deep Java Library_Java怎么集成AI模型部署
 Golang后端API开发_Golang如何高效开发后端和API
 Python异步并发改进_Python异步编程有哪些新改进
 C++系统编程内存管理_C++系统编程怎么与Rust竞争内存安全
 Java GraalVM原生镜像构建_Java怎么用GraalVM构建高效原生镜像
 Python FastAPI异步API开发_Python怎么用FastAPI构建异步API
 C++现代C++20/23/26特性_现代C++有哪些新标准特性如modules和coroutines
 广告
广告Copyright 2014-2025 https://www.php.cn/ All Rights Reserved | php.cn | 湘ICP备2023035733号


 509
509


