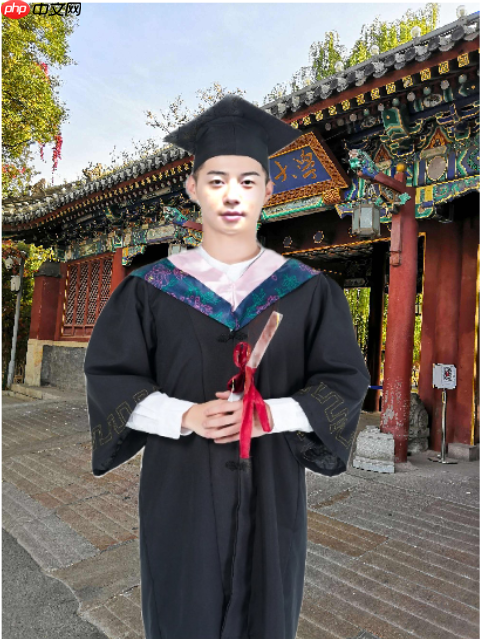
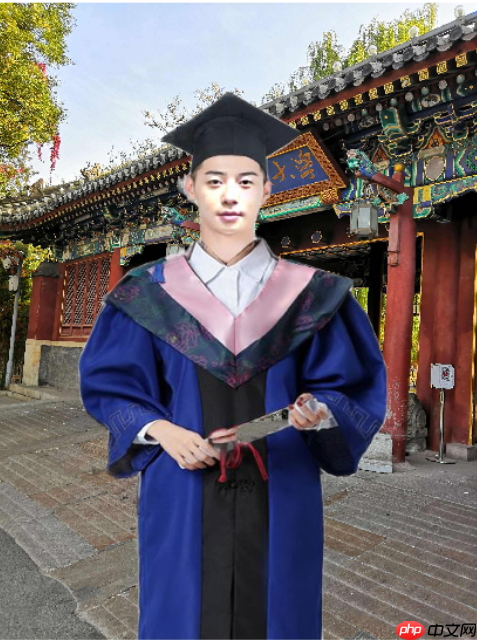
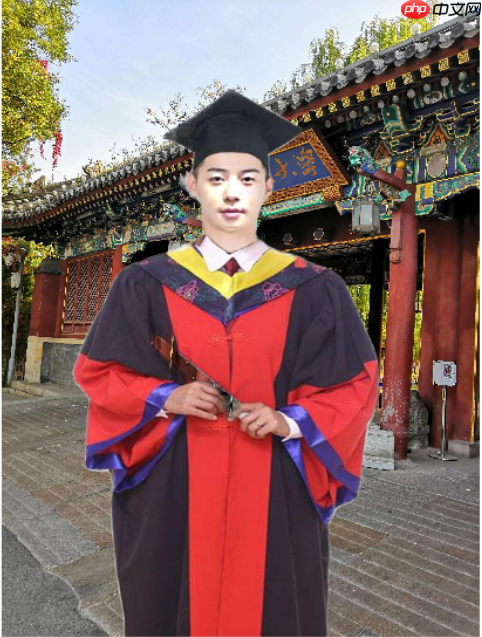
本项目针对疫情期间毕业生无法拍摄毕业照的遗憾,提供DIY毕业照解决方案。通过AI换lian将个人人脸合成到样本图,再经毕业服装抠图与合成、人体抠图与学校背景合成,完成毕业照制作。使用paddlehub等工具实现,但存在服装学科颜色、帽子垂穗处理等需完善的瑕疵,最终祝福毕业生前程似锦。
☞☞☞AI 智能聊天, 问答助手, AI 智能搜索, 免费无限量使用 DeepSeek R1 模型☜☜☜

项目简介
由于疫情的影响,许多毕业生他们可能都没办法拥有一张属于自己的毕业照,这将成为许多人说遗憾。于是便做了这样一个DIY毕业照的项目,最后祝福各位毕业生前程似锦,万事如意。
一、安装必要的包
!pip install --upgrade paddlehub -i https://mirror.baidu.com/pypi/simple
!hub install deeplabv3p_xception65_humanseg==1.1.2
二、AI换lian
把自己的脸合成到样本图上
只需修改im1,im2
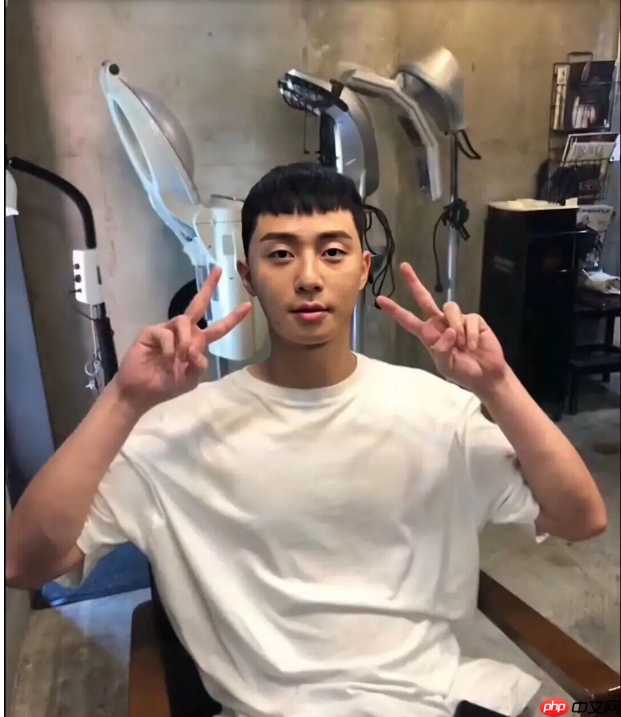
im1:自己脸的图片
im2:样本图
import cv2import numpy as npimport paddlehub as hub
def get_image_size(image):
    """
    获取图片大小(高度,宽度)
    :param image: image
    :return: (高度,宽度)
    """
    image_size = (image.shape[0], image.shape[1])    return image_sizedef get_face_landmarks(image):
    """
    获取人脸标志,68个特征点
    :param image: image
    :param face_detector: dlib.get_frontal_face_detector
    :param shape_predictor: dlib.shape_predictor
    :return: np.array([[],[]]), 68个特征点
    """
    dets = face_landmark.keypoint_detection([image])
    num_faces = len(dets[0]['data'][0])    if num_faces == 0:        print("Sorry, there were no faces found.")        return None
    # shape = shape_predictor(image, dets[0])
    face_landmarks = np.array([[p[0], p[1]] for p in dets[0]['data'][0]])    return face_landmarksdef get_face_mask(image_size, face_landmarks):
    """
    获取人脸掩模
    :param image_size: 图片大小
    :param face_landmarks: 68个特征点
    :return: image_mask, 掩模图片
    """
    mask = np.zeros(image_size, dtype=np.int32)
    points = np.concatenate([face_landmarks[0:16], face_landmarks[26:17:-1]])
    points = np.array(points, dtype=np.int32)

    cv2.fillPoly(img=mask, pts=[points], color=255)    # mask = np.zeros(image_size, dtype=np.uint8)
    # points = cv2.convexHull(face_landmarks)  # 凸包
    # cv2.fillConvexPoly(mask, points, color=255)
    return mask.astype(np.uint8)def get_affine_image(image1, image2, face_landmarks1, face_landmarks2):
    """
    获取图片1仿射变换后的图片
    :param image1: 图片1, 要进行仿射变换的图片
    :param image2: 图片2, 只要用来获取图片大小,生成与之大小相同的仿射变换图片
    :param face_landmarks1: 图片1的人脸特征点
    :param face_landmarks2: 图片2的人脸特征点
    :return: 仿射变换后的图片
    """
    three_points_index = [18, 8, 25]
    M = cv2.getAffineTransform(face_landmarks1[three_points_index].astype(np.float32),
                               face_landmarks2[three_points_index].astype(np.float32))
    dsize = (image2.shape[1], image2.shape[0])
    affine_image = cv2.warpAffine(image1, M, dsize)    return affine_image.astype(np.uint8)def get_mask_center_point(image_mask):
    """
    获取掩模的中心点坐标
    :param image_mask: 掩模图片
    :return: 掩模中心
    """
    image_mask_index = np.argwhere(image_mask > 0)
    miny, minx = np.min(image_mask_index, axis=0)
    maxy, maxx = np.max(image_mask_index, axis=0)
    center_point = ((maxx + minx) // 2, (maxy + miny) // 2)    return center_pointdef get_mask_union(mask1, mask2):
    """
    获取两个掩模掩盖部分的并集
    :param mask1: mask_image, 掩模1
    :param mask2: mask_image, 掩模2
    :return: 两个掩模掩盖部分的并集
    """
    mask = np.min([mask1, mask2], axis=0)  # 掩盖部分并集
    mask = ((cv2.blur(mask, (5, 5)) == 255) * 255).astype(np.uint8)  # 缩小掩模大小
    mask = cv2.blur(mask, (3, 3)).astype(np.uint8)  # 模糊掩模
    return maskdef skin_color_adjustment(im1, im2, mask=None):
    """
    肤色调整
    :param im1: 图片1
    :param im2: 图片2
    :param mask: 人脸 mask. 如果存在,使用人脸部分均值来求肤色变换系数;否则,使用高斯模糊来求肤色变换系数
    :return: 根据图片2的颜色调整的图片1
    """
    if mask is None:
        im1_ksize = 55
        im2_ksize = 55
        im1_factor = cv2.GaussianBlur(im1, (im1_ksize, im1_ksize), 0).astype(np.float)
        im2_factor = cv2.GaussianBlur(im2, (im2_ksize, im2_ksize), 0).astype(np.float)    else:
        im1_face_image = cv2.bitwise_and(im1, im1, mask=mask)
        im2_face_image = cv2.bitwise_and(im2, im2, mask=mask)
        im1_factor = np.mean(im1_face_image, axis=(0, 1))
        im2_factor = np.mean(im2_face_image, axis=(0, 1))

    im1 = np.clip((im1.astype(np.float) * im2_factor / np.clip(im1_factor, 1e-6, None)), 0, 255).astype(np.uint8)    return im1def main():
    im1 = cv2.imread("face.png")  # face_image
    im1 = cv2.resize(im1, (600, im1.shape[0] * 600 // im1.shape[1]))
    landmarks1 = get_face_landmarks(im1)  # 68_face_landmarks
    if landmarks1 is None:        print('{}:检测不到人脸'.format(image_face_path))
        exit(1)
    im1_size = get_image_size(im1)  # 脸图大小
    im1_mask = get_face_mask(im1_size, landmarks1)  # 脸图人脸掩模


    # ret_val, im2 = cam.read()  # camera_image
    im2 = cv2.imread("di_zhao.png")
    landmarks2 = get_face_landmarks(im2)  # 68_face_landmarks
    if landmarks2 is not None:
        im2_size = get_image_size(im2)  # 摄像头图片大小
        im2_mask = get_face_mask(im2_size, landmarks2)  # 摄像头图片人脸掩模

        affine_im1 = get_affine_image(im1, im2, landmarks1, landmarks2)  # im1(脸图)仿射变换后的图片
        affine_im1_mask = get_affine_image(im1_mask, im2, landmarks1, landmarks2)  # im1(脸图)仿射变换后的图片的人脸掩模

        union_mask = get_mask_union(im2_mask, affine_im1_mask)  # 掩模合并

        # affine_im1_face_image = cv2.bitwise_and(affine_im1, affine_im1, mask=union_mask)  # im1(脸图)的脸
        # im2_face_image = cv2.bitwise_and(im2, im2, mask=union_mask)  # im2(摄像头图片)的脸
        # cv2.imshow('affine_im1_face_image', affine_im1_face_image)
        # cv2.imshow('im2_face_image', im2_face_image)

        affine_im1 = skin_color_adjustment(affine_im1, im2, mask=union_mask)  # 肤色调整
        point = get_mask_center_point(affine_im1_mask)  # im1(脸图)仿射变换后的图片的人脸掩模的中心点
        seamless_im = cv2.seamlessClone(affine_im1, im2, mask=union_mask, p=point, flags=cv2.NORMAL_CLONE)  # 进行泊松融合

        # cv2.imshow('affine_im1', affine_im1)
        # cv2.imshow('im2', im2)
        # cv2.imshow('seamless_im', seamless_im)
        cv2.imwrite('hecheng.jpg', seamless_im)        # plt.imshow(seamless_im)
        # plt.show()

    else:
        cv2.imshow('seamless_im', im2)        # plt.imshow(im2)
        # plt.show()if __name__ == '__main__':
    face_landmark = hub.Module(name="face_landmark_localization")
    main()
[2022-06-07 11:22:24,086] [ WARNING] - The _initialize method in HubModule will soon be deprecated, you can use the __init__() to handle the initialization of the object
[2022-06-07 11:22:24,177] [ WARNING] - The _initialize method in HubModule will soon be deprecated, you can use the __init__() to handle the initialization of the object
三、毕业服装抠图与合成
#调用一些相关的包import matplotlibimport matplotlib.pyplot as plt
import matplotlib.image as mpimg
import cv2from PIL import Imageimport numpy as npimport paddlehub as hub
# S1  衣服图片抠图 ---------------------------------------------------------------------module = hub.Module(name="deeplabv3p_xception65_humanseg")
res = module.segmentation(paths = ["bo.png"], visualization=True, output_dir='pic_output')


res_img_path = './pic_output/bo.png'img = mpimg.imread(res_img_path)
plt.figure(figsize=(10, 10))
plt.imshow(img)
plt.axis('off')
plt.show()
[2022-06-07 16:11:24,181] [ WARNING] - The _initialize method in HubModule will soon be deprecated, you can use the __init__() to handle the initialization of the object
# S2  显示原始图片 ---------------------------------------------------------------------# 原始图片test_img_path = ["hecheng.jpg"]#import numpy as np #wpb addimg = mpimg.imread(test_img_path[0])

# 展示 原始图片plt.figure(figsize=(10,10))
plt.imshow(img) #wpb comment#plt.imshow(img.astype(np.uint8))#wpb addplt.axis('off')
plt.show()
# S3  获取关键点图像 ---------------------------------------------------------------------module = hub.Module(name="human_pose_estimation_resnet50_mpii")
res = module.keypoint_detection(paths = ["hecheng.jpg"], visualization=True, output_dir='pic_output')

res_img_path = './pic_output/hecheng.jpg'img = mpimg.imread(res_img_path)
plt.figure(figsize=(10, 10))
plt.imshow(img)
plt.axis('off')
plt.show()print(res)
[2022-06-07 16:12:03,050] [ WARNING] - The _initialize method in HubModule will soon be deprecated, you can use the __init__() to handle the initialization of the object
image saved in pic_output/hechengtime=1654589524.jpg
[{'path': 'hecheng.jpg', 'data': OrderedDict([('left_ankle', [205, 698]), ('left_knee', [200, 698]), ('left_hip', [211, 490]), ('right_hip', [269, 482]), ('right_knee', [274, 705]), ('right_ankle', [264, 297]), ('pelvis', [227, 490]), ('thorax', [242, 319]), ('upper_neck', [242, 267]), ('head_top', [242, 133]), ('right_wrist', [190, 467]), ('right_elbow', [110, 423]), ('right_shoulder', [153, 319]), ('left_shoulder', [332, 319]), ('left_elbow', [369, 430]), ('left_wrist', [279, 467])])}]
# S4  换衣服 ---------------------------------------------------------------------#获取衣服位置left_posx=res[0]["data"]["right_shoulder"][0]
left_posy=res[0]["data"]["right_shoulder"][1]
right_posx=res[0]["data"]["left_ankle"][0]
right_posy=res[0]["data"]["left_ankle"][1]print(left_posx, left_posy)print(right_posx, right_posy)#读取图片Image1 = Image.open('hecheng.jpg')
Image1copy = Image1.copy()

Image2 = Image.open('pic_output/bo.png')
Image2copy = Image2.copy()

#resize clothes       可以对抠出的服装图片进行放大缩小width,height=Image1copy.size
newsize=(int(width*1.0),int(height*0.9))
Image2copy = Image2.resize(newsize)#制定要粘贴左上角坐标       可以抠出的服装图片进行移动position=(int(left_posx*-0.07),int(left_posy*0.55) ) # ,right_posx, right_posyprint(position)# 换衣服 , 应该还有更好的方法进行照片合成Image1copy.paste(Image2copy,position,Image2copy) # 将翻转后图像region  粘贴到  原图im 中的 box位置
  # 存为新文件  #Image1copy.save('./pic_output/newclothes.png') Image1copy.save('./pic_output/newclothes_bo.jpg')

# 显示穿着新衣的照片img = mpimg.imread('./pic_output/newclothes_bo.jpg')


plt.figure(figsize=(10,10))
plt.imshow(img)
plt.axis('off')
plt.show()
153 319
205 698
(-10, 175)
四、合成学校背景图片
import paddlehub as hubimport matplotlib.pyplot as plt
import matplotlib.image as mpimg
import cv2from PIL import Imageimport numpy as npimport math
import paddlehub as hubimport numpy as npimport matplotlib.pyplot as plt
import matplotlib.image as mpimg
#加载预训练模型"deeplabv3p_xception65_humanseghumanseg = hub.Module(name="deeplabv3p_xception65_humanseg")#可以添加多张图片img_path = ["hecheng.jpg"]

results = humanseg.segmentation(data={"image":img_path},visualization=True, output_dir='humanseg_output')#遍历图片抠图结果for i in range(len(img_path)):    #呈现原图
    img1 = mpimg.imread(img_path[i])
    plt.figure(figsize=(10,10))
    plt.imshow(img1)
    plt.axis('off')
    plt.show()
    result=results[i]    print(result)    #打印 抠图结果的数字列表
    # print(result["data"].shape)
    #以图形方式呈现结果
    prediction = result["data"]
    plt.imshow(prediction)
    plt.show()    #运用线性代数实现:使用抠图数据剪切原图
    newimg = np.zeros(img1.shape)
    newimg[:,:,0] = img1[:,:,0] * (prediction>0)
    newimg[:,:,1] = img1[:,:,1] * (prediction>0)
    newimg[:,:,2] = img1[:,:,2] * (prediction>0)
    newimg = newimg.astype(np.uint8)

    # 抠图结果展示
    plt.figure(figsize=(10,10))
    plt.imshow(newimg)
    plt.axis('off')
    plt.show()
[2022-06-07 16:48:59,533] [ WARNING] - The _initialize method in HubModule will soon be deprecated, you can use the __init__() to handle the initialization of the object
{'save_path': 'humanseg_output/hecheng.png', 'data': array([[0., 0., 0., ..., 0., 0., 0.],
       [0., 0., 0., ..., 0., 0., 0.],
       [0., 0., 0., ..., 0., 0., 0.],
       ...,
       [0., 0., 0., ..., 0., 0., 0.],
       [0., 0., 0., ..., 0., 0., 0.],
       [0., 0., 0., ..., 0., 0., 0.]], dtype=float32)}
base_image = Image.open(f'xuexiao.jpeg').convert('RGB')
fore_image = Image.open(f'humanseg_output/hecheng.png').resize(base_image.size)# 图片加权合成scope_map = np.array(fore_image)[:,:,-1] / 255scope_map = scope_map[:,:,np.newaxis]
scope_map = np.repeat(scope_map, repeats=3, axis=2)
res_image = np.multiply(scope_map, np.array(fore_image)[:,:,:3]) + np.multiply((1-scope_map), np.array(base_image))#保存图片res_image = Image.fromarray(np.uint8(res_image))
res_image.save(f"humanseg_output/hecheng_xue.jpg")print('照片合成完毕')
plt.figure(figsize=(10,10))
plt.imshow(res_image)
plt.axis('off')
plt.show()
照片合成完毕
总结
本次项目主要使用了脸部抠图+合成、衣服抠图+合成、人体抠图+背景合成,这三大块的功能来完成。但是仍然存在瑕疵。例如服装上学科代表的颜色和帽子垂穗颜色不能更换、以及最后合成后的帽子垂穗会消失,这都是后面需要完善的地方。

