本文介绍将PP-HumanSeg-Lite轻量级人像分割模型部署到树莓派的流程。先克隆PaddleSeg仓库、安装相关工具并下载预训练模型,接着导出静态图模型并转为ONNX格式,最后编写预测代码。将相关文件夹打包至树莓派,即可运行实现实时人像分割。
☞☞☞AI 智能聊天, 问答助手, AI 智能搜索, 免费无限量使用 DeepSeek R1 模型☜☜☜
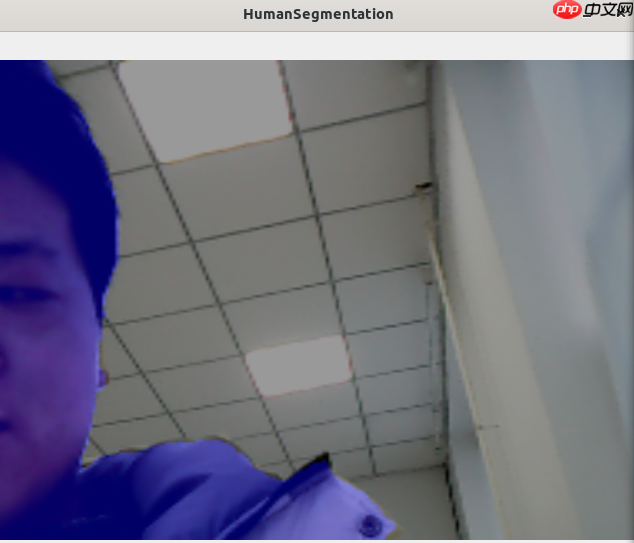
人像分割是图像分割领域的高频应用,PaddleSeg推出在大规模人像数据上训练的人像分割系列模型PP-HumanSeg,包括超轻量级模型PP-HumanSeg-Lite,满足在服务端、移动端、Web端多种使用场景的需求。本项目将PP-HumanSeg-Lite模型转为onnx并部署到树莓派,实现人像抠图效果。效果如下图所示(这里只露个半脸):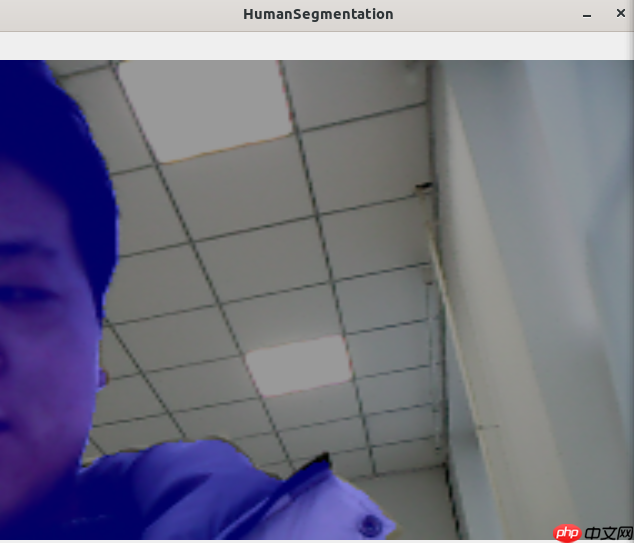
本项目将PaddleSeg的轻量级人像分割模型转换为onnx,将其部署到树莓派实现实时人像分割。树莓派环境如下:
树莓派4B
摄像头一个

Ubuntu Desktop 21.10
onnxruntime
opencv-python
# step 1: git clone %cd ~/
!git clone https://gitee.com/PaddlePaddle/PaddleSeg.git
# step 2: install paddleseg!pip install paddleseg
# step 3: 下载预训练模型%cd ~/PaddleSeg/contrib/PP-HumanSeg
!python pretrained_model/download_pretrained_model.py
# step 4: 导出静态图模型%cd ~/PaddleSeg/contrib/PP-HumanSeg
!python ../../export.py \
--config configs/fcn_hrnetw18_small_v1_humanseg_192x192_mini_supervisely.yml \
--model_path pretrained_model/fcn_hrnetw18_small_v1_humanseg_192x192/model.pdparams \
--save_dir export_model/fcn_hrnetw18_small_v1_humanseg_192x192 \
 --with_softmax  --input_shape 1 3 192 192
# step 5:转为onnx模型# ① 安装paddle2onnx!pip install paddle2onnx
# ② 转换为onnx%cd ~/PaddleSeg/contrib/PP-HumanSeg
! paddle2onnx --model_dir ./export_model/fcn_hrnetw18_small_v1_humanseg_192x192/ \
    --model_filename model.pdmodel \
    --params_filename model.pdiparams \
    --save_file onnx_model/model.onnx \
--opset_version 12# step 6: 转移模型路径%cd ~/ !mkdir pp_humanseg_deploy %cd ~/pp_humanseg_deploy/ !mkdir onnx_model !cp ~/PaddleSeg/contrib/PP-HumanSeg/onnx_model/model.onnx ~/pp_humanseg_deploy/onnx_model
创建/home/aistudio/pp_humanseg_deploy/predict.py,将以下内容放进predict.py。
import cv2import numpy as npimport onnxruntime as rtdef normalize(im, mean=[0.5, 0.5, 0.5], std=[0.5, 0.5, 0.5]):
    im = im.astype(np.float32, copy=False) / 255.0
    im -= mean
    im /= std    return imdef resize(im, target_size=608, interp=cv2.INTER_LINEAR):
    if isinstance(target_size, list) or isinstance(target_size, tuple):
        w = target_size[0]
        h = target_size[1]    else:
        w = target_size
        h = target_size
    im = cv2.resize(im, (w, h), interpolation=interp)    return imdef preprocess(image, target_size=(192, 192)):
    image = normalize(image)
    image = resize(image, target_size=target_size)
    image = np.transpose(image, [2, 0, 1])
    image = image[None, :, :, :]    return imagedef display_masked_image(mask, image, color_map=[255, 0, 0], weight=0.6):
    mask = mask > 0
    c1 = np.zeros(shape=mask.shape, dtype='uint8')
    c2 = np.zeros(shape=mask.shape, dtype='uint8')
    c3 = np.zeros(shape=mask.shape, dtype='uint8')
    pseudo_img = np.dstack((c1, c2, c3))    for i in range(3):
        pseudo_img[:, :, i][mask] = color_map[i]
    vis_result = cv2.addWeighted(image, weight, pseudo_img, 1 - weight, 0)    return vis_result


onnx_model_path = 'onnx_model/model.onnx'sess = rt.InferenceSession(onnx_model_path)
input_name = sess.get_inputs()[0].name
label_name = sess.get_outputs()[0].name

target_size = (192, 192)

cap_video = cv2.VideoCapture(0)if not cap_video.isOpened():    raise IOError("Error opening video stream or file.")while cap_video.isOpened():
    ret, raw_frame = cap_video.read()
    pre_shape = raw_frame.shape[0:2][::-1]    if ret:
        frame = cv2.cvtColor(raw_frame, cv2.COLOR_BGRA2RGB)
        frame = preprocess(frame, target_size)
        pred = sess.run(
            [label_name],
            {input_name: frame.astype(np.float32)}
        )[0]
        pred = pred[0]
        raw_frame = resize(raw_frame, target_size)
        image = display_masked_image(pred, raw_frame)
        image = resize(image, target_size=pre_shape)
        cv2.imshow('HumanSegmentation', image)        if cv2.waitKey(1) & 0xFF == ord('q'):            break
else: breakcap_video.release()将/home/aistudio/pp_humanseg_deploy文件夹打包,放入树莓派环境运行predict.py,效果如下:
以上就是轻量级人像分割模型PP-HumanSeg树莓派部署的详细内容,更多请关注php中文网其它相关文章!

每个人都需要一台速度更快、更稳定的 PC。随着时间的推移,垃圾文件、旧注册表数据和不必要的后台进程会占用资源并降低性能。幸运的是,许多工具可以让 Windows 保持平稳运行。

 广告
广告Copyright 2014-2025 https://www.php.cn/ All Rights Reserved | php.cn | 湘ICP备2023035733号


 294
294


