本文介绍PaddlePaddle实现的PeleeNet,这是高效CNN架构,适用于移动设备。其采用Two-Way Dense Layer、Stem Block等结构,复现了相关精度。还说明数据集准备、环境配置,以及模型训练、评估、预测和推理部署方法,也提及自动化测试脚本等内容。
☞☞☞AI 智能聊天, 问答助手, AI 智能搜索, 免费无限量使用 DeepSeek R1 模型☜☜☜

这是一个PaddlePaddle实现的PeleeNet。
PeleeNet是一个高效的卷积神经网络(CNN)架构,由传统的卷积法构建。与其他高效架构相比,PeleeNet有很大的速度优势,可以应用于图像分类及其它的计算机视觉任务。
论文: PeleeNet: An efficient DenseNet architecture for mobile devices
参考repo: PeleeNet
在此非常感谢Robert-JunWang贡献的PeleeNet,提高了本repo复现论文的效率。
数据集为ImageNet,训练集包含1281167张图像,验证集包含50000张图像。
│imagenet
├──train
│  ├── n01440764
│  │   ├── n01440764_10026.JPEG
│  │   ├── n01440764_10027.JPEG
│  │   ├── ......│  ├── ......├──val
│  ├── n01440764
│  │   ├── ILSVRC2012_val_00000293.JPEG
│  │   ├── ILSVRC2012_val_00002138.JPEG
│  │   ├── ......│  ├── ......
您可以从ImageNet 官网申请下载数据。
| 模型 | epochs | top1 acc (参考精度) | top1 acc (复现精度) | 权重 | 训练日志 |
|---|---|---|---|---|
| PeleeNet | 120 | - | 0.713 (official repo) | 0.713 | 120epochs-pretrain_(checkpoint-latest.pd | log.txt) |
| PeleeNet | 120+20 | 0.726 (paper) | 0.716 (official repo) | 0.716 | 20epochs-finetune_(checkpoint-best.pd | 20epochs-finetune_log.txt) |
权重及训练日志下载地址:百度网盘 or work/20epochs-finetune_checkpoint-best.pd
硬件和框架版本等环境的要求如下:
%cd /home/aistudio/# !git clone https://github.com/flytocc/PeleeNet-paddle.git!unzip PeleeNet-paddle-master.zip
# 需要安装2.2及以上版本的Paddle,如果# 安装GPU版本的Paddlepip install paddlepaddle-gpu==2.2.0# 安装CPU版本的Paddlepip install paddlepaddle==2.2.0
更多安装方法可以参考:Paddle安装指南。
%cd /home/aistudio/PeleeNet-paddle-master
!pip install -r requirements.txt
如果您已经ImageNet1k数据集,那么该步骤可以跳过,如果您没有,则可以从ImageNet官网申请下载。
如果只是希望快速体验模型训练功能,可以参考:飞桨训推一体认证(TIPC)开发文档
如果您希望直接体验评估或者预测推理过程,可以直接根据第2章的内容下载提供的预训练模型,直接体验模型评估、预测、推理部署等内容。
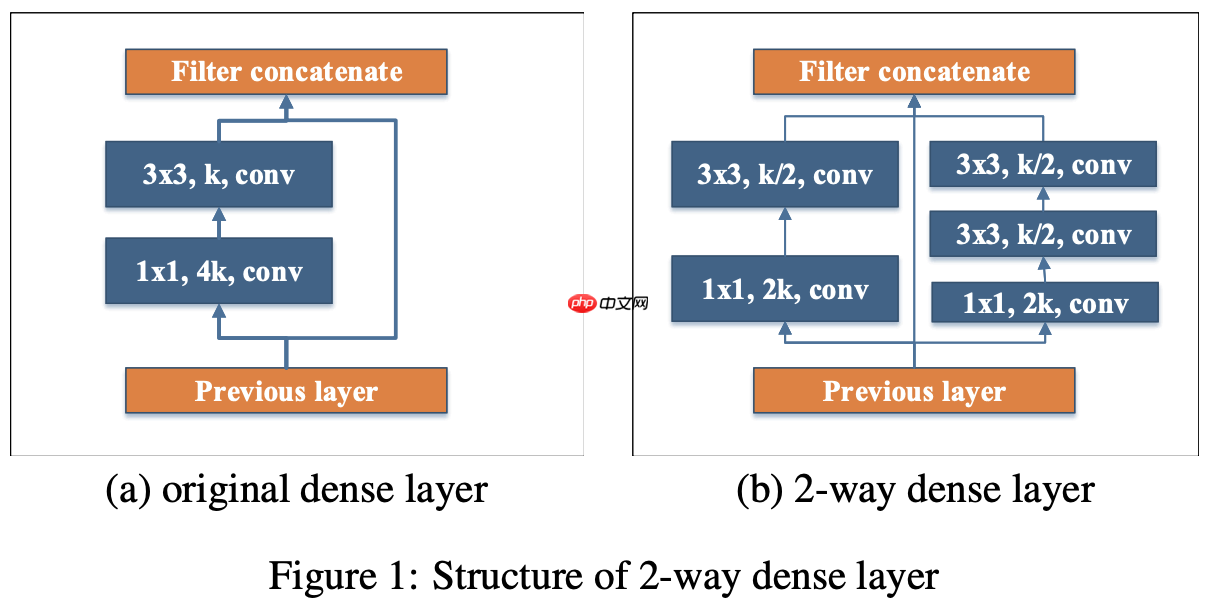
受Inception结构的启发,由两路分别捕捉不同尺度感受野信息的网络分支构成。第一路经过一层1x1卷积完成bottleneck之后,再经过一层3x3卷积;第二路则在bottleneck之后,再经过两层3x3卷积:
class _DenseLayer(nn.Layer):

    def __init__(self, num_input_features, growth_rate, bottleneck_width, drop_rate):
        super(_DenseLayer, self).__init__()
        growth_rate = int(growth_rate / 2)
        inter_channel = int(growth_rate * bottleneck_width / 4) * 4
        if inter_channel > num_input_features / 2:
            inter_channel = int(num_input_features / 8) * 4
            print('adjust inter_channel to ', inter_channel)
        self.branch2a = BasicConv2d(
            num_input_features, inter_channel, kernel_size=1)
        self.branch2b = BasicConv2d(
            inter_channel, growth_rate, kernel_size=3, padding=1)
        self.branch2a = BasicConv2d(
            num_input_features, inter_channel, kernel_size=1)
        self.branch2b = BasicConv2d(
            inter_channel, growth_rate, kernel_size=3, padding=1)
        self.branch2c = BasicConv2d(
            growth_rate, growth_rate, kernel_size=3, padding=1)    def forward(self, x):
        branch2 = self.branch2a(x)
        branch2 = self.branch2b(branch2)
        branch2 = self.branch2a(x)
        branch2 = self.branch2b(branch2)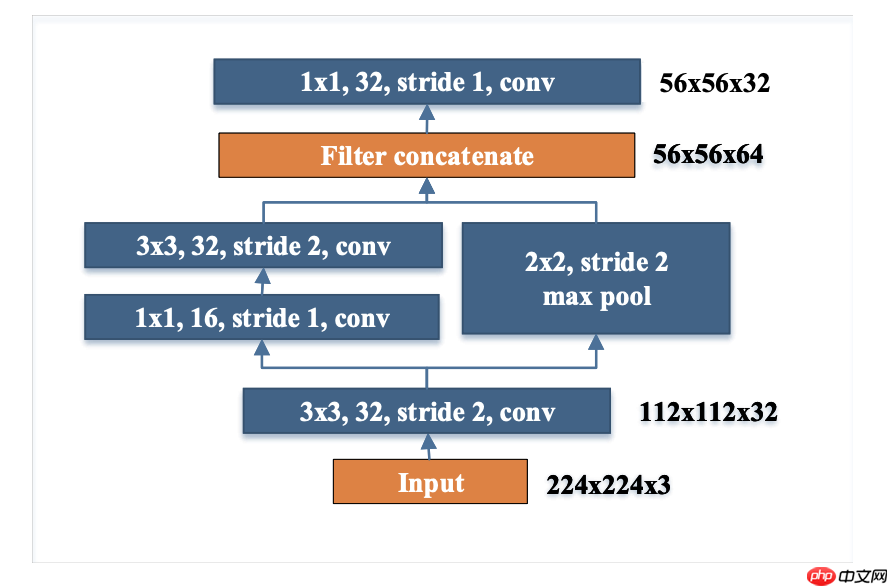
branch2 = self.branch2c(branch2) return paddle.concat([x, branch2, branch2], 1)实现输入图像空间维度的第一次降采样(stride=2)和通道数的增加。并且在不增加较多计算量的前提下,该模块能够确保较强的特征表达能力:
class _StemBlock(nn.Layer):

    def __init__(self, num_input_channels, num_init_features):
        super(_StemBlock, self).__init__()
        num_stem_features = int(num_init_features/2)
        self.stem1 = BasicConv2d(
            num_input_channels, num_init_features, kernel_size=3, stride=2, padding=1)
        self.stem2a = BasicConv2d(
            num_init_features, num_stem_features, kernel_size=1, stride=1, padding=0)
        self.stem2b = BasicConv2d(
            num_stem_features, num_init_features, kernel_size=3, stride=2, padding=1)
        self.stem3 = BasicConv2d(            2*num_init_features, num_init_features, kernel_size=1, stride=1, padding=0)
        self.pool = nn.MaxPool2D(kernel_size=2, stride=2)    def forward(self, x):
        out = self.stem1(x)
        branch2 = self.stem2a(out)
        branch2 = self.stem2b(branch2)
        branch2 = self.pool(out)
        out = paddle.concat([branch2, branch2], 1)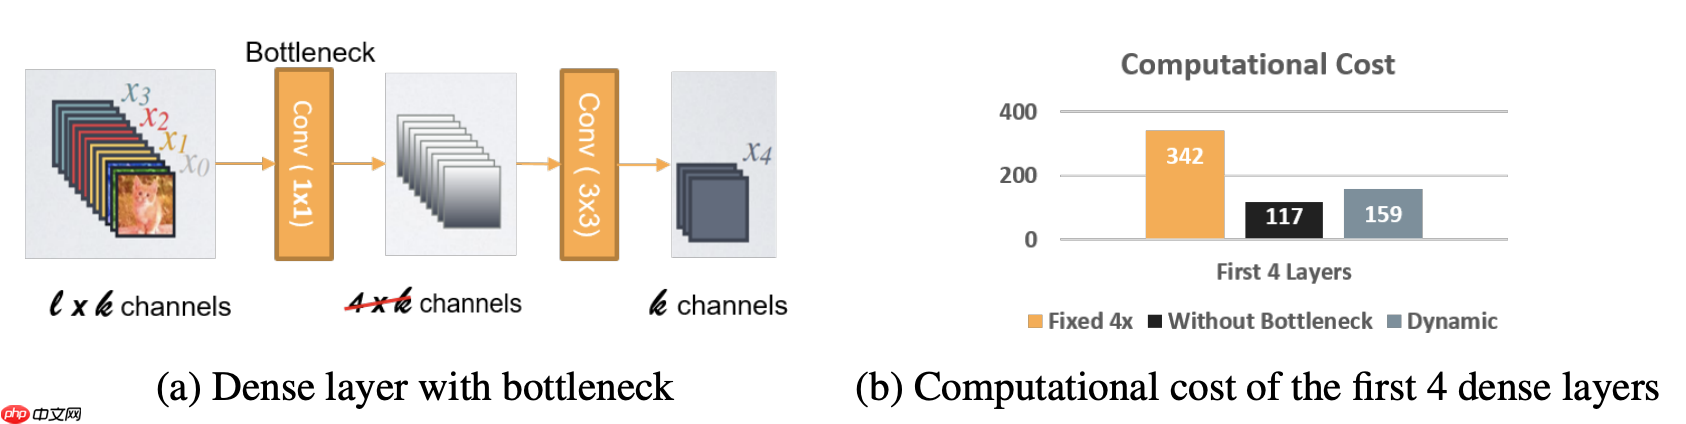
out = self.stem3(out) return out瓶颈层(1x1卷积层)的输出通道数随输入形状而变化,而并非DenseNet中growth-rate的4倍(growth_rate表示每经过一个dense block,所增加的通道数),从而确保瓶颈层的计算量不会显著增加:
class _DenseBlock(nn.Sequential):

	def __init__(self, num_layers, num_input_features, bn_size, growth_rate, drop_rate):
        super(_DenseBlock, self).__init__()        for i in range(num_layers):
            layer = _DenseLayer(num_input_features + i *
growth_rate, growth_rate, bn_size, drop_rate) setattr(self, 'denselayer%d' % (i + 1), layer)过渡层(transition layer)的输入输出通道数保持一致,即为dense group中最后一个dense block的输出通道数(in_ch+n*growth_rate);
采用post-activation结构,替换DenseNet中的pre-activation结构。因而在inference阶段,BN层和卷积层可以融合在一起,以提升推理速度:
class BasicConv2d(nn.Layer):

    def __init__(self, in_channels, out_channels, activation=True, **kwargs):
        super(BasicConv2d, self).__init__()
        self.conv = nn.Conv2D(in_channels, out_channels,
                              bias_attr=False, **kwargs)
        self.norm = nn.BatchNorm2D(out_channels)
        self.activation = activation    def forward(self, x):
        x = self.conv(x)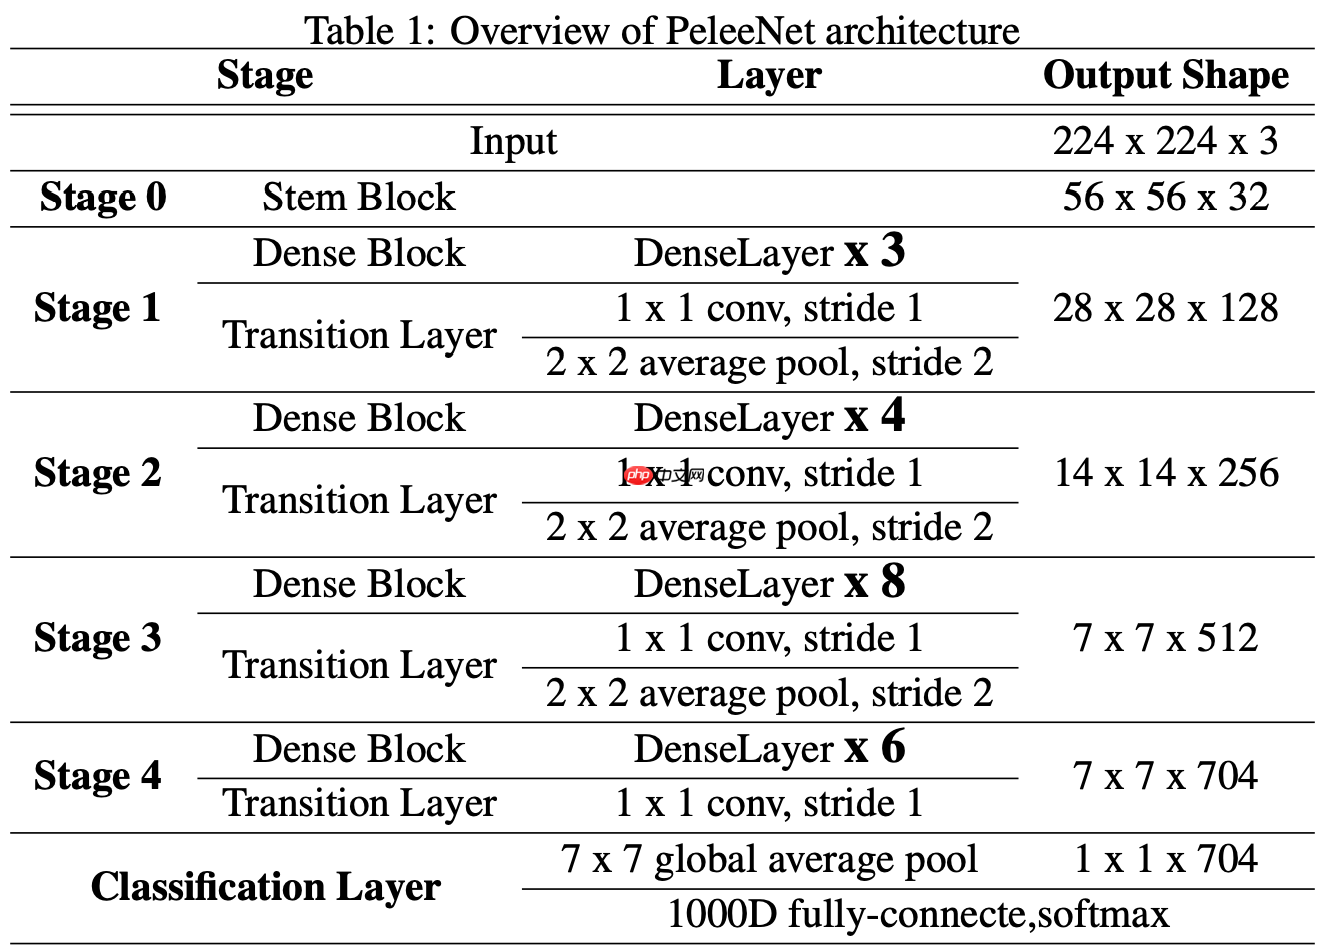
x = self.norm(x) if self.activation: return F.relu(x) else: return x基于上述改进,Pelee分类网络的总体结构如下:
class PeleeNet(nn.Layer):

    def __init__(self, growth_rate=32, block_config=[3, 4, 8, 6],
                 num_init_features=32, bottleneck_width=[1, 2, 4, 4],
                 drop_rate=0.05, num_classes=1000):
        super(PeleeNet, self).__init__()
        self.features = nn.Sequential(*[
            ('stemblock', _StemBlock(3, num_init_features)),
        ])        if type(growth_rate) is list:
            growth_rates = growth_rate            assert len(growth_rates) == 4, \                'The growth rate must be the list and the size must be 4'
        else:
            growth_rates = [growth_rate] * 4
        if type(bottleneck_width) is list:
            bottleneck_widths = bottleneck_width            assert len(bottleneck_widths) == 4, \                'The bottleneck width must be the list and the size must be 4'
        else:
            bottleneck_widths = [bottleneck_width] * 4
        # Each denseblock
        num_features = num_init_features        for i, num_layers in enumerate(block_config):
            block = _DenseBlock(num_layers=num_layers,
                                num_input_features=num_features,
                                bn_size=bottleneck_widths[i],
                                growth_rate=growth_rates[i],
                                drop_rate=drop_rate)            setattr(self.features, 'denseblock%d' % (i + 1), block)
            num_features = num_features + num_layers * growth_rates[i]            setattr(self.features, 'transition%d' % (i + 1), BasicConv2d(
                num_features, num_features, kernel_size=1, stride=1, padding=0))            if i != len(block_config) - 1:                setattr(self.features, 'transition%d_pool' %
                        (i + 1), nn.AvgPool2D(kernel_size=2, stride=2))
                num_features = num_features        # Linear layer
        self.classifier = nn.Linear(num_features, num_classes)
        self.drop_rate = drop_rate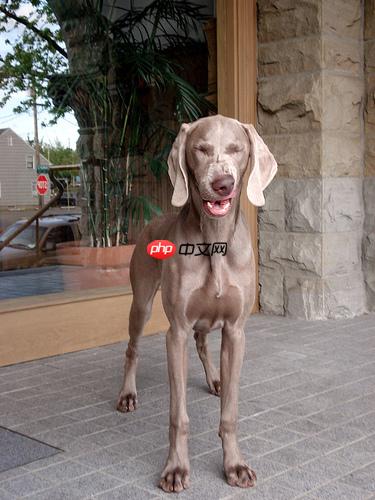
self.apply(self._initialize_weights)测试图片
%cd /home/aistudio/PeleeNet-paddle-master

%run predict.py \
    --model peleenet \
    --infer_imgs ./demo/ILSVRC2012_val_00020010.JPEG \
--resume /home/aistudio/work/20epochs-finetune_checkpoint-best.pd最终输出结果为
[{'class_ids': [178, 246, 211, 236, 159], 'scores': [0.9958851933479309, 0.002891531912609935, 0.0004746659251395613, 0.00018126792565453798, 0.00013171558384783566], 'file_name': './demo/ILSVRC2012_val_00020010.JPEG', 'label_names': ['Weimaraner', 'Great Dane', 'vizsla, Hungarian pointer', 'Doberman, Doberman pinscher', 'Rhodesian ridgeback']}]表示预测的类别为Weimaraner(魏玛猎狗),ID是178,置信度为0.9958851933479309。
pretrain
export CUDA_VISIBLE_DEVICES=0,1
python -m paddle.distributed.launch --gpus="0,1" \
    main.py \
    --model peleenet \
    --batch_size 256 \
    --aa '' --smoothing 0 --train_interpolation 'bilinear' --reprob 0 \
    --mixup 0 --cutmix 0 \
    --opt momentum --weight_decay 1e-4 --min_lr 0 --warmup_epochs 0 \
    --lr 0.18 --epochs 120 \
    --data_path /path/to/imagenet/ \
    --cls_label_path_train /path/to/train_list.txt \
    --cls_label_path_val /path/to/val_list.txt \
    --output_dir output/peleenet_pt/ \
--dist_evalps: 如果未指定cls_label_path_train/cls_label_path_val,会读取data_path下train/val里的图片作为train-set/val-set。
fintune
export CUDA_VISIBLE_DEVICES=0,1
python -m paddle.distributed.launch --gpus="0,1" \
    main.py \
    --model peleenet \
    --batch_size 256 \
    --aa '' --smoothing 0 --train_interpolation 'bilinear' --reprob 0 \
    --mixup 0 --cutmix 0 \
    --opt momentum --weight_decay 1e-4 --min_lr 0 --warmup_epochs 0 \
    --lr 0.005 --epochs 20 \
    --data_path /path/to/imagenet/ \
    --cls_label_path_train /path/to/train_list.txt \
    --cls_label_path_val /path/to/val_list.txt \
    --output_dir output/peleenet_ft/ \
    --dist_eval \
--no_remove_head_from_pretained --finetune $PRETRAINED_MODELps: 如果未指定cls_label_path_train/cls_label_path_val,会读取data_path下train/val里的图片作为train-set/val-set。
部分训练日志如下所示。
[14:04:15.171051] Epoch: [119] [2000/2502] eta: 0:02:23 lr: 0.000001 loss: 1.3032 (1.2889) time: 0.2833 data: 0.0065[14:04:20.781305] Epoch: [119] [2020/2502] eta: 0:02:17 lr: 0.000001 loss: 1.3059 (1.2895) time: 0.2794 data: 0.0118
python eval.py \
    --model peleenet \
    --batch_size 256 \
    --train_interpolation 'bilinear' \
    --data_path /path/to/imagenet/ \
    --cls_label_path_val /path/to/val_list.txt \
--resume $TRAINED_MODELps: 如果未指定cls_label_path_val,会读取data_path/val里的图片作为val-set。
可以参考模型导出,
将该模型转为 inference 模型只需运行如下命令:
%run export_model.py \
    --model peleenet \
    --output_dir ./output/ \
--resume /home/aistudio/work/20epochs-finetune_checkpoint-best.pd%run infer.py \
--model_file ./output/model.pdmodel \
--params_file ./output/model.pdiparams \
--input_file ./demo/ILSVRC2012_val_00020010.JPEG输出结果为
[{'class_ids': [178, 246, 211, 236, 159], 'scores': [0.9958919286727905, 0.002890672069042921, 0.00047152844490483403, 0.00018087819626089185, 0.00013146322453394532], 'file_name': './demo/ILSVRC2012_val_00020010.JPEG', 'label_names': ['Weimaraner', 'Great Dane', 'vizsla, Hungarian pointer', 'Doberman, Doberman pinscher', 'Rhodesian ridgeback']}]表示预测的类别为Weimaraner(魏玛猎狗),ID是178,置信度为0.9958919286727905。与predict.py结果的误差在正常范围内。
Serving部署教程可参考:链接。
详细日志在test_tipc/output
TIPC: TIPC: test_tipc/README.md
首先安装auto_log,需要进行安装,安装方式如下: auto_log的详细介绍参考https://github.com/LDOUBLEV/AutoLog。
git clone https://github.com/LDOUBLEV/AutoLog
cd AutoLog/
pip3 install -r requirements.txt
python3 setup.py bdist_wheel
pip3 install ./dist/auto_log-1.2.0-py3-none-any.whl
进行TIPC:
bash test_tipc/prepare.sh test_tipc/config/PeleeNet/peleenet.txt 'lite_train_lite_infer'bash test_tipc/test_train_inference_python.sh test_tipc/config/PeleeNet/peleenet.txt 'lite_train_lite_infer'
TIPC结果:
如果运行成功,在终端中会显示下面的内容,具体的日志也会输出到test_tipc/output/文件夹中的文件中。
Run successfully with command - python3 main.py --model=peleenet --aa='' --smoothing=0 --train_interpolation=bilinear --reprob=0 --mixup=0 --cutmix=0 --lr=0.25 --data_path=./dataset/ILSVRC2012/ --cls_label_path_train=./dataset/ILSVRC2012/train_list.txt --cls_label_path_val=./dataset/ILSVRC2012/val_list.txt --dist_eval --output_dir=./test_tipc/output/norm_train_gpus_0_autocast_null/peleenet --epochs=2 --batch_size=8 !Run successfully with command - python3 eval.py --model=peleenet --train_interpolation=bilinear --data_path=./dataset/ILSVRC2012/ --cls_label_path_val=./dataset/ILSVRC2012/val_list.txt --resume=./test_tipc/output/norm_train_gpus_0_autocast_null/peleenet/checkpoint-latest.pd !Run successfully with command - python3 export_model.py --model=peleenet --resume=./test_tipc/output/norm_train_gpus_0_autocast_null/peleenet/checkpoint-latest.pd --output=./test_tipc/output/norm_train_gpus_0_autocast_null !......
本paddle版本的PeleeNet精度对齐了official repo,但始终和论文对不上。
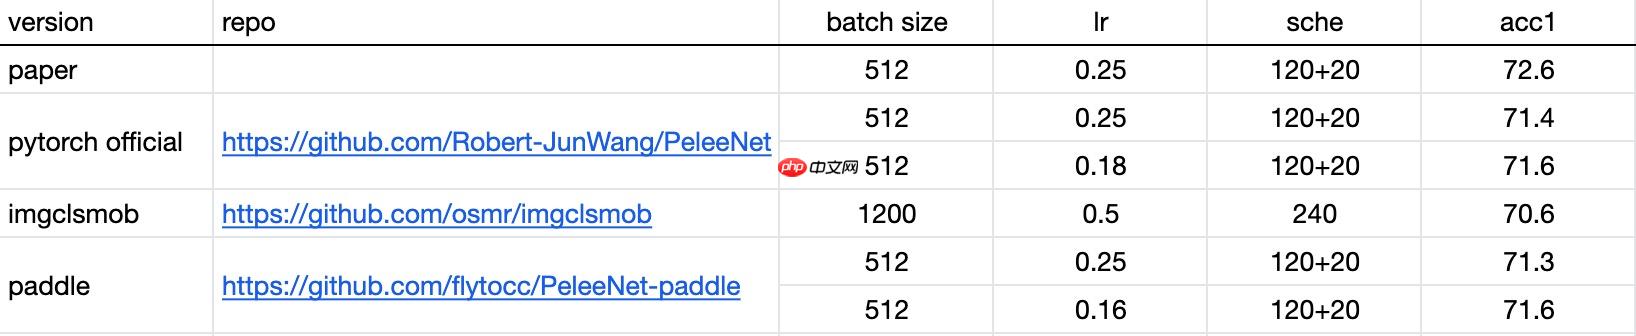
我在arxiv上找到了三个版本的论文:
在v1中,作者给出的精度为71.3,和official repo训练出来的精度一样。
在v2中,作者给出了lr(0.18|0.005)、epochs(120|20)和schedule(cosine),并更新了更高的精度72.1,这也是official repo中提供的预训练模型的精度。但使用official repo训练只能得到71.6。
在v3中,作者更新了lr(0.18|0.005)->lr(0.25|0.005)和精度72.1->72.6。
更长的训练能提高精。例如renmada训练了300epochs能达到72.2。
以上就是基于PaddlePaddle复现的PeleeNet的详细内容,更多请关注php中文网其它相关文章!

每个人都需要一台速度更快、更稳定的 PC。随着时间的推移,垃圾文件、旧注册表数据和不必要的后台进程会占用资源并降低性能。幸运的是,许多工具可以让 Windows 保持平稳运行。

 广告
广告Copyright 2014-2025 https://www.php.cn/ All Rights Reserved | php.cn | 湘ICP备2023035733号


 317
317