该项目总结了 AIStudio 上主流的 DeepSeek-R1 调用方式,省去开发者调研工作,助力平台项目繁荣。介绍了四种方法:星河大模型 API 服务、星河社区一键部署(均不刚需 GPU,推荐),Ollama 本地部署、PaddleNLP 3.0 部署(推荐 GPU 环境),并详述操作步骤。用户可 fork 项目,选合适环境运行,发挥创造力开发。
☞☞☞AI 智能聊天, 问答助手, AI 智能搜索, 免费无限量使用 DeepSeek R1 模型☜☜☜

一、项目背景
自DeepSeek-R1发布的一个多月以来,DeepSeek-R1一直霸占大模型热门榜,AIStudio平台上的关于DeepSeek-R1的热门项目也层出不穷。
从个人调研来看,AIStudio上的项目大多是将DeepSeek-R1部署后使用,方法有通过Ollama部署、通过PaddleNLP调用等,部分项目会选择调用千帆大模型ModelBuilder中的DeepSeek-R1的API接口,等等,不一而论。
那么,本项目总结了时下主流的DeepSeek-R1调用方式,省去开发者调研的工作,助力AIStudio项目繁荣。
快速开始
- fork 本项目,选择合适的环境运行项目。
- 这个正在看的ipynb重命名为一个你喜欢的名字,列如deepseek.ipynb。
- 选择某种方法部署模型。
- 新建一个名字是main.ipynb的文件,发挥你的创造力。
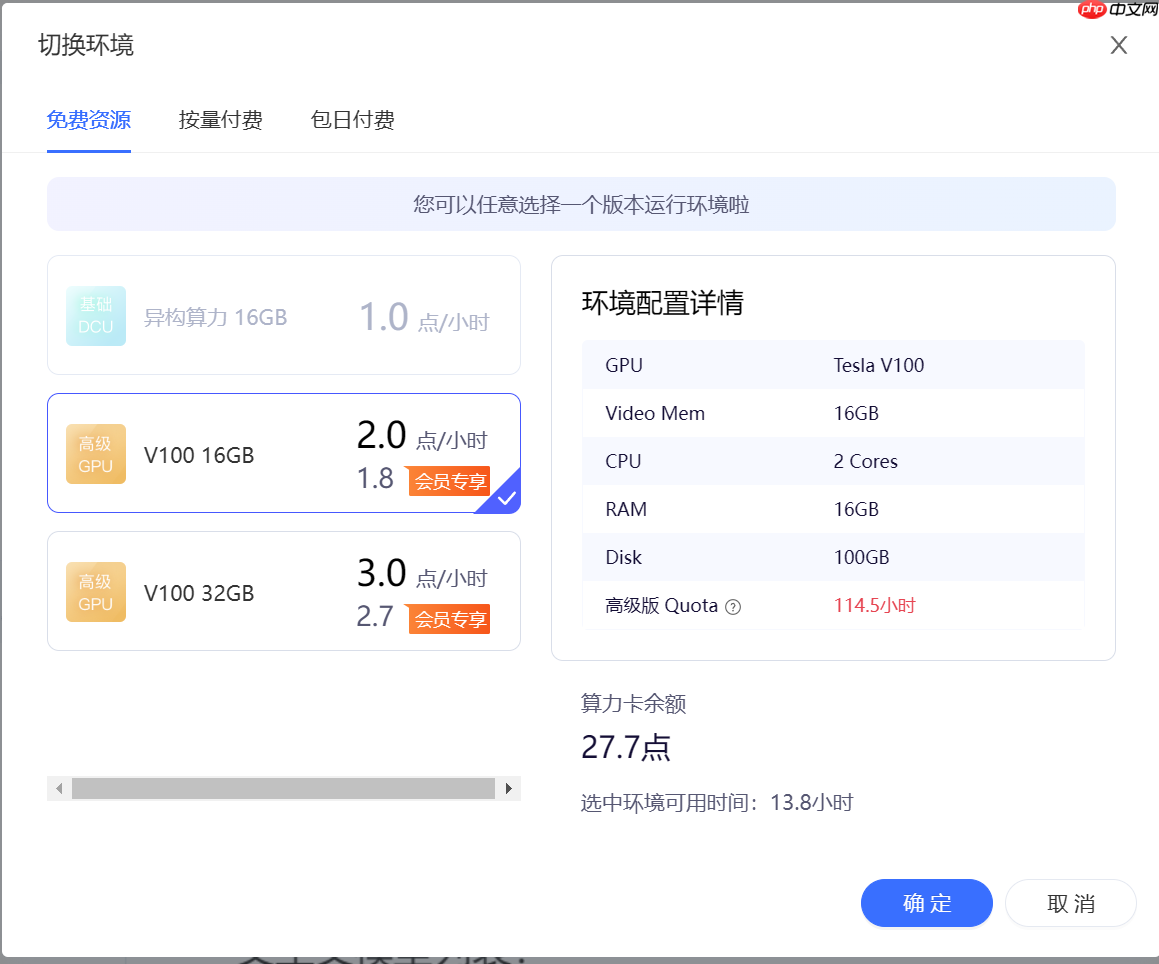
环境选择(必看)
本项目介绍的四种方法,二、星河大模型 API 服务(推荐) 和 三、星河社区一键部署(推荐) 不刚需GPU环境,
其余的两种环境推荐使用GPU环境,V100或A100都可以,显存大小不做要求。
二、星河大模型 API 服务(推荐)
点击这里前往星河大模型 API 服务
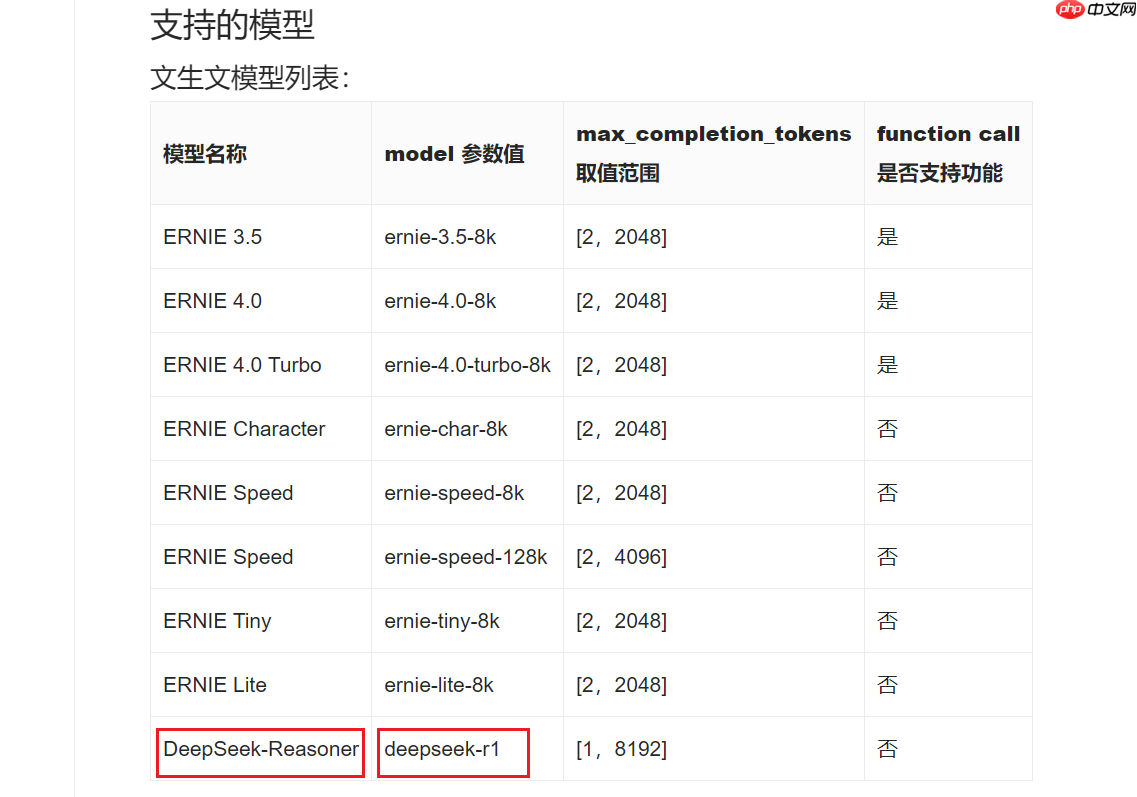
是的,星河大模型 API 服务支持DeepSeek-R1了!
填完参数后,一键即可调用!
文生文
含有 AI Studio 访问令牌的环境变量,https://aistudio.baidu.com/account/accessToken,
如果想跑通DEMO,那么就要在下面的代码中更换你的AI_STUDIO_API_KEY。
import os

os.environ["AI_STUDIO_API_KEY"] = "your_access_token"
import osfrom openai import OpenAI

client = OpenAI(
     api_key=os.environ.get("AI_STUDIO_API_KEY"),  # 含有 AI Studio 访问令牌的环境变量,https://aistudio.baidu.com/account/accessToken,
     base_url="https://aistudio.baidu.com/llm/lmapi/v3",  # aistudio 大模型 api 服务域名)

chat_completion = client.chat.completions.create(
    messages=[
        {'role': 'system', 'content': '你是开发者助理,你精通开发相关的知识,负责给开发者提供搜索帮助建议。'},
        {'role': 'user', 'content': '你好,请介绍一下你自己'}
    ],
    model="deepseek-r1",
    temperature=0.6,
)print(chat_completion.choices[0].message.content)
多轮对话
import os
from openai import OpenAI

def get_response(messages):
    client = OpenAI(
        api_key=os.environ.get("AI_STUDIO_API_KEY"),  # 含有 AI Studio 访问令牌的环境变量,https://aistudio.baidu.com/account/accessToken,
        base_url="https://aistudio.baidu.com/llm/lmapi/v3",  # aistudio 大模型 api 服务域名
    )
    completion = client.chat.completions.create(model="ernie-3.5-8k", messages=messages)
    return completion

messages = [
    {
        "role": "system",
        "content": "你是 AI Studio 开发者助理,你精通开发相关的知识,负责给开发者提供搜索帮助建议。",
    }
]

assistant_output = "您好,我是AI Studio 开发者助理,请问有什么能帮助你的吗?"
print(f"""输入:"结束",结束对话
""")
print(f"模型输出:{assistant_output}
")
user_input = ""
while "结束" not in user_input:
    user_input = input("请输入:")
    # 将用户问题信息添加到messages列表中
    messages.append({"role": "user", "content": user_input})
    assistant_output = get_response(messages).choices[0].message.content
    # 将大模型的回复信息添加到messages列表中
    messages.append({"role": "assistant", "content": assistant_output})
    print(f"模型输出:{assistant_output}")
    print("
")
流式输出
import osfrom openai import OpenAI

client = OpenAI(
    api_key=os.environ.get("AI_STUDIO_API_KEY"),  # 含有 AI Studio 访问令牌的环境变量,https://aistudio.baidu.com/account/accessToken,
    base_url="https://aistudio.baidu.com/llm/lmapi/v3",  # aistudio 大模型 api 服务域名)

completion = client.chat.completions.create(
    model="ernie-3.5-8k",
    messages=[
        {'role': 'system', 'content': '你是 AI Studio 实训AI开发平台的开发者助理,你精通开发相关的知识,负责给开发者提供搜索帮助建议。'},
        {'role': 'user', 'content': '你好,请介绍一下AI Studio'}
    ],
    stream=True,
)for chunk in completion:    print(chunk.choices[0].delta.content or "", end="")
异步调用
来自开发者的提醒:在异步调用前使用nest_asyncio.apply(),
原因:Python的asyncio框架默认不允许嵌套时间循环,即在一个已经运行的事件循环中启动另一个事件循环会引发RuntimeError: This event loop is already running 的错误。
nest_asyncio 通过打补丁的方式,允许在已有的事件循环中运行新的事件循环,从而解决了这一限制。
!pip install nest_asyncio
import nest_asyncio
nest_asyncio.apply()
import osfrom openai import AsyncOpenAIimport asyncio

client = AsyncOpenAI(
    api_key=os.environ.get("AI_STUDIO_API_KEY"),  # 含有 AI Studio 访问令牌的环境变量,https://aistudio.baidu.com/account/accessToken,
    base_url="https://aistudio.baidu.com/llm/lmapi/v3",  # aistudio 大模型 api 服务域名)async def main() -> None:
    chat_completion = await client.chat.completions.create(
        messages=[
            {'role': 'system', 'content': '你是 AI Studio 实训AI开发平台的开发者助理,你精通开发相关的知识,负责给开发者提供搜索帮助建议。'},
            {'role': 'user', 'content': '你好,请介绍一下AI Studio'}
        ],
        model="ernie-3.5-8k",
    )    print(chat_completion.choices[0].message.content)


asyncio.run(main())
打印思维链(DeepSeek-R1)
是的,这是DeepSeek-R1的专属功能!
非流式
import osfrom openai import OpenAI

client = OpenAI(
     api_key=os.environ.get("AI_STUDIO_API_KEY"),  # 含有 AI Studio 访问令牌的环境变量,https://aistudio.baidu.com/account/accessToken,
     base_url="https://aistudio.baidu.com/llm/lmapi/v3",  # aistudio 大模型 api 服务域名)

chat_completion = client.chat.completions.create(
    messages=[
        {'role': 'system', 'content': '你是 AI Studio 实训AI开发平台的开发者助理,你精通开发相关的知识,负责给开发者提供搜索帮助建议。'},
        {'role': 'user', 'content': '你好,请介绍一下AI Studio'}
    ],
    model="deepseek-r1",
)print(chat_completion.choices[0].message.reasoning_content)print(chat_completion.choices[0].message.content)
流式
import osfrom openai import OpenAI

client = OpenAI(
    api_key=os.environ.get("AI_STUDIO_API_KEY"),  # 含有 AI Studio 访问令牌的环境变量,https://aistudio.baidu.com/account/accessToken,
    base_url="https://aistudio.baidu.com/llm/lmapi/v3",  # aistudio 大模型 api 服务域名)

completion = client.chat.completions.create(
    model="deepseek-r1",
    messages=[
        {'role': 'system', 'content': '你是 AI Studio 实训AI开发平台的开发者助理,你精通开发相关的知识,负责给开发者提供搜索帮助建议。'},
        {'role': 'user', 'content': '你好,请介绍一下AI Studio'}
    ],
    stream=True,
)for chunk in completion:    if hasattr(chunk.choices[0].delta, 'reasoning_content') and chunk.choices[0].delta.reasoning_content:        print(chunk.choices[0].delta.reasoning_content, end="", flush=True)    else:        print(chunk.choices[0].delta.content, end="", flush=True)
三、星河社区一键部署(推荐)

部署链接:https://aistudio.baidu.com/deploy/mine
AIStudio平台现在可以全自动化部署DeepSeek-R1了!
0.首先点击进入部署页面。
也可以在侧边栏找到一键部署
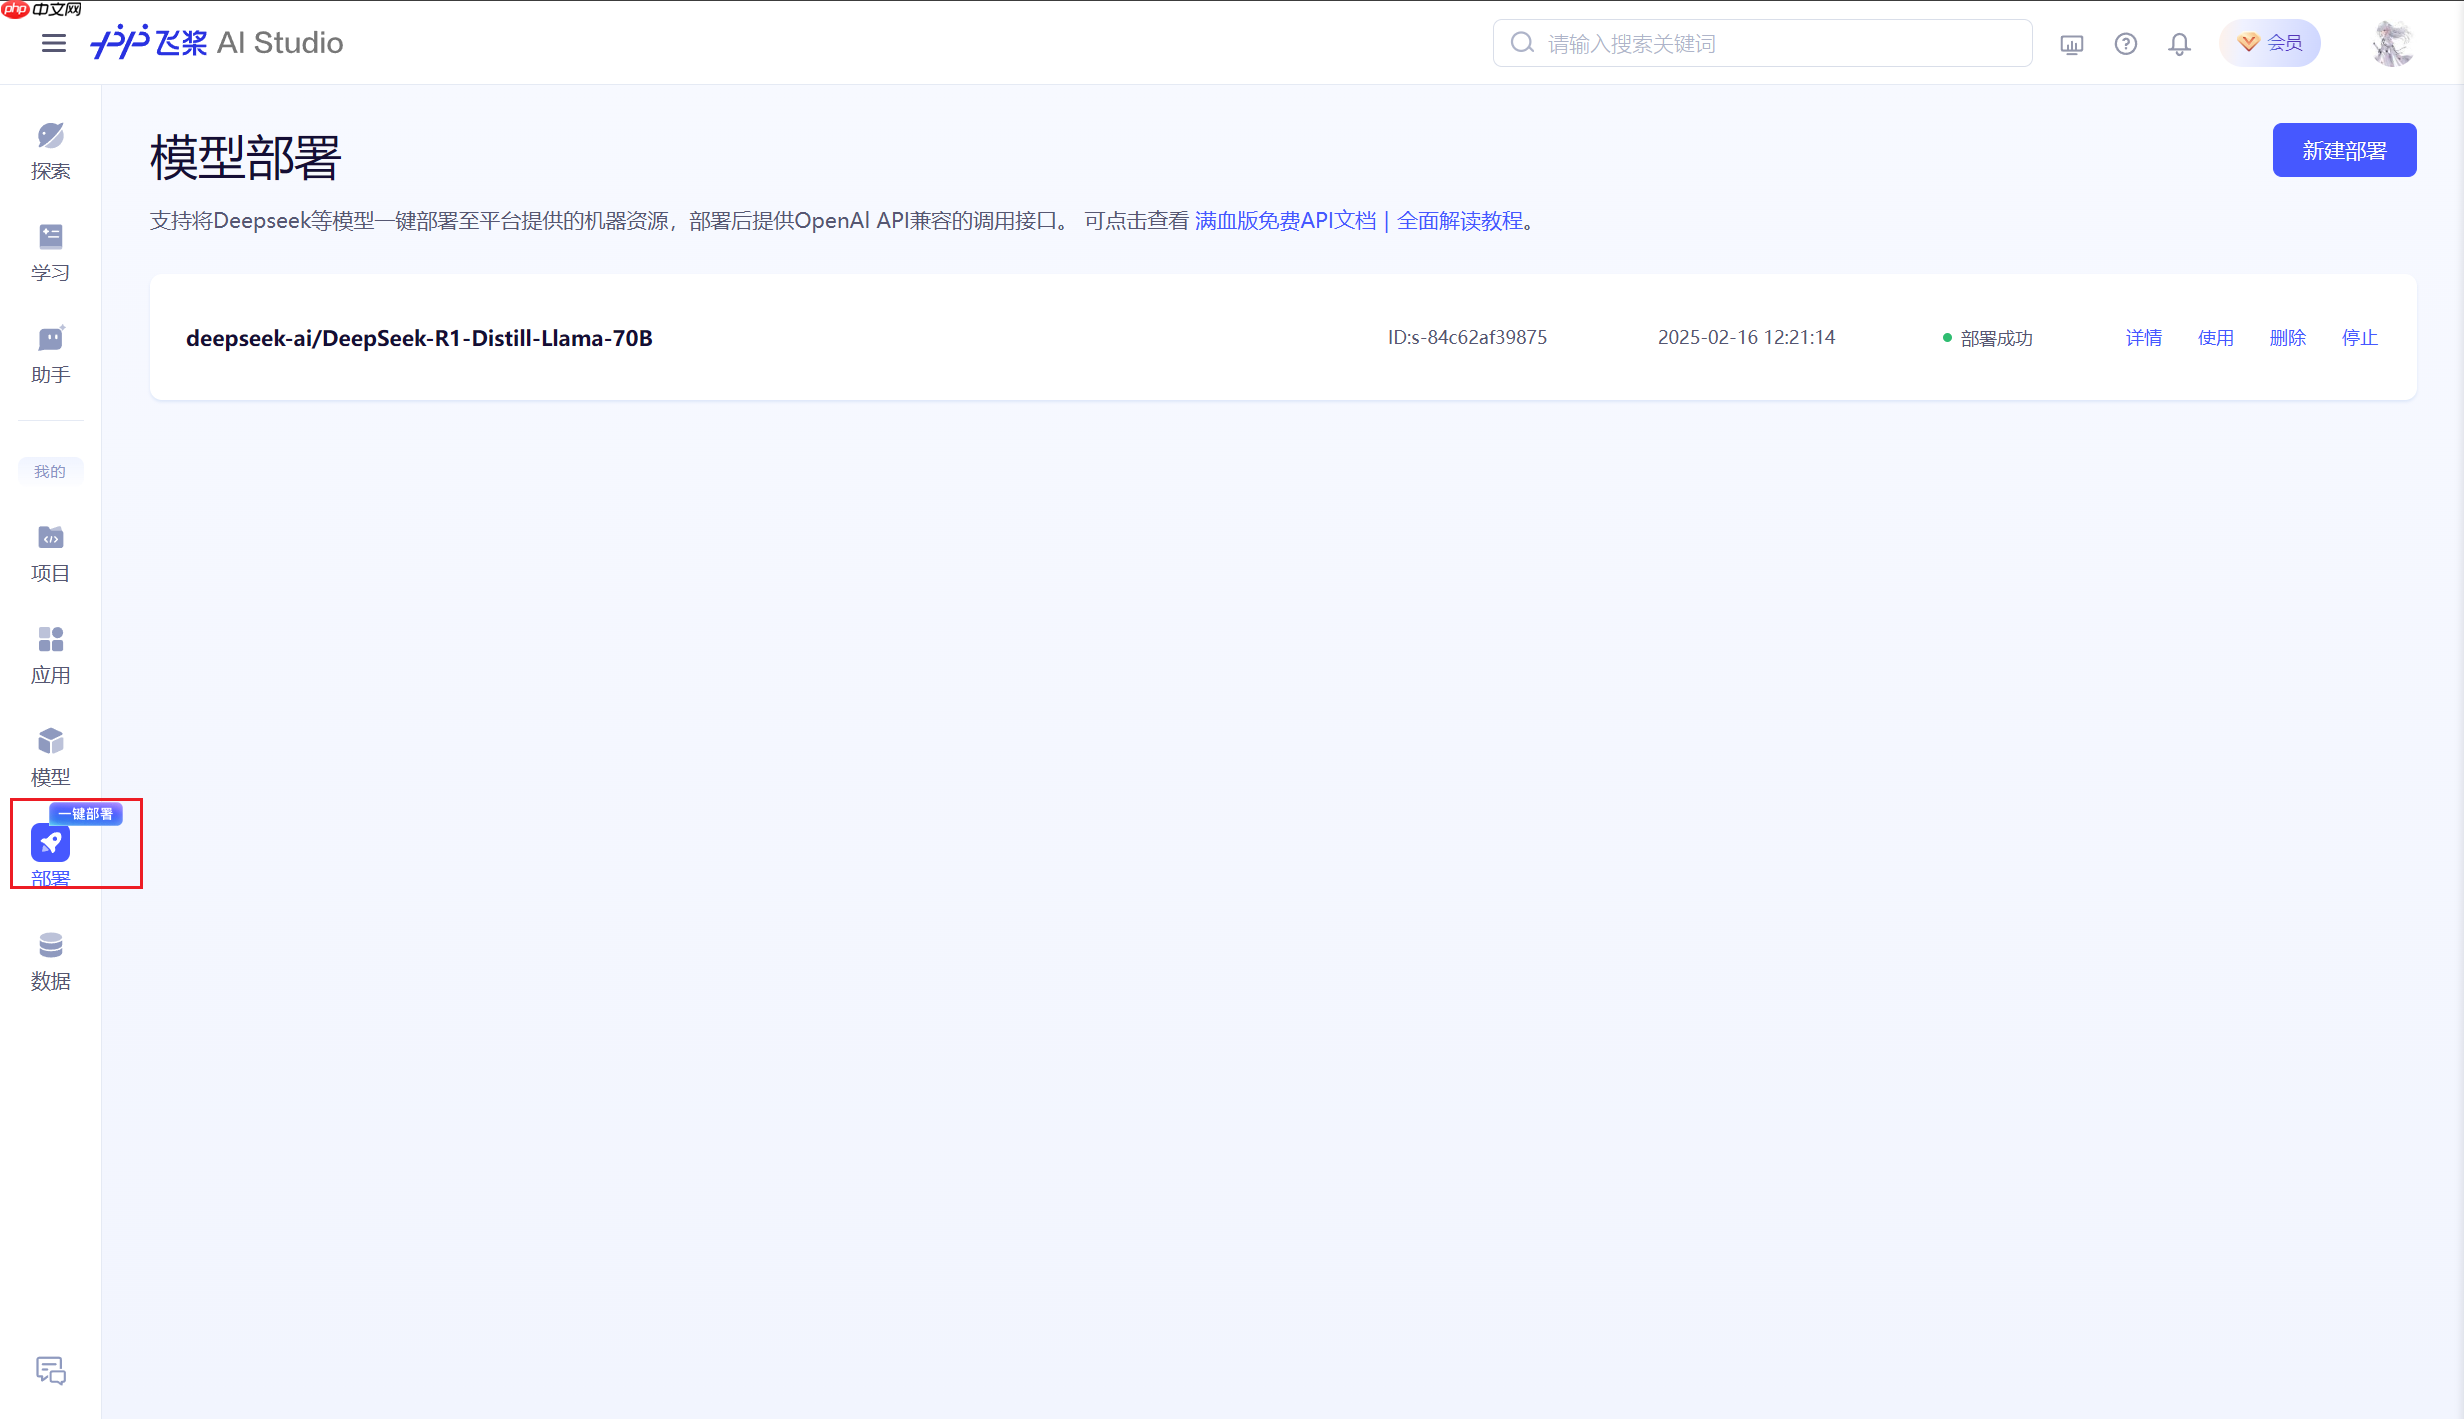

1.进入部署界面后,点击新建部署。
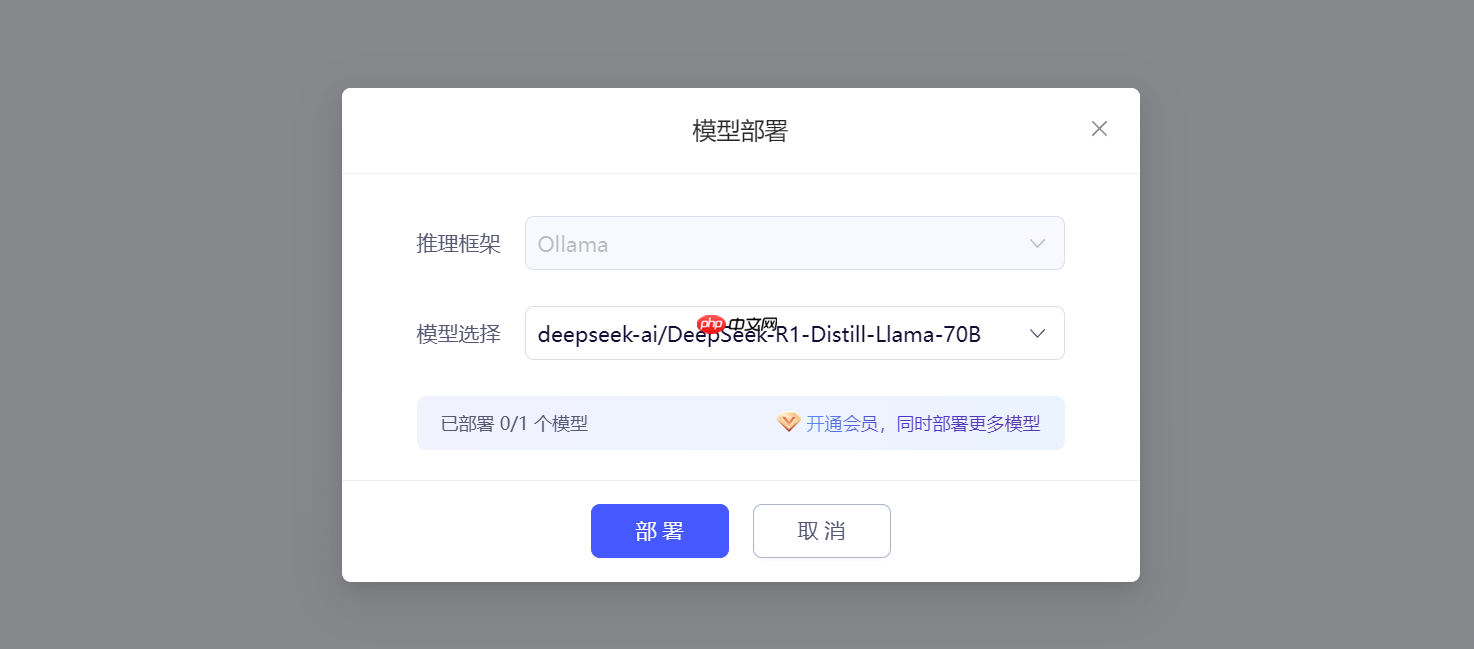
2.模型部署窗口。
- 推理框架:默认选择Ollama,无法更换。
- 模型选择:根据需要自行选择,这里使用deepseek-ai/DeepSeek-R1-Distill-Llama-70B。
选择完成后,点击部署。
3.等待部署成功
当出现下图红框内容时,代表模型部署成功。

4.获取APIKey和BaseURL
单击使用,弹出下图的使用代码。
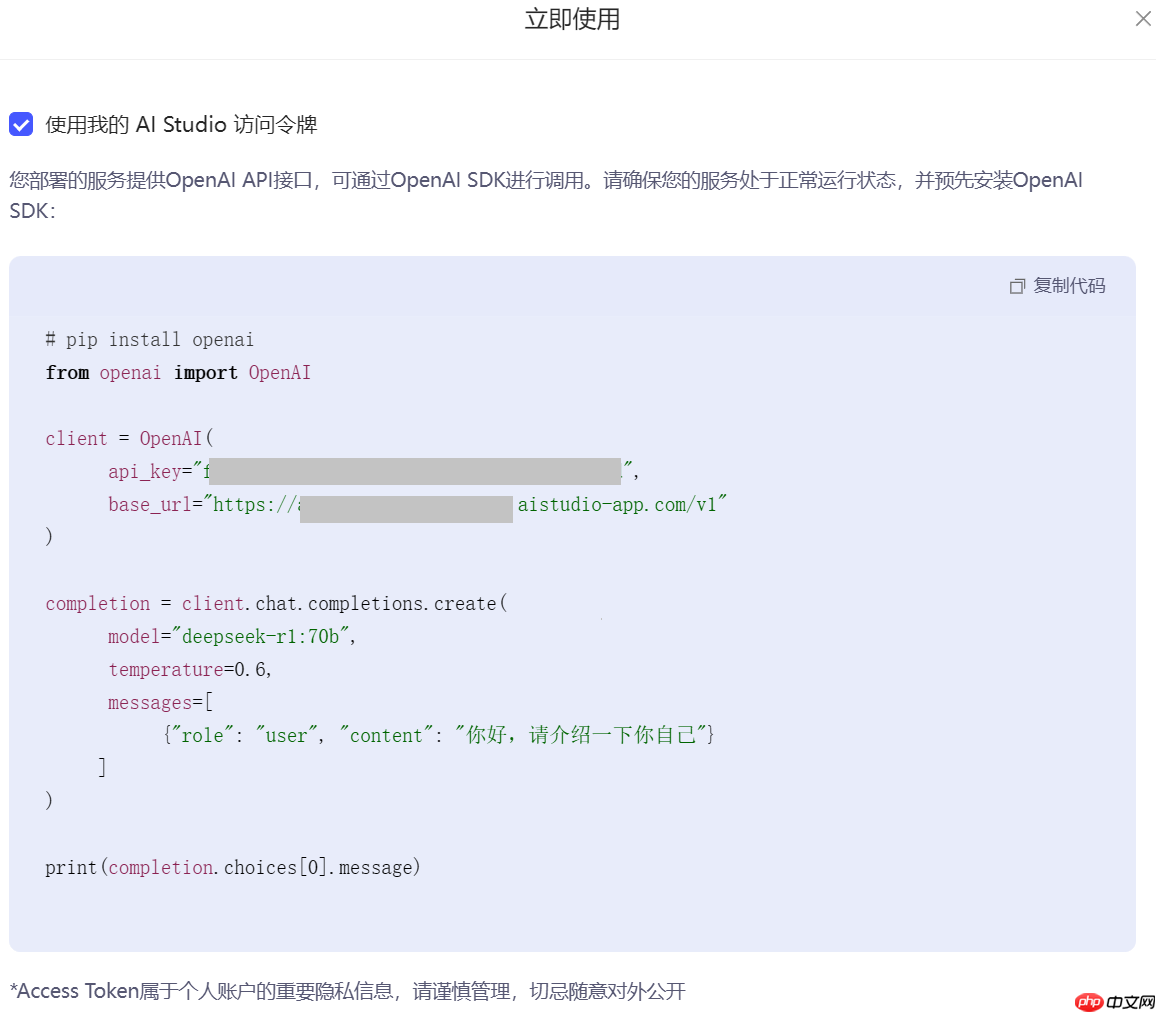
下面做一个测试。
事实上,**二、星河大模型 API 服务(推荐)**中的代码是通用的。
import osfrom openai import OpenAI

client = OpenAI(
    api_key="f3fe51a610b66b6774dd1c20cece21899b94d9fd", # 更换为你的
    base_url="https://api-p5n1pfy5r2g9sez9.aistudio-app.com/v1" # 更换为你的)

chat_completion = client.chat.completions.create(
    model="deepseek-r1:70b", # 根据你部署的版本更改
    messages=[
        {'role': 'system', 'content': 'You are a helpful assistant.'},
        {'role': 'user', 'content': '你好,请介绍一下你自己'}
    ],
    temperature=0.6,  # DeepSeek 官方推荐值)print(chat_completion.choices[0].message.content)
您好!我是由中国的深度求索(DeepSeek)公司开发的智能助手DeepSeek-R1。如您有任何任何问题,我会尽我所能为您提供帮助。 您好!我是由中国的深度求索(DeepSeek)公司开发的智能助手DeepSeek-R1。如您有任何任何问题,我会尽我所能为您提供帮助。

1.环境配置
用于在本地环境中安装并启动 Ollama 服务,通过创建文件夹、解压安装包以及运行服务命令,
以便后续使用 Ollama 进行模型加载和推理等操作,运行成功可看到下图。
# 1. 在根目录下创建`ollama`文件夹!mkdir ollama# 2. 解压ollama!tar -C ollama -xzf data/data315295/ollama-linux-amd64.tgz# 3. 解压deepseek-r1模型!tar -zxvf data/data315295/ollama-models.tar.gz# 4. 复制模型文件到.ollama路径(这是Ollama存放模型的目录, 这样就可以省去从网络下载模型的步骤)!cp -r ./models .ollama# 5. 删除解压的模型文件, 其实3和4可以合并为一步 mv 命令,懒得改了!rm -rf models/
在 Linux 系统中,Ollama 默认将模型存储在 /usr/share/ollama/.ollama/models 目录,
如果一切正常,那么执行tree /home/aistudio/.ollama,应该会得到如下的结构
/home/aistudio/.ollama
└── models
    ├── blobs
    │   ├── sha256-369ca498f347f710d068cbb38bf0b8692dd3fa30f30ca2ff755e211c94768150
    │   ├── sha256-40fb844194b25e429204e5163fb379ab462978a262b86aadd73d8944445c09fd
    │   ├── sha256-6e4c38e1172f42fdbff13edf9a7a017679fb82b0fde415a3e8b3c31c6ed4a4e4
    │   ├── sha256-96c415656d377afbff962f6cdb2394ab092ccbcbaab4b82525bc4ca800fe8a49
    │   └── sha256-f4d24e9138dd4603380add165d2b0d970bef471fac194b436ebd50e6147c6588
    └── manifests
        └── registry.ollama.ai
            └── library
                └── deepseek-r1
                    └── latest
这样,在部署模型时,Ollama就能找到本地的模型权重了。
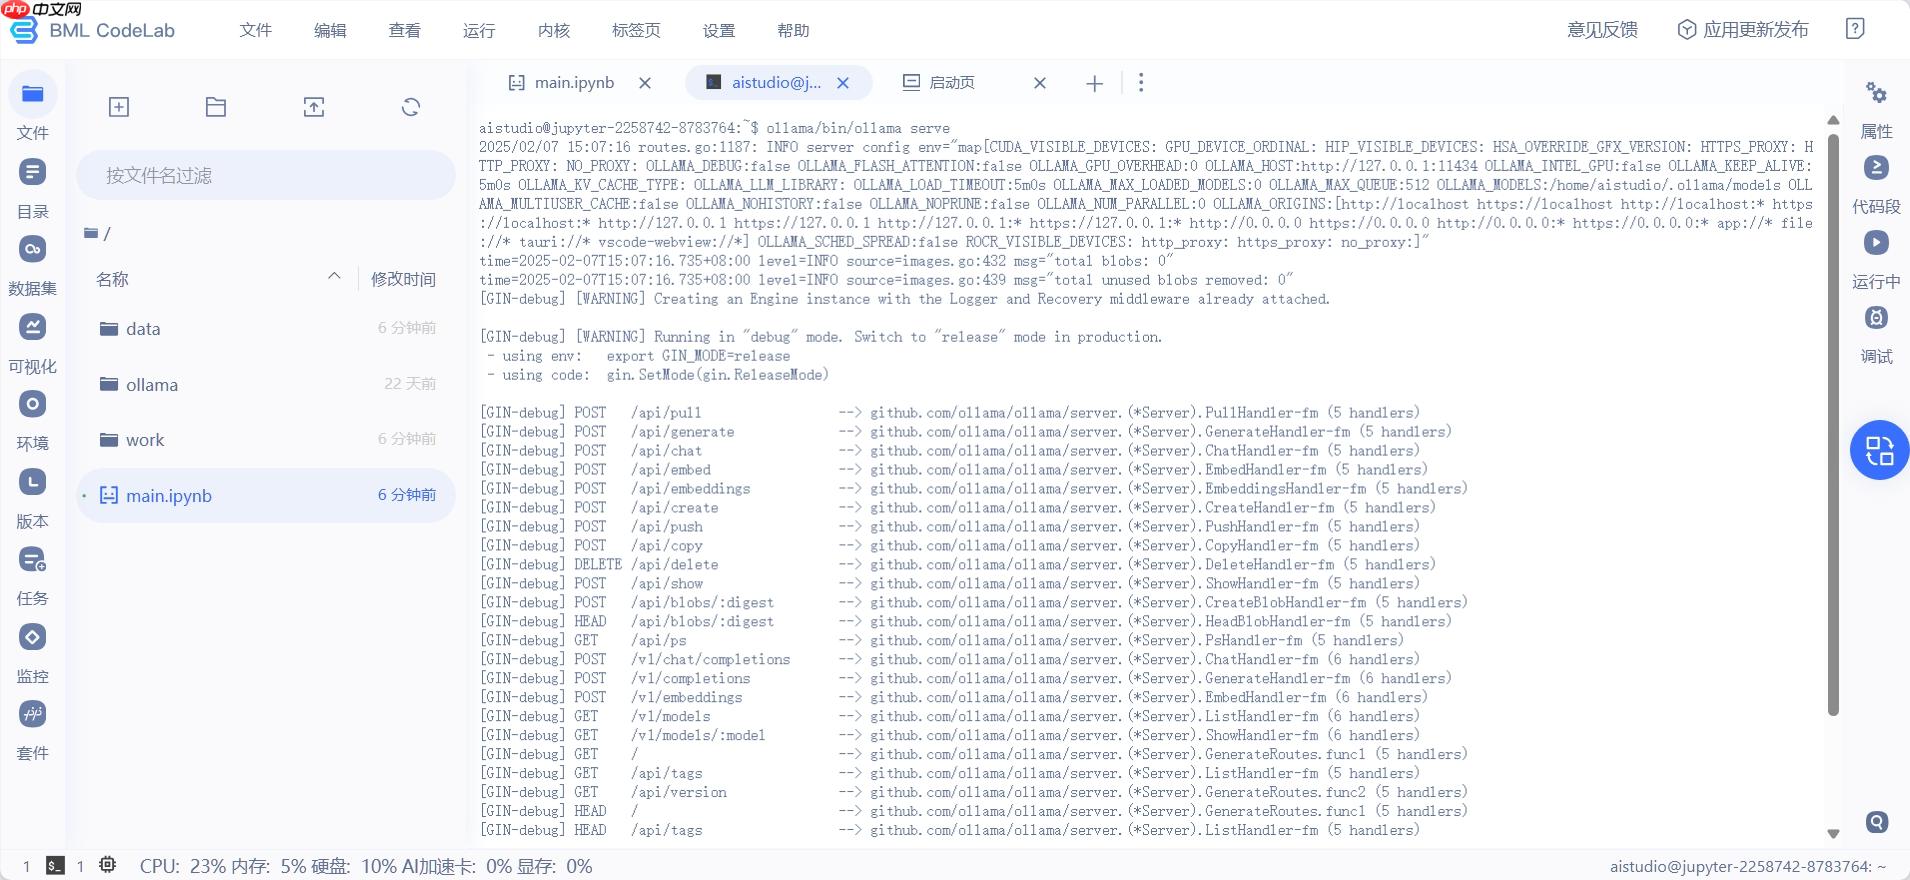
2.启动Ollama服务
在终端中执行如下命令:
ollama/bin/ollama serve
运行成功可看到下图。
通过如下命令可以查看本地已有的模型权重,不需要特意前往终端执行。
# 查看模型!ollama/bin/ollama ls
NAME                  ID              SIZE      MODIFIED
deepseek-r1:latest    0a8c26691023    4.7 GB    About a minute ago
执行成功如下图。

4.快速推理
老样子,配置OpenAI客户端。
二、星河大模型 API 服务(推荐) 中的代码仍然可以使用(配置完客户端后)。
from openai import OpenAI# 配置 OpenAI SDKclient = OpenAI(
    base_url="http://localhost:11434/v1/",  # Ollama 的 API 地址
    api_key="ollama",  # Ollama 的 API 密钥,固定为 "ollama")# 调用模型进行对话chat_completion = client.chat.completions.create(
    messages=[
        {"role": "system", ""}
        {"role": "user", "content": "解释下人工智能、机器学习、深度学习三者的关系。"}
    ],
    model="deepseek-r1",  # 模型名称
    temperature=0.6,
)print(chat_completion.choices[0].message.content)
五、PaddleNLP 3.0部署
严格地将,基于PaddleNLP 3.0部署DeepSeek-R1进行本地访问,这种方式被划分为“调用”类别更合适。
使用PaddleNLP在飞桨星河社区一键迅速部署DeepseekR1,在本地通过API远程访问。
参考项目:【PaddleNLP 3.0】轻松动手玩转DeepSeek-R1
1.环境配置
采用V100和A100环境。执行以下操作即可。
# 自动确认并卸载已安装的 paddlenlp 库!pip uninstall paddlenlp -y# 解压安装PaddleNLP,文件来自PaddleNLP GitHub仓库 develop分支(2025年1月24日)!tar -xf PaddleNLP-20250124124-1801.tgz# 创建一个名为 'external-libraries' 的目录,用于存放安装的外部库(星河平台默认安装库重启后会被清空,所以需要将安装的库放到外部目录中)# 创建环境依赖库,针对不同的GPU环境,请使用者自行切换# !mkdir -p /home/aistudio/external-libraries!tar zxf external-libraries.tgz# !!! 依赖文件已经安装在external-libraries中,无需再次安装,
Found existing installation: paddlenlp 2.8.1
Uninstalling paddlenlp-2.8.1:
  Successfully uninstalled paddlenlp-2.8.1
2.快速推理
# 将自定义的外部库目录添加到系统路径中,以便Python能够导入这些库中的模块import sys
# 添加包含已安装外部库的目录sys.path.insert(0, '/home/aistudio/external-libraries')# 添加PaddleNLP项目的根目录到系统路径,以便可以导入其模块和包sys.path.insert(0, '/home/aistudio/PaddleNLP')
PaddleNLP 3.0 支持模型名称如下:
- deepseek-ai/DeepSeek-R1-Distill-Qwen-1.5B
- deepseek-ai/DeepSeek-R1-Distill-Qwen-7B
- deepseek-ai/DeepSeek-R1-Distill-Qwen-14B (A100 40G环境可以使用)
- deepseek-ai/DeepSeek-R1-Distill-Qwen-32B (A100 40G环境可以使用, wint8量化)
- deepseek-ai/DeepSeek-R1-Distill-Llama-8B
- deepseek-ai/DeepSeek-R1-Distill-Llama-70B (需4卡V100 32G环境)
import paddlefrom llm.predict.predictor import PredictorArgument, ModelArgument, create_predictorfrom paddlenlp.utils import is_paddlenlp_ops_available# 安装paddlenlp_ops算子后需重启内核启用# 支持模型名称# deepseek-ai/DeepSeek-R1-Distill-Qwen-1.5B # deepseek-ai/DeepSeek-R1-Distill-Qwen-7B# deepseek-ai/DeepSeek-R1-Distill-Qwen-14B (A100 40G环境可以使用)# deepseek-ai/DeepSeek-R1-Distill-Qwen-32B (A100 40G环境可以使用wint8量化)# deepseek-ai/DeepSeek-R1-Distill-Llama-8B# deepseek-ai/DeepSeek-R1-Distill-Llama-70B (需4卡V100 32G环境)predictor_args = PredictorArgument(
    model_name_or_path="deepseek-ai/DeepSeek-R1-Distill-Qwen-1.5B",
    src_length=1024,
    min_length=32,
    max_length=2048,
    top_k=0,
    top_p=0.7,
    temperature=0.95,
    repetition_penalty=1.0,
    dtype="float16",
    inference_model= True if is_paddlenlp_ops_available() else False,    # quant_type="weight_only_int8",)

paddle.set_default_dtype(predictor_args.dtype)
predictor = create_predictor(predictor_args, ModelArgument())
/opt/conda/envs/python35-paddle120-env/lib/python3.10/site-packages/paddle/utils/cpp_extension/extension_utils.py:686: UserWarning: No ccache found. Please be aware that recompiling all source files may be required. You can download and install ccache from: https://github.com/ccache/ccache/blob/master/doc/INSTALL.md warnings.warn(warning_message) /home/aistudio/external-libraries/tqdm/auto.py:21: TqdmWarning: IProgress not found. Please update jupyter and ipywidgets. See https://ipywidgets.readthedocs.io/en/stable/user_install.html from .autonotebook import tqdm as notebook_tqdm /opt/conda/envs/python35-paddle120-env/lib/python3.10/site-packages/_distutils_hack/__init__.py:31: UserWarning: Setuptools is replacing distutils. Support for replacing an already imported distutils is deprecated. In the future, this condition will fail. Register concerns at https://github.com/pypa/setuptools/issues/new?template=distutils-deprecation.yml warnings.warn([2025-02-16 14:27:11,438] [ WARNING] - The paddlenlp_ops package is not installed. you can read the docs and install it by hand, you can refer to: https://github.com/PaddlePaddle/PaddleNLP/blob/develop/csrc/README.md (…)-Distill-Qwen-1.5B/tokenizer_config.json: 100%|██████████| 3.06k/3.06k [00:00<00:00, 6.91MB/s] (…)Seek-R1-Distill-Qwen-1.5B/tokenizer.json: 100%|██████████| 7.03M/7.03M [00:00<00:00, 226MB/s] (…)eepSeek-R1-Distill-Qwen-1.5B/config.json: 100%|██████████| 673/673 [00:00<00:00, 3.61MB/s][2025-02-16 14:27:12,133] [ INFO] - Loading configuration file /home/aistudio/.paddlenlp/models/deepseek-ai/DeepSeek-R1-Distill-Qwen-1.5B/config.json[2025-02-16 14:27:12,135] [ INFO] - We are usingto load 'deepseek-ai/DeepSeek-R1-Distill-Qwen-1.5B'.[2025-02-16 14:27:12,135] [ INFO] - Loading configuration file /home/aistudio/.paddlenlp/models/deepseek-ai/DeepSeek-R1-Distill-Qwen-1.5B/config.json (…)k-R1-Distill-Qwen-1.5B/model.safetensors: 100%|██████████| 3.55G/3.55G [00:39<00:00, 89.2MB/s][2025-02-16 14:27:52,188] [ INFO] - Loading weights file from cache at /home/aistudio/.paddlenlp/models/deepseek-ai/DeepSeek-R1-Distill-Qwen-1.5B/model.safetensors[2025-02-16 14:27:57,559] [ INFO] - Loaded weights file from disk, setting weights to model. W0216 14:27:57.575721 533 gpu_resources.cc:119] Please NOTE: device: 0, GPU Compute Capability: 7.0, Driver API Version: 12.0, Runtime API Version: 11.8 W0216 14:27:57.581272 533 gpu_resources.cc:164] device: 0, cuDNN Version: 8.9.[2025-02-16 14:28:52,828] [ INFO] - All model checkpoint weights were used when initializing Qwen2ForCausalLM.[2025-02-16 14:28:52,830] [ INFO] - All the weights of Qwen2ForCausalLM were initialized from the model checkpoint at deepseek-ai/DeepSeek-R1-Distill-Qwen-1.5B. If your task is similar to the task the model of the checkpoint was trained on, you can already use Qwen2ForCausalLM for predictions without further training. (…)Distill-Qwen-1.5B/generation_config.json: 100%|██████████| 181/181 [00:00<00:00, 691kB/s][2025-02-16 14:28:52,883] [ INFO] - Loading configuration file /home/aistudio/.paddlenlp/models/deepseek-ai/DeepSeek-R1-Distill-Qwen-1.5B/generation_config.json /home/aistudio/PaddleNLP/paddlenlp/generation/configuration_utils.py:250: UserWarning: using greedy search strategy. However, `temperature` is set to `0.6` -- this flag is only used in sample-based generation modes. You should set `decode_strategy="greedy_search" ` or unset `temperature`. This was detected when initializing the generation config instance, which means the corresponding file may hold incorrect parameterization and should be fixed. warnings.warn( /home/aistudio/PaddleNLP/paddlenlp/generation/configuration_utils.py:255: UserWarning: using greedy search strategy. However, `top_p` is set to `0.95` -- this flag is only used in sample-based generation modes. You should set `decode_strategy="greedy_search" ` or unset `top_p`. This was detected when initializing the generation config instance, which means the corresponding file may hold incorrect parameterization and should be fixed. warnings.warn([2025-02-16 14:28:53,079] [ INFO] - Loading configuration file /home/aistudio/.paddlenlp/models/deepseek-ai/DeepSeek-R1-Distill-Qwen-1.5B/config.json[2025-02-16 14:28:53,080] [ INFO] - Loading configuration file /home/aistudio/.paddlenlp/models/deepseek-ai/DeepSeek-R1-Distill-Qwen-1.5B/generation_config.json
from IPython.display import Markdown
input_text = "介绍下现代自然语言处理的基石Transformer架构。"result = predictor.predict(input_text)[0]
output = result.replace("\n", "```\n").replace(" \n", "```\n")
Markdown(output)3.云服务部署
参考项目:基于PaddleNLP 3.0部署DeepSeek-R1进行本地访问
在Aistudio开启一个flask服务,即可在V100上部署R1,并在本地访问,将DeepSeek嵌入到各个子模块中了。
快速部署
本项目提供了sever.py文件,可以快速部署。
请务必按顺序执行前两个小节。
1.点击左上角的应用更新发布 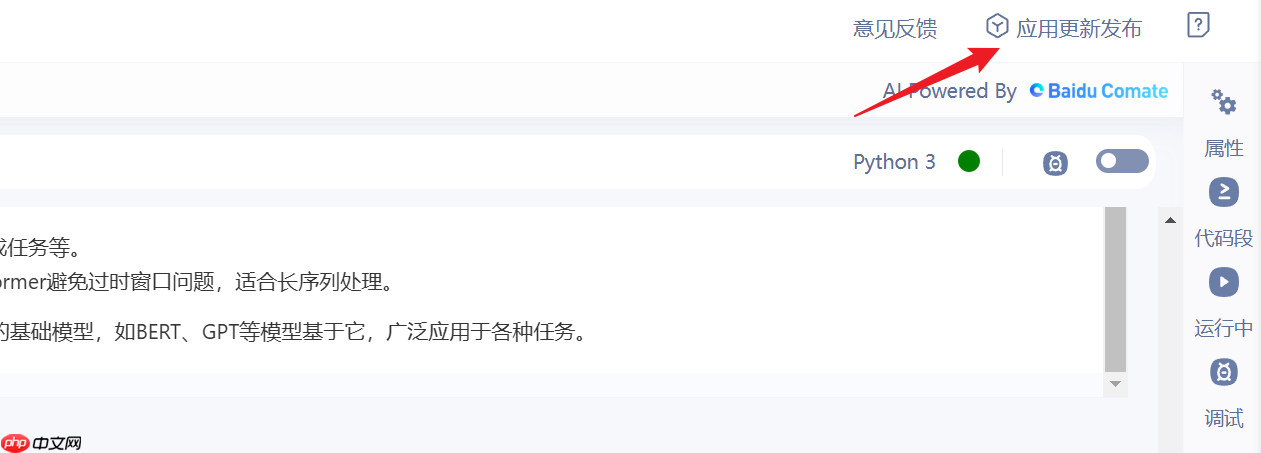
2.选择独占机器,选择下一步
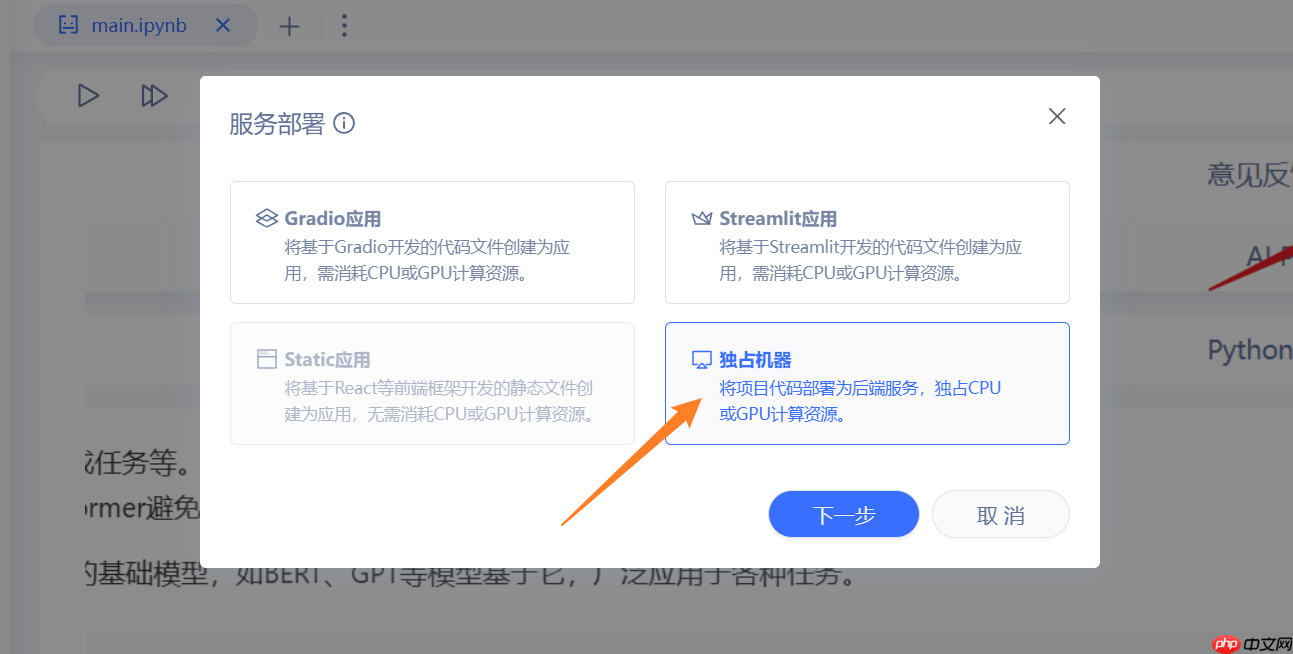
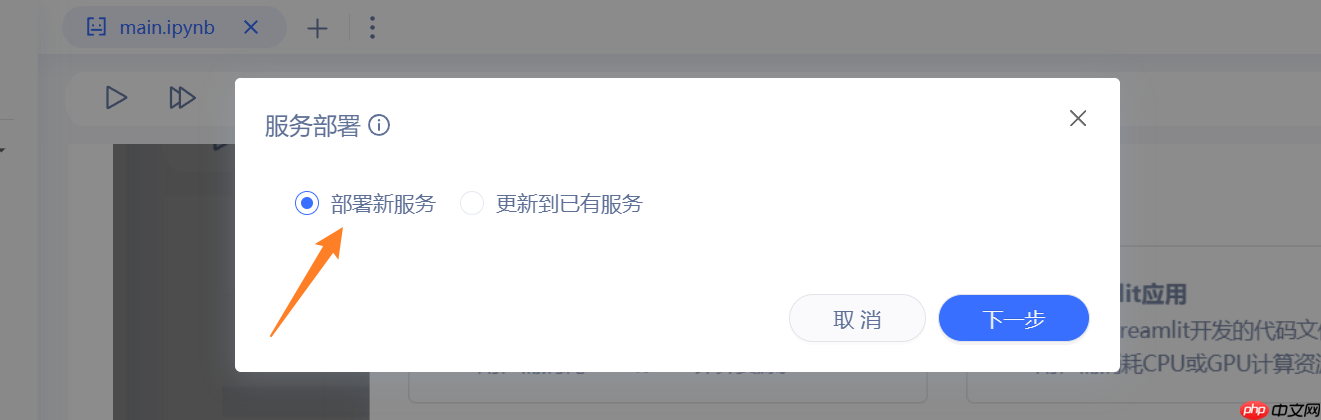
3.选择部署新服务,选择下一步
4.填入启动参数之后
- 1.服务启动命令: python server.py
- 2.部署包目录: 不要修改
- 3.监听端口: 不要修改
- 4.选择环境: 至尊版GPU
- 5.访问等级: 都可以;私有要鉴权, 公开大家都能用。
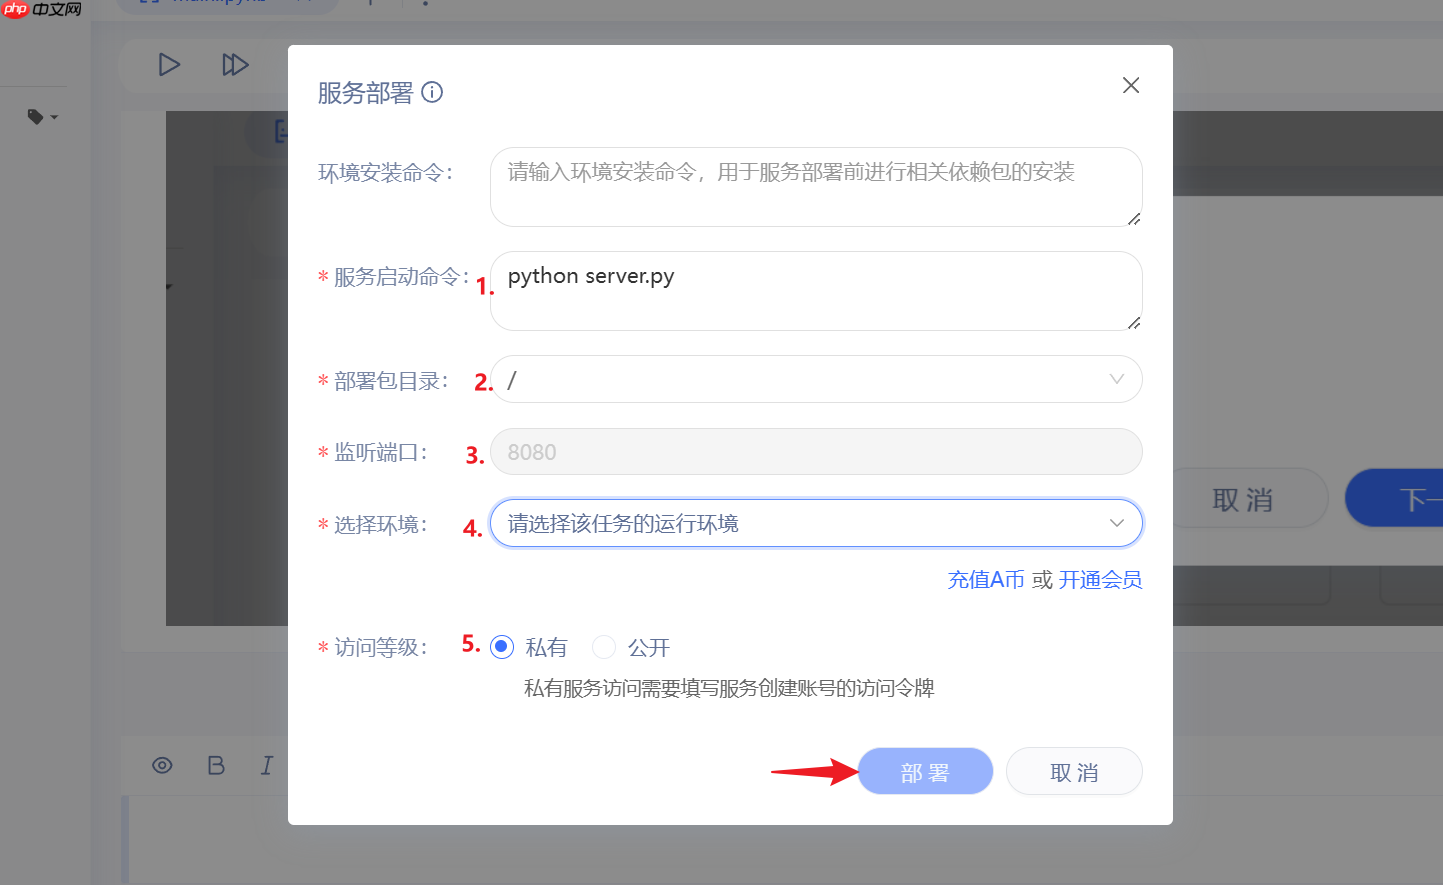
5.最后点击部署,等待一段时间(可能10分钟还要久),即可
调用模型
需要从项目界面的服务部署子页面,获取AI Studio的API_URL,记录下。
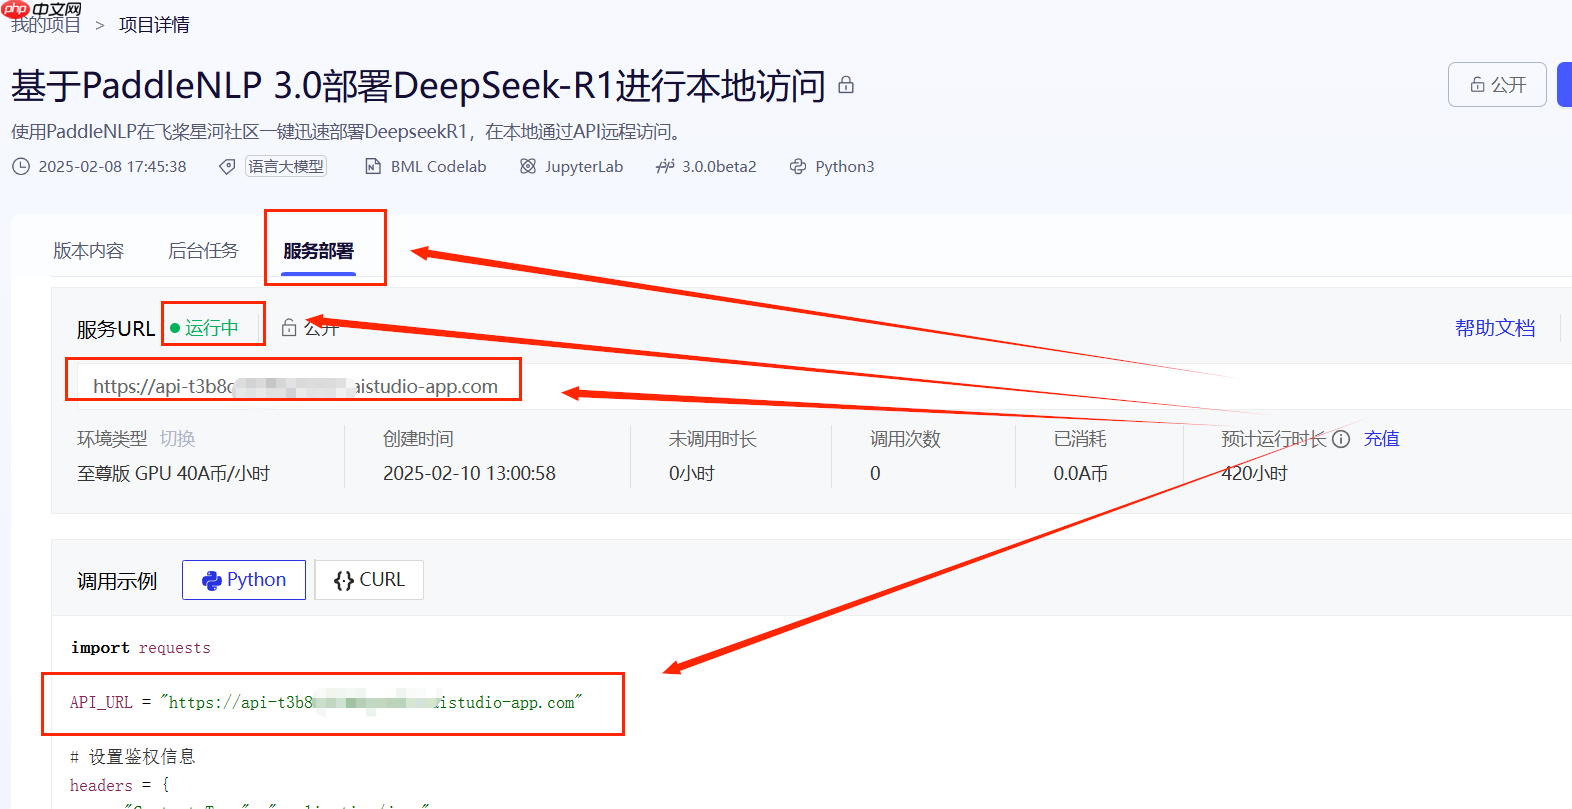
将下面代码中的API_URL替换为你的API_URL,调整input_text即可执行。
与前面若干种方法不同的是,这种方法不支持OpenAI库,也不支持与大模型多轮对话,只能单向获得回复。
import requests

API_URL = "https://***************.aistudio-app.com" # AI Studio接口地址input_text = "《诗三百》收录了多少篇李白的诗歌?" # 输入文本# 请求头headers = {    "Content-Type": "application/json"}# 发送请求response = requests.post(API_URL, json={'input_text': input_text}, headers=headers, timeout=3600, verify=False)print(response.content.decode('utf-8'))
自定义服务端
服务端使用的模型是deepseek-ai/DeepSeek-R1-Distill-Qwen-1.5B,如果希望替换为其他模型,可以修改 server.py 第14行。
PaddleNLP 3.0 支持模型名称如下:
- deepseek-ai/DeepSeek-R1-Distill-Qwen-1.5B
- deepseek-ai/DeepSeek-R1-Distill-Qwen-7B
- deepseek-ai/DeepSeek-R1-Distill-Qwen-14B (A100 40G环境可以使用)
- deepseek-ai/DeepSeek-R1-Distill-Qwen-32B (A100 40G环境可以使用, wint8量化)
- deepseek-ai/DeepSeek-R1-Distill-Llama-8B
- deepseek-ai/DeepSeek-R1-Distill-Llama-70B (需4卡V100 32G环境)
如果你想丰富服务端的功能,可以修改 32行 到 41行。
@app.route('/', methods=['POST'])def home():
# 从POST请求中获取input_text
input_text = request.json.get('input_text', "") print(f"input_text: {input_text}")
result = predictor.predict(input_text)[0] # output = result.replace("\n", "```\n").replace(" \n", "```\n")
print(f"result: {result}")
return result