本文以心脏病预测为例,介绍基于飞桨搭建简单神经网络的过程。先说明项目背景与数据集,含年龄、性别等特征及是否发病标签。接着处理数据,包括检查缺失值、统计量、相关性,进行独热编码和归一化。随后搭建神经网络,设置超参数,经6轮训练,训练集正确率0.845,测试集0.84,最后展示预测结果,为深度学习入门者提供参考。
☞☞☞AI 智能聊天, 问答助手, AI 智能搜索, 免费无限量使用 DeepSeek R1 模型☜☜☜

随着对机器学习的学习,对更进一步的深度学习产生了浓厚的兴趣,并尝试使用了一些开发套件进行深度学习的尝试,但由于使用的是现成的套件,对神经网络的原理以及过程并不能详细的了解。为了更进一步的学习,笔者尝试手动搭建一个简单的神经网络并训练使用。
本文以心脏病发展分析和预测数据集为例,搭建神经网络对心脏病的发作进行预测。
#解压数据集至work文件夹!unzip '/home/aistudio/data/data99207/心脏病发作分析和预测数据集.zip' -d work/ -yimport pandas as pd
data = pd.read_csv('./work/heart.csv')#数据展现data.head()Archive: /home/aistudio/data/data99207/心脏病发作分析和预测数据集.zip caution: filename not matched: -y
   age  sex  cp  trtbps  chol  fbs  restecg  thalachh  exng  oldpeak  slp  \
0   63    1   3     145   233    1        0       150     0      2.3    0
1   37    1   2     130   250    0        1       187     0      3.5    0
2   41    0   1     130   204    0        0       172     0      1.4    2
3   56    1   1     120   236    0        1       178     0      0.8    2
4   57    0   0     120   354    0        1       163     1      0.6    2

   caa  thall  output
0    0      1       1
1    0      2       1
2    0      2       1
3    0      2       1
4    0      2       1
本文旨在学习手写搭建神经网络的完整过程,所以仅使用了一个简单的神经网络,当需要使用更为复杂的网络时,仅需对网络的定义进行调整。
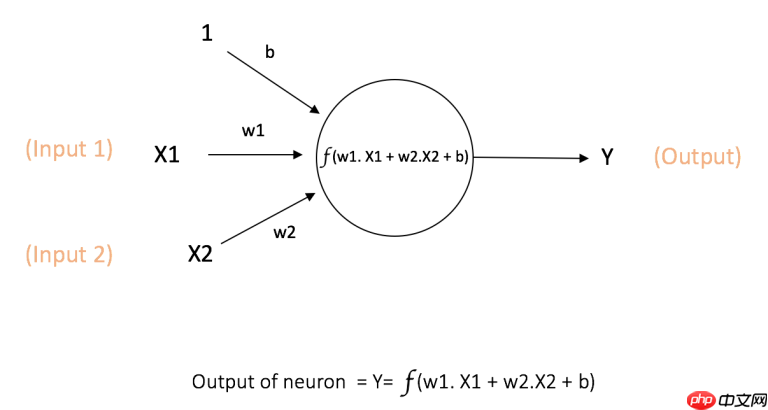
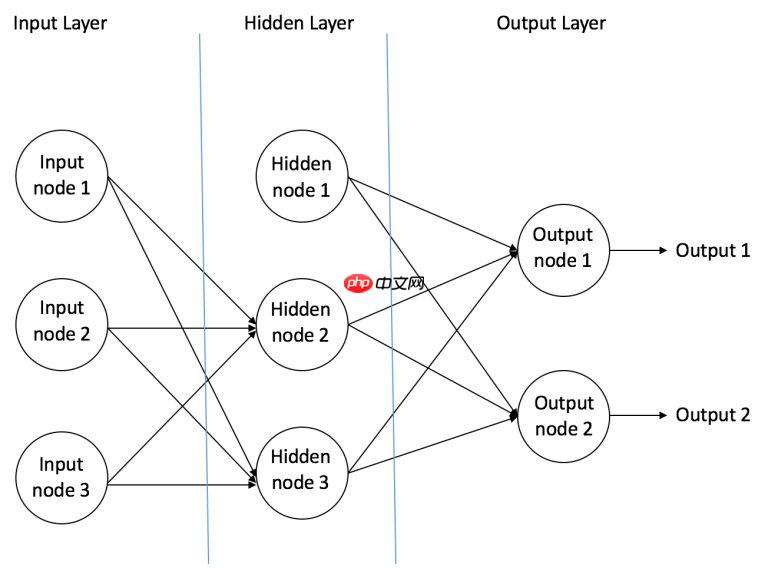
这里简单介绍一下神经网络的原理,神经网络由众多神经元构成。它可以接受来自其他神经元的输入或者是外部的数据,然后计算一个输出。神经元的计算过程如图所示: 当众多神经元排列连接,构成了神经网络中的层,层与层相互连接构成了最为简单的神经网络,如图所示:
 当然只有前向的传播计算是不够的,各个神经元之间需要用损失函数来计算训练结果与实际的误差,再通过优化器(即各种梯度下降的方法)来更新权值,这就是反向传播的过程。这个过程会不断的重复,直到误差低于我们设定好的要求。这时一整个神经网络的计算就完成了。 下图展示了一个MLP的反向传播的过程:
在训练各种模型时,对数据的处理与探索是非常重要的一环,直接影响的模型的训练速度和精度,所以笔者单独列出对数据的处理过程进行展示
我们实际应用的数据常常会碰到缺失与异常的情况,所以对数据集进行缺失与异常的检查并进一步处理是必要的。
本文由于数据是完整的,并没有展示对缺失值与异常值处理的过程
import numpy as npimport matplotlib.pyplot as pltimport seaborn as snsimport paddle#数据缺失值检查print(data.isnull().sum())
age         0
sex         0
cp          0
trtbps      0
chol        0
fbs         0
restecg     0
thalachh    0
exng        0
oldpeak     0
slp         0
caa         0
thall       0
output      0
dtype: int64
在完成数据的完整性检查后,我们还需要对数据有一个初步的了解,本文只选择了数据的统计量进行简单的查看。
#数据统计量展现data.describe()
              age         sex          cp      trtbps        chol         fbs  \
count  303.000000  303.000000  303.000000  303.000000  303.000000  303.000000
mean    54.366337    0.683168    0.966997  131.623762  246.264026    0.148515
std      9.082101    0.466011    1.032052   17.538143   51.830751    0.356198
min     29.000000    0.000000    0.000000   94.000000  126.000000    0.000000
25%     47.500000    0.000000    0.000000  120.000000  211.000000    0.000000
50%     55.000000    1.000000    1.000000  130.000000  240.000000    0.000000
75%     61.000000    1.000000    2.000000  140.000000  274.500000    0.000000
max     77.000000    1.000000    3.000000  200.000000  564.000000    1.000000

          restecg    thalachh        exng     oldpeak         slp         caa  \
count  303.000000  303.000000  303.000000  303.000000  303.000000  303.000000
mean     0.528053  149.646865    0.326733    1.039604    1.399340    0.729373
std      0.525860   22.905161    0.469794    1.161075    0.616226    1.022606
min      0.000000   71.000000    0.000000    0.000000    0.000000    0.000000
25%      0.000000  133.500000    0.000000    0.000000    1.000000    0.000000
50%      1.000000  153.000000    0.000000    0.800000    1.000000    0.000000
75%      1.000000  166.000000    1.000000    1.600000    2.000000    1.000000
max      2.000000  202.000000    1.000000    6.200000    2.000000    4.000000

            thall      output
count  303.000000  303.000000
mean     2.313531    0.544554
std      0.612277    0.498835
min      0.000000    0.000000
25%      2.000000    0.000000
50%      2.000000    1.000000
75%      3.000000    1.000000
max 3.000000 1.000000#相关性热图,以初步查看自变量对结果的影响程度plt.figure(figsize=(10,10)) sns.heatmap(data.corr(),annot=True,fmt='.1f') plt.show()
/opt/conda/envs/python35-paddle120-env/lib/python3.7/site-packages/matplotlib/cbook/__init__.py:2349: DeprecationWarning: Using or importing the ABCs from 'collections' instead of from 'collections.abc' is deprecated, and in 3.8 it will stop working
  if isinstance(obj, collections.Iterator):
/opt/conda/envs/python35-paddle120-env/lib/python3.7/site-packages/matplotlib/cbook/__init__.py:2366: DeprecationWarning: Using or importing the ABCs from 'collections' instead of from 'collections.abc' is deprecated, and in 3.8 it will stop working
  return list(data) if isinstance(data, collections.MappingView) else data
/opt/conda/envs/python35-paddle120-env/lib/python3.7/site-packages/matplotlib/colors.py:101: DeprecationWarning: np.asscalar(a) is deprecated since NumPy v1.16, use a.item() instead
  ret = np.asscalar(ex)
<Figure size 720x720 with 2 Axes>
在对数据有进一步的了解之后,我们需要对数据的结构进行处理,以方便其对神经网络进行输入,并且需要根据实际的需求,对数据进行增广、压缩、增强等操作,目的是为了模型更为高效。
#由于cp,restecg,slp,thall是非顺序型的多分类变量,需进行进行独热编码a = pd.get_dummies(data['cp'], prefix = "cp")
b = pd.get_dummies(data['restecg'], prefix = "restecg")
c = pd.get_dummies(data['slp'], prefix = "slope")
d = pd.get_dummies(data['thall'], prefix = "thall")
data = pd.concat([data,a,b,c,d], axis = 1)
data = data.drop(columns = ['cp','restecg','slp', 'thall'])
data.head()
   age  sex  trtbps  chol  fbs  thalachh  exng  oldpeak  caa  output  ...  \
0   63    1     145   233    1       150     0      2.3    0       1  ...
1   37    1     130   250    0       187     0      3.5    0       1  ...
2   41    0     130   204    0       172     0      1.4    0       1  ...
3   56    1     120   236    0       178     0      0.8    0       1  ...
4   57    0     120   354    0       163     1      0.6    0       1  ...

   restecg_0  restecg_1  restecg_2  slope_0  slope_1  slope_2  thall_0  \
0          1          0          0        1        0        0        0
1          0          1          0        1        0        0        0
2          1          0          0        0        0        1        0
3          0          1          0        0        0        1        0
4          0          1          0        0        0        1        0

   thall_1  thall_2  thall_3
0        1        0        0
1        0        1        0
2        0        1        0
3        0        1        0
4        0        1        0

[5 rows x 24 columns]
#最后对数据集进行划分,并归一化,完成数据预处理from sklearn.model_selection import train_test_splitfrom sklearn.preprocessing import StandardScaler
X = data.drop(['output'], axis = 1)#删除['outout']特征y = data.output.values
X_train,X_test,y_train,y_test = train_test_split(X,y,random_state=6)  #随机种子6,划分训练集与测试集standardScaler = StandardScaler()
standardScaler.fit(X_train)
X_train = standardScaler.transform(X_train)
X_test = standardScaler.transform(X_test)#对训练集与测试集归一化,使模型能更好的收敛y_train=y_train.reshape(y_train.shape[0],1)
y_test=y_test.reshape(y_test.shape[0],1)#由于在计算模型的评价指标时(x,)的数据会报错,所以需要进行转换
#定义网络class Net(paddle.nn.Layer):
    def __init__(self):
        super(Net,self).__init__()
        self.fc1 = paddle.nn.Linear(in_features=23,out_features=100)
        self.fc2 = paddle.nn.Linear(in_features=100,out_features=100)
        self.fc3 = paddle.nn.Linear(in_features=100,out_features=2)#输出向量的维度需要根据分类结果进行选择


    def forward(self,x):
        x=self.fc1(x)
        x=self.fc2(x)
        x=self.fc3(x)        return x
net=Net()W0223 00:07:17.249727 4104 device_context.cc:447] Please NOTE: device: 0, GPU Compute Capability: 7.0, Driver API Version: 10.1, Runtime API Version: 10.1 W0223 00:07:17.254323 4104 device_context.cc:465] device: 0, cuDNN Version: 7.6.
#超参数设置# 设置迭代次数epochs = 6#损失函数:交叉熵loss_func = paddle.nn.CrossEntropyLoss()#优化器opt = paddle.optimizer.Adam(learning_rate=0.1,parameters=net.parameters())
#训练程序for epoch in range(epochs):
    all_acc = 0
    for i in range(X_train.shape[0]):
        x = paddle.to_tensor([X_train[i]],dtype="float32")
        y = paddle.to_tensor([y_train[i]],dtype="int64")
        infer_y = net(x)
        loss = loss_func(infer_y,y)
        loss.backward()
        acc= paddle.metric.accuracy(infer_y,y)
        all_acc=all_acc+acc.numpy()
        opt.step()
        opt.clear_gradients#清除梯度
        #print("epoch: {}, loss is: {},acc is:{}".format(epoch, loss.numpy(),acc.numpy()))由于输出过长,这里注释掉了
print("第{}次正确率为:{}".format(epoch+1,all_acc/i))第1次正确率为:[0.7300885] 第2次正确率为:[0.8053097] 第3次正确率为:[0.8362832] 第4次正确率为:[0.7920354] 第5次正确率为:[0.71681416] 第6次正确率为:[0.84513277]
#测试集数据运行net.eval()#模型转换为测试模式all_acc = 0for i in range(X_test.shape[0]):
        x = paddle.to_tensor([X_test[i]],dtype="float32")
        y = paddle.to_tensor([y_test[i]],dtype="int64")
        infer_y = net(x)    # 计算损失与精度
        loss = loss_func(infer_y, y)
        acc = paddle.metric.accuracy(infer_y, y)
        all_acc = all_acc+acc.numpy()    # 打印信息
#print("loss is: {}, acc is: {}".format(loss.numpy(), acc.numpy()))print("测试集正确率:{}".format(all_acc/i))测试集正确率:[0.84]
#预测结果展示net.eval()
x = paddle.to_tensor([X_train[1]],dtype="float32")
y = paddle.to_tensor([y_train[1]],dtype="int64")
infer_y = net(x)# 计算损失与精度loss = loss_func(infer_y, y)# 打印信息print("X_train[1] is :{}\n y_train[1] is :{}\n predict is {}".format(X_train[1],y_train[1],np.argmax(infer_y.numpy()[0])))X_train[1] is :[-1.48235364 -1.49761715 -1.12562388 0.45148196 -0.382707 0.96548999 1.46723474 -0.89784884 -0.6964023 -0.92771533 -0.44128998 1.54533482 -0.29346959 0.99560437 -0.96110812 -0.13392991 -0.27537136 -0.93596638 1.07791686 -0.0942809 -0.23624977 0.91139737 -0.8030738 ] y_train[1] is :[1] predict is 1
可以看到,模型在训练集上的准确率为0.845,在测试集上的准确率在0.84,并且我们抽取了一个数据进行预测,进行更为直观的展示,模型的预测结果与实际相符。
本文对一个项目使用神经网络建模并预测使用的过程进行了一个较为完整的展示,包括了数据探索,数据处理,模型训练,模型评价等,并且在使用神经网络时采取了使用基础api进行组网的方式,希望能对刚了解深度学习并想要尝试的同学有所启发
浙江工业大学之江学院 理学院 数据科学与大数据技术专业 2019级 本科生 汪哲瑜
我在AI Studio上获得青铜等级,点亮1个徽章,来互关呀~ https://aistudio.baidu.com/aistudio/personalcenter/thirdview/761690
以上就是基于飞桨的简单神经网络搭建—以心脏病的预测为例的详细内容,更多请关注php中文网其它相关文章!

每个人都需要一台速度更快、更稳定的 PC。随着时间的推移,垃圾文件、旧注册表数据和不必要的后台进程会占用资源并降低性能。幸运的是,许多工具可以让 Windows 保持平稳运行。

Copyright 2014-2025 https://www.php.cn/ All Rights Reserved | php.cn | 湘ICP备2023035733号