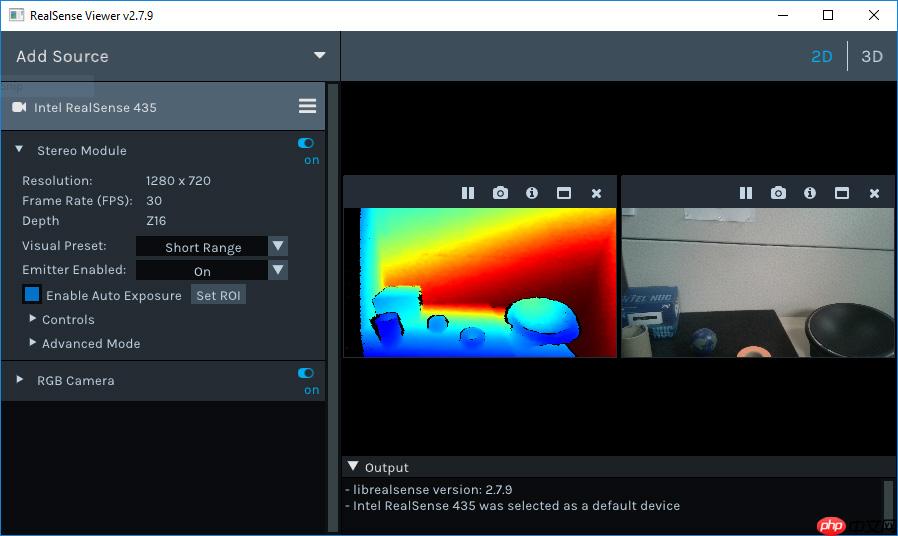
本文分享结合RealSense深感摄像头与PaddleHub实现目标检测和深度测量的方法。先介绍RealSense的特性及Python调用方式,再说明基于PaddleHub用普通摄像头部署目标检测模型的过程,最后展示整合两者的代码及效果,还提及未来可能分享在其他平台的实现。
☞☞☞AI 智能聊天, 问答助手, AI 智能搜索, 免费无限量使用 DeepSeek R1 模型☜☜☜
# 安装pyrealsense2库$ pip install pyrealsense2
# 导入必要的库import pyrealsense2 as rsimport numpy as npimport cv2# 配置视频流参数pipeline = rs.pipeline()
config = rs.config()
config.enable_stream(rs.stream.depth, 640, 480, rs.format.z16, 30)
config.enable_stream(rs.stream.color, 640, 480, rs.format.bgr8, 30)# 启动视频流pipeline.start(config)try:    while True:        # 等待帧读取
        frames = pipeline.wait_for_frames()
        depth_frame = frames.get_depth_frame()
        color_frame = frames.get_color_frame()        if not depth_frame or not color_frame:            continue

        # 转换为Ndarray
        depth_image = np.asanyarray(depth_frame.get_data())
        color_image = np.asanyarray(color_frame.get_data())        # 对深度图进行着色
        depth_colormap = cv2.applyColorMap(cv2.convertScaleAbs(depth_image, alpha=0.03), cv2.COLORMAP_JET)        # 拼接彩色图和深度图
        images = np.hstack((color_image, depth_colormap))        # 显示画面
        cv2.namedWindow('RealSense', cv2.WINDOW_AUTOSIZE)
        cv2.imshow('RealSense', images)
        cv2.waitKey(1)finally:    # 结束视频流
    pipeline.stop()
# 导入必要的库import cv2import paddlehub as hub# 加载目标检测模型model = hub.Module(name="ssd_mobilenet_v1_pascal")# 启动视频流cap = cv2.VideoCapture(0)while True:    # 读取视频帧
    success, frame = cap.read()    # 进行目标检测,获取检测结果
    results = model.object_detection(
        images=[frame],
        visualization=False
        )[0]['data']
    # 遍历检测结果,绘制预测框、类别标签和置信度
    for result in results:
        cv2.rectangle(
            frame,
            (int(result['left']), int(result['top'])),
            (int(result['right']), int(result['bottom'])),
            [255, 0, 0], 2)
        cv2.putText(
            frame,
            '%s %.02f' % (result['label'], result['confidence']*100),
            (int(result['left']), int(result['top'])),
            cv2.FONT_HERSHEY_SIMPLEX,
            1.2, (255, 255, 255), 2)    # 显示画面
    cv2.imshow('Object Detection', frame)    # 等待键盘响应
    key = cv2.waitKey(1)    # 如果按下Esc键,退出程序
    if key == 27:        break# 释放视频流cap.release()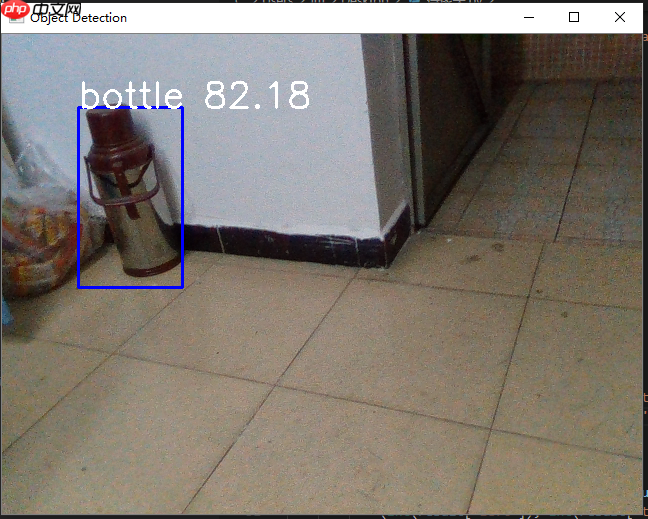
# 导入必要的库import paddlehub as hub
import pyrealsense2 as rs
import numpy as np
import cv2#配置视频流参数align_to = rs.stream.color
pipeline = rs.pipeline()
config = rs.config()
alignedFs = rs.align(align_to)
config.enable_stream(rs.stream.depth, 640, 480, rs.format.z16, 30)
config.enable_stream(rs.stream.color, 640, 480, rs.format.bgr8, 30)# 加载目标检测模型model = hub.Module(name="ssd_mobilenet_v1_pascal")# 启动视频流pipeline.start(config)while True: # 读取视频帧
frames = pipeline.wait_for_frames()
frames = alignedFs.process(frames)
depth_frame = frames.get_depth_frame()
color_frame = frames.get_color_frame() # 转换为Ndarray
depth_image = np.asanyarray(depth_frame.get_data())
color_image = np.asanyarray(color_frame.get_data())
depth_colormap = cv2.applyColorMap(cv2.convertScaleAbs(depth_image, alpha=0.03), cv2.COLORMAP_JET) # 进行目标检测,获取检测结果
results = model.object_detection(
images=[color_image],
visualization=False
)[0]['data']
# 遍历检测结果,绘制预测框、类别标签和置信度
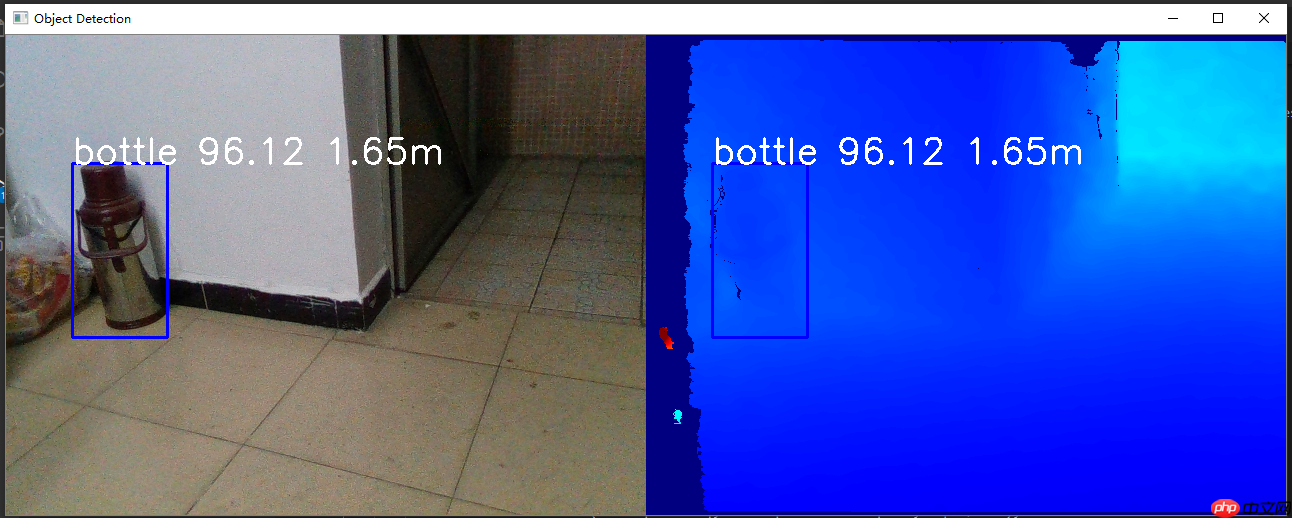
for result in results: # 计算中心点
c_x, c_y = int(result['left'] + (result['right'] - result['left']) / 2), int(result['top'] + (result['bottom'] - result['top']) / 2) # 取中心周围的25个点
depths = depth_image[min(0, c_y-2):c_y+3, min(0, c_x-2):c_x+3] # 去除0求平均得到距离
depth = np.sum(depths)/np.sum(depths!=0)
# 预测框、距离、标签和置信度绘制
cv2.rectangle(
color_image,
(int(result['left']), int(result['top'])),
(int(result['right']), int(result['bottom'])),
[255, 0, 0], 2)
cv2.putText(
color_image,
'%s %.02f %.02fm' % (result['label'], result['confidence']*100, depth/1000),
(int(result['left']), int(result['top'])),
cv2.FONT_HERSHEY_SIMPLEX,
1.2, (255, 255, 255), 2)
cv2.rectangle(
depth_colormap,
(int(result['left']), int(result['top'])),
(int(result['right']), int(result['bottom'])),
[255, 0, 0], 2)
cv2.putText(
depth_colormap,
'%s %.02f %.02fm' % (result['label'], result['confidence']*100, depth/1000),
(int(result['left']), int(result['top'])),
cv2.FONT_HERSHEY_SIMPLEX,
1.2, (255, 255, 255), 2) # 拼接画面
images = np.hstack((color_image, depth_colormap))
# 显示画面
cv2.imshow('Object Detection', images) # 等待键盘响应
key = cv2.waitKey(1) # 如果按下Esc键,退出程序
if key == 27:
break# 释放视频流pipeline.stop()
以上就是RealSense:简单实现对特定目标的深度测量的详细内容,更多请关注php中文网其它相关文章!

每个人都需要一台速度更快、更稳定的 PC。随着时间的推移,垃圾文件、旧注册表数据和不必要的后台进程会占用资源并降低性能。幸运的是,许多工具可以让 Windows 保持平稳运行。

Copyright 2014-2025 https://www.php.cn/ All Rights Reserved | php.cn | 湘ICP备2023035733号


 432
432