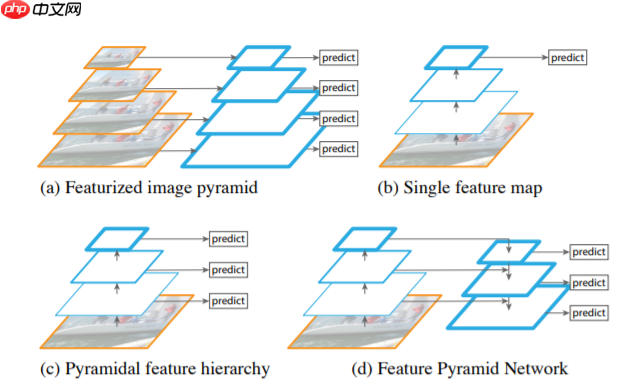
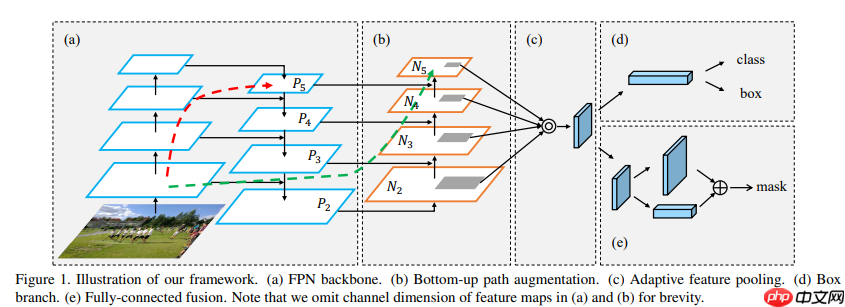
本文是FPN综述教程,先介绍FPN开山之作,含简介、相关工作、结构及基于ResNet18的代码实现。还讲解了PAFPN,其在FPN基础上增加自底向上路径,给出结构与代码。最后阐述BiFPN,包括简介、结构及多特征图示例的代码实现。
☞☞☞AI 智能聊天, 问答助手, AI 智能搜索, 免费无限量使用 DeepSeek R1 模型☜☜☜

- 鸽了好久的项目,看平台对FPN介绍不多,我来捡个漏。
- 带大家逐行coding

论文链接Feature Pyramid Networks for Object Detection
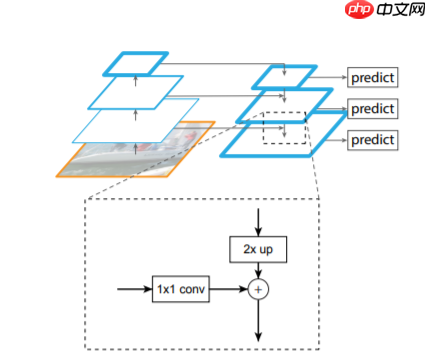
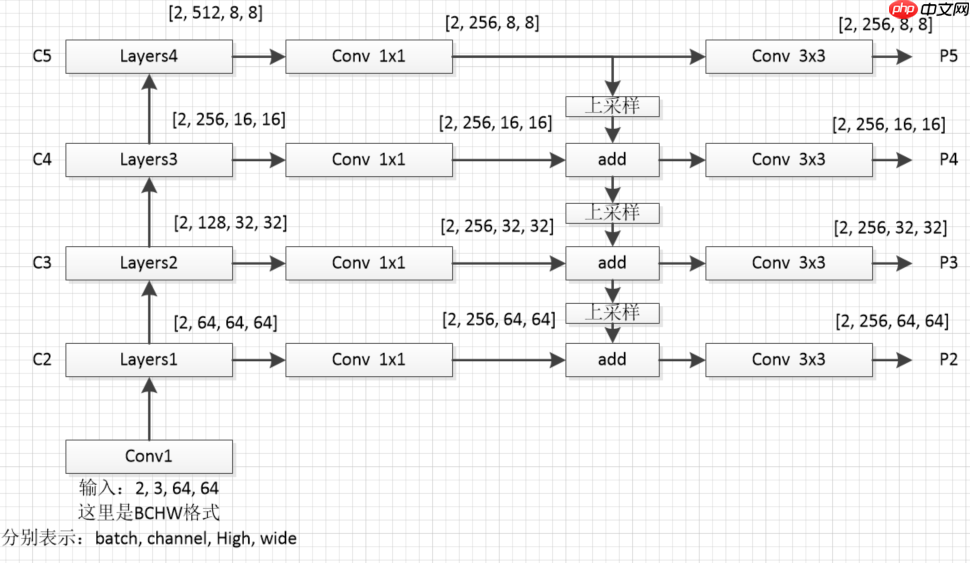
- 为了防止大家迷糊,我这里对上图从新绘制个细节图如下(这里我采用的是resnet18作为特征提取网络)
# 导入相关的包import paddleimport paddle.nn.functional as Fimport paddle.nn as nn
# 构建resnet18的基础模块# Identity模块表示没有任何操作class Identity(nn.Layer):
def __init_(self):
super().__init__() def forward(self, x):
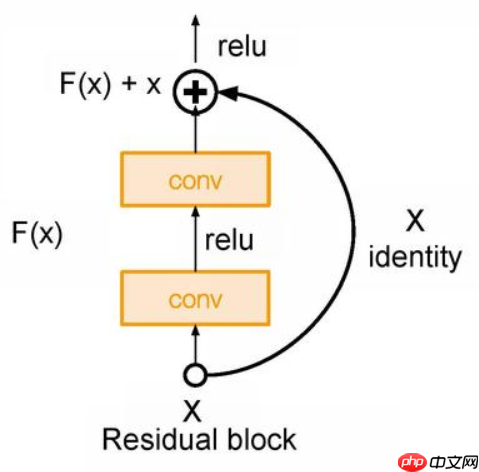
return x# Block模块是构成resnet的主要模块# 通过判断步长(stride == 2)和通道数(in_dim != out_dim)# 判断indentity = self.downsample(h)中,self.downsample()下采样方式class Block(nn.Layer):
def __init__(self, in_dim, out_dim, stride):
super().__init__() ## 补充代码
self.conv1 = nn.Conv2D(in_dim, out_dim, 3, stride=stride, padding=1, bias_attr=False)
self.bn1 = nn.BatchNorm2D(out_dim)
self.conv2 = nn.Conv2D(out_dim, out_dim, 3, stride=1, padding=1, bias_attr=False)
self.bn2 = nn.BatchNorm2D(out_dim)
self.relu = nn.ReLU() if stride == 2 or in_dim != out_dim:
self.downsample = nn.Sequential(*[
nn.Conv2D(in_dim,out_dim,1,stride=stride),
nn.BatchNorm2D(out_dim)]) else:
self.downsample = Identity() def forward(self, x):
## 补充代码
h = x
x = self.conv1(x)
x = self.bn1(x)
x = self.relu(x)
x = self.conv2(x)
x = self.bn2(x)
indentity = self.downsample(h)
x = x + indentity
x = self.relu(x) return x# 搭建resnet18主干网络class ResNet18(nn.Layer):
def __init__(self, in_dim=64):
super().__init__()
self.in_dim = in_dim # stem layer
self.conv1 = nn.Conv2D(in_channels=3,out_channels=in_dim,kernel_size=3,stride=1,padding=1,bias_attr=False)
self.bn1 = nn.BatchNorm2D(in_dim)
self.relu = nn.ReLU()
#blocks
self.layers1 = self._make_layer(dim=64,n_blocks=2,stride=1)
self.layers2 = self._make_layer(dim=128,n_blocks=2,stride=2)
self.layers3 = self._make_layer(dim=256,n_blocks=2,stride=2)
self.layers4 = self._make_layer(dim=512,n_blocks=2,stride=2) def _make_layer(self, dim, n_blocks, stride):
layer_list = []
layer_list.append(Block(self.in_dim, dim, stride=stride))
self.in_dim = dim for i in range(1,n_blocks):
layer_list.append(Block(self.in_dim, dim, stride=1)) return nn.Sequential(*layer_list) def forward(self, x):
# 创建一个存放不同尺度特征图的列表
fpn_list = []
x = self.conv1(x)
x = self.bn1(x)
x = self.relu(x)
x = self.layers1(x) # x [2, 64, 64, 64]
fpn_list.append(x)
x = self.layers2(x) # x [2, 128, 32, 32]
fpn_list.append(x)
x = self.layers3(x) # x [2, 256, 16, 16]
fpn_list.append(x)
x = self.layers4(x) # x [2, 512, 8, 8]
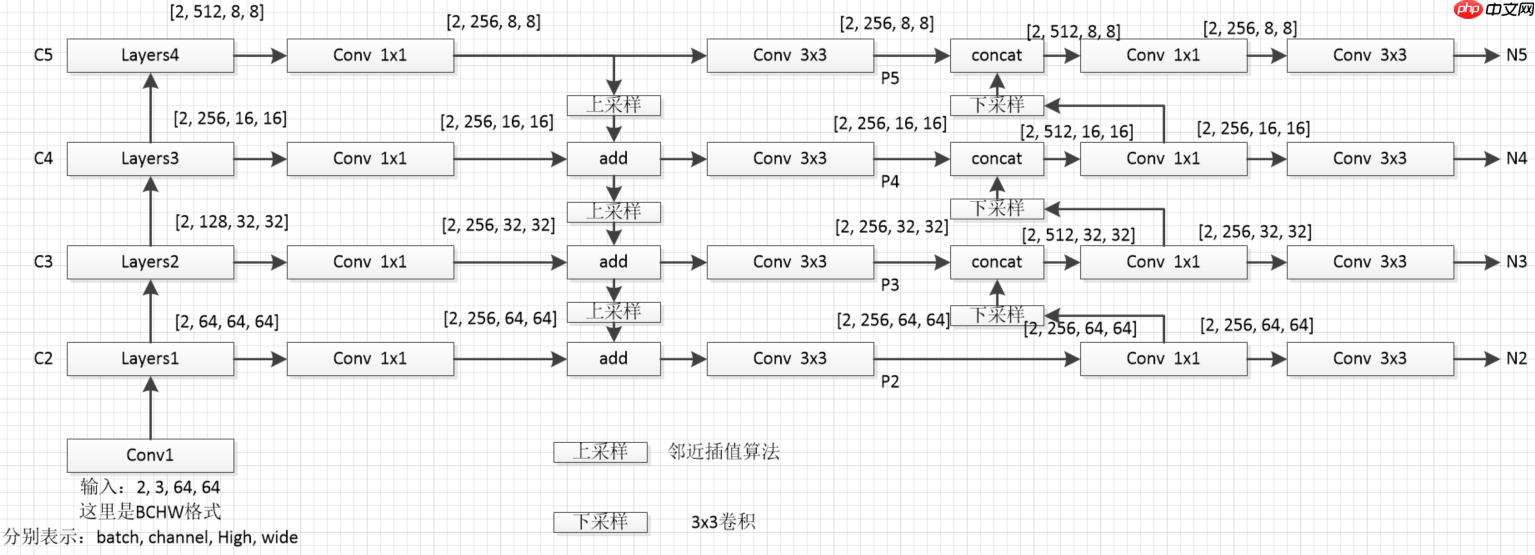
fpn_list.append(x) return fpn_list# FPN构建# fpn_list中包含以下特征维度,对应章节1.3中的图# C2 [2, 64, 64, 64]# C3 [2, 128, 32, 32]# C4 [2, 256, 16, 16]# C5 [2, 512, 8, 8]class FPN(nn.Layer):
def __init__(self,in_channel_list,out_channel):
super(FPN, self).__init__()
self.inner_layer=[] # 1x1卷积,统一通道数
self.out_layer=[] # 3x3卷积,对add后的特征图进一步融合
for in_channel in in_channel_list:
self.inner_layer.append(nn.Conv2D(in_channel,out_channel,1))
self.out_layer.append(nn.Conv2D(out_channel,out_channel,kernel_size=3,padding=1)) def forward(self,x):
head_output=[] # 存放最终输出特征图
corent_inner=self.inner_layer[-1](x[-1]) # 过1x1卷积,对C5统一通道数操作
head_output.append(self.out_layer[-1](corent_inner)) # 过3x3卷积,对统一通道后过的特征进一步融合,加入head_output列表
print(self.out_layer[-1](corent_inner).shape)
for i in range(len(x)-2,-1,-1): # 通过for循环,对C4,C3,C2进行
pre_inner=corent_inner
corent_inner=self.inner_layer[i](x[i]) # 1x1卷积,统一通道数操作
size=corent_inner.shape[2:] # 获取上采样的大小(size)
pre_top_down=F.interpolate(pre_inner,size=size) # 上采样操作(这里大家去看一下interpolate这个上采样api)
add_pre2corent=pre_top_down+corent_inner # add操作
head_output.append(self.out_layer[i](add_pre2corent)) # 3x3卷积,特征进一步融合操作,并加入head_output列表
print(self.out_layer[i](add_pre2corent).shape)
return head_output# head_output 中包含以下特征维度,对应章节1.3中的图# P5 [2, 256, 8, 8]# P4 [2, 256, 16, 16]# P3 [2, 256, 32, 32]# P2 [2, 256, 64, 64]model = ResNet18()# print(model)# [64,128,256,512]表示输入特征通道数的列表(C2-C5的通道数列表),256表示过FPN后最终通道数(P2-P5的通道数)fpn=FPN([64,128,256,512],256) x = paddle.randn([2, 3, 64, 64]) fpn_list = model(x) out = fpn(fpn_list)# print(list(reversed(out)))
/opt/conda/envs/python35-paddle120-env/lib/python3.7/site-packages/paddle/nn/layer/norm.py:653: UserWarning: When training, we now always track global mean and variance.
  "When training, we now always track global mean and variance.")
[2, 256, 8, 8]
[2, 256, 16, 16]
[2, 256, 32, 32]
[2, 256, 64, 64]
# 构建一个用于下采样的卷积池化模块class ConvNormLayer(nn.Layer):
    def __init__(self, in_channel, out_channel, kernel_size, stride, padding=1):
        super(ConvNormLayer, self).__init__()
        self.conv = nn.Conv2D(in_channel, out_channel, kernel_size, stride, padding)
        self.norm = nn.BatchNorm2D(out_channel)    def forward(self, inputs):
        out = self.conv(inputs)
out = self.norm(out) return out# PAFPN构建# fpn_list中包含以下特征维度,对应章节2.1中的图# C2 [2, 64, 64, 64]# C3 [2, 128, 32, 32]# C4 [2, 256, 16, 16]# C5 [2, 512, 8, 8]class PAFPN(nn.Layer):
def __init__(self,in_channel_list,out_channel):
super(PAFPN, self).__init__()
self.fpn = FPN(in_channel_list, out_channel)
self.bottom_up = ConvNormLayer(out_channel, out_channel, 3, 2) # 2倍下采样模块
self.inner_layer=[] # 1x1卷积,统一通道数,处理P3-P5的输出,这里要注意P2和P3-P5的输入通道是不同的,可以看2.1图3,
self.out_layer=[] # 3x3卷积,对concat后的特征图进一步融合
for i in range(len(in_channel_list)): if i==0:
self.inner_layer.append(nn.Conv2D(out_channel, out_channel,1)) # 处理P2
else:
self.inner_layer.append(nn.Conv2D(out_channel*2, out_channel,1)) # 处理P3-P5
self.out_layer.append(nn.Conv2D(out_channel,out_channel,kernel_size=3,padding=1)) def forward(self,x):
head_output=[] # 存放最终输出特征图
fpn_out = self.fpn(x) # FPN操作
print('------------FPN--PAFPN--------------') # PAFPN操作分割线
corent_inner=self.inner_layer[0](fpn_out[-1]) # 过1x1卷积,对P2统一通道数操作
head_output.append(self.out_layer[0](corent_inner)) # 过3x3卷积,对统一通道后过的特征进一步融合,加入head_output列表
print(self.out_layer[0](corent_inner).shape) for i in range(1,len(fpn_out),1):
pre_bottom_up = corent_inner
pre_concat = self.bottom_up(pre_bottom_up) # 下采样
pre_inner = paddle.concat([fpn_out[-1-i],pre_concat], 1) # concat
corent_inner=self.inner_layer[i](pre_inner) # 1x1卷积压缩通道
head_output.append(self.out_layer[i](corent_inner)) # 3x3卷积进一步融合
print(self.out_layer[i](corent_inner).shape)
return head_output# head_output 中包含以下特征维度,对应章节1.3中的图# N2 [2, 256, 64, 64]# N3 [2, 256, 32, 32]# N4 [2, 256, 16, 16]# N5 [2, 256, 8, 8]model = ResNet18()# print(model)# [64,128,256,512]表示输入特征通道数的列表(C2-C5的通道数列表),256表示过FPN后最终通道数(P2-P5的通道数)pafpn=PAFPN([64,128,256,512],256) x = paddle.randn([2, 3, 64, 64]) fpn_list = model(x) out = pafpn(fpn_list)
[2, 256, 8, 8]
[2, 256, 16, 16]
[2, 256, 32, 32]
[2, 256, 64, 64]
------------FPN--PAFPN--------------
[2, 256, 64, 64]
[2, 256, 32, 32]
[2, 256, 16, 16]
[2, 256, 8, 8]
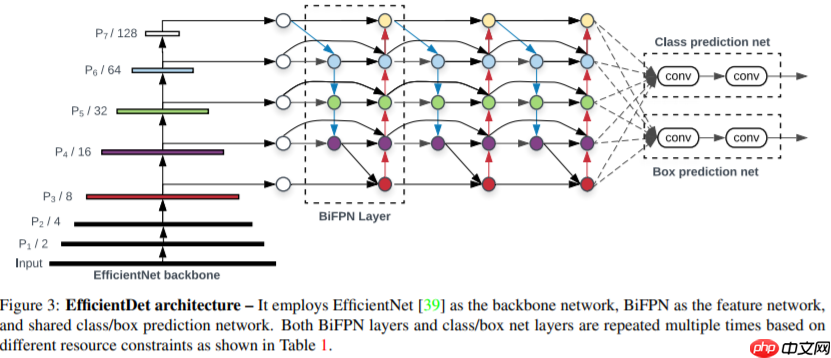
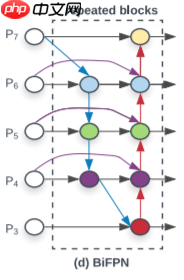
- 图中各个模块说明:(这里没有对原论文加入注意力机制进行实现,只是实现了模型结构,并略微改进了构建方式)
- C(2-5)到P(3-7)下采样块 C_to_P:将C(2-5)四个特征图变为P(3-7)五个特征图(原论文是将3个变为5个,下采样方法一样),图中的P(3-7)块没有任何操作,只是个标识
- 1x1和3x3卷积模块Sepconv_BN_Swish:构建3.1节每个彩色节点模块
- 绿色块BiFPN_block1:这里跟原论文代码构建方式不同,原论文是通过一层层进行搭建,这样限定了输入必须是五个特征图,本项目的搭建方式可以实现n个(3<n,这里的3是由BiFPN中间结构所决定的),其中的连接方式采用concat方式,进行上采样操作
- 蓝色块BiFPN_block2:接受BiFPN_block1传出特征图,同样连接方式采用concat方式,下采样采用最大池化方式
- 橙色块BiFPN_block:表示BiFPN_block1、BiFPN_block2共同组合一个BiFPN_block模块,这里第一个BiFPN_block与第二个BiFPN_block输出特征图通道略有不同,后续BiFPN_block(3、4....)特征通道数均与第二个BiFPN_block相同
- Identity:Identity模块不作任何处理输入=输出(这里使用是方便简化代码的构建)
# 构建每个彩色节点模块,由3x3和1x1卷积构成class Sepconv_BN_Swish(nn.Layer):
    def __init__(self, in_channels, out_channels=None):
        super(Sepconv_BN_Swish, self).__init__()        if out_channels is None:
            out_channels = in_channels
        self.depthwise_conv = nn.Conv2D(in_channels, in_channels, kernel_size=3, stride=1, padding=1)
        self.pointwise_conv = nn.Conv2D(in_channels, out_channels, kernel_size=1, stride=1)
        self.norm = nn.BatchNorm2D(out_channels)
        self.act = nn.Swish()    def forward(self, inputs):
        out = self.depthwise_conv(inputs)
        out = self.pointwise_conv(out)
        out = self.norm(out)
out = self.act(out) return out# 由(C2-C5)产生(P3-P7),操作是将C5降采样# C2 [2, 64, 64, 64]# C3 [2, 128, 32, 32]# C4 [2, 256, 16, 16]# C5 [2, 512, 8, 8]class C_to_P(nn.Layer):
def __init__(self,inputs_size=8): # inputs_size是C5的size
super(C_to_P, self).__init__()
self.max_pool = nn.AdaptiveMaxPool2D(inputs_size//2) def forward(self, inputs):
output=[] # 存放最终输出特征图(P3-P7)
output = inputs
out = self.max_pool(inputs[-1]) # 最大池化用于下采样
output.append(out) return output# P3 [2, 64, 64, 64]# P4 [2, 128, 32, 32]# P5 [2, 256, 16, 16]# P6 [2, 512, 8, 8]# P7 [2, 512, 4, 4]# BiFPN_block1实现的操作是(5->3)这层的操作class BiFPN_block1(nn.Layer):
def __init__(self,in_channel_list,out_channel):
super(BiFPN_block1, self).__init__()
self.block1_layer=[] # 用于3个存放彩色节点模块和1个Identity(以5个特征图为例)
for i in range(len(in_channel_list)-2):
if i == 0:
in_channel = in_channel_list[-1-i] + in_channel_list[-2-i] else:
in_channel = out_channel + in_channel_list[-2-i]
self.block1_layer.append(Sepconv_BN_Swish(in_channel,out_channel))
self.block1_layer.append(Identity()) def forward(self,x):
print('----block1----')
head_output = [] # 存放最终输出特征图
channel_list = [] # 存放block1_layer操作后通道变化
feat_size = [] # 存放特征图尺寸的列表
head_output.append(x[-1])
channel_list.append(x[-1].shape[1])
feat_size.append(x[-1].shape[2]) print(x[-1].shape) for i in range(len(x)-1):
size = x[-2-i].shape[2:] if i == 0: # 看3.2图,上采样输入在第一次是P7,后三次是过3x3和1x1卷积
pre_upsampling = x[-1] else:
pre_upsampling = N_layer # N_layer来自第一次循环产生的
upsampling = F.interpolate(pre_upsampling,size=size) # 上采样操作
pre_N = paddle.concat([upsampling,x[-2-i]], 1) # concat链接
N_layer = self.block1_layer[i](pre_N) # 过3x3和1x1卷积,最后一个是Identity(看本代码块12行)
if i < len(x)-2: # P(4,5,6)跨层连接,P7无跨层连接操作
pre_block2 = paddle.concat([N_layer,x[-2-i]],1) else:
pre_block2 = N_layer
head_output.append(pre_block2)
channel_list.append(pre_block2.shape[1])
feat_size.append(pre_block2.shape[2]) print(pre_block2.shape)
return channel_list, head_output, max(feat_size) # max(feat_size)获取所有特征图的最大size,用于block2中的下采样# BiFPN_block2实现的操作是(3->5)这层的操作class BiFPN_block2(nn.Layer):
def __init__(self,in_channel_list,out_channel, max_size):
super(BiFPN_block2, self).__init__()
self.block2_layer=[] # 用于5个存放彩色节点模块
for i in range(len(in_channel_list)):
if i == 0:
in_channel = in_channel_list[-1] else:
in_channel = in_channel_list[-1-i] + out_channel
self.block2_layer.append(Sepconv_BN_Swish(in_channel,out_channel))
downsampling_size = max_size # P3 size(特征图最大size),用于下采样
self.max_pool=[] for i in range(len(in_channel_list)-1): # 用于4个下采样模块
self.max_pool.append(nn.AdaptiveMaxPool2D(downsampling_size//2))
downsampling_size = downsampling_size//2
def forward(self,x):
print('----block2----')
head_output=[] # 存放最终输出特征图
corent_block2 = self.block2_layer[0](x[-1])
head_output.append(corent_block2) print(corent_block2.shape) for i in range(len(x)-1):
downsampling = self.max_pool[i](corent_block2) # 获取上层下采样结果
pre_block2 = paddle.concat([downsampling,x[-2-i]],1) # 将下采样结果和block1的输出concat
corent_block2 = self.block2_layer[1+i](pre_block2) # 过3x3和1x1卷积
head_output.append(corent_block2) print(corent_block2.shape)
return head_output# 将BiFPN_block1和将BiFPN_block2合并class BiFPN_block(nn.Layer):
def __init__(self,in_channel_list,out_channel):
super(BiFPN_block, self).__init__()
self.out_channel = out_channel
self.bifpn_block1 = BiFPN_block1(in_channel_list, out_channel) def forward(self,x):
block1_channel_list, out, max_size = self.bifpn_block1(x)
bifpn_block2 = BiFPN_block2(block1_channel_list, self.out_channel, max_size)
out = bifpn_block2(out)
return out# 将BiFPN_block构建为num个,这里需要注意第一个BiFPN_block和第二个BiFPN_block输入特征图通道数的区别,# 后续(3、4...)输入特征图通道数均和第二个BiFPN_block相同class BiFPN(nn.Layer):
def __init__(self,in_channel_list0,out_channel,num):
super(BiFPN, self).__init__()
self.bifpn_layer=[]
in_channel_list1=[] for i in range(len(in_channel_list0)):
in_channel_list1.append(out_channel) for i in range(num): if i==0:
in_channel_list = in_channel_list0 else:
in_channel_list = in_channel_list1
self.bifpn_layer.append(BiFPN_block(in_channel_list,out_channel)) def forward(self,x):
out = x for layer in self.bifpn_layer: print('--------bifpn_layer--------')
out = layer(out)
return out# 以5个特征图为例model = ResNet18() x = paddle.randn([2, 3, 64, 64]) fpn_list = model(x) c_to_p = C_to_P() out = c_to_p(fpn_list) in_channel_list = [64,128,256,512,512] out_channel = 256bifpn_num = 3bifpn = BiFPN(in_channel_list,out_channel,bifpn_num) out = bifpn(out)
--------bifpn_layer--------
----block1----
[2, 512, 4, 4]
[2, 768, 8, 8]
[2, 512, 16, 16]
[2, 384, 32, 32]
[2, 320, 64, 64]
----block2----
[2, 256, 64, 64]
[2, 256, 32, 32]
[2, 256, 16, 16]
[2, 256, 8, 8]
[2, 256, 4, 4]
--------bifpn_layer--------
----block1----
[2, 256, 4, 4]
[2, 512, 8, 8]
[2, 512, 16, 16]
[2, 512, 32, 32]
[2, 512, 64, 64]
----block2----
[2, 256, 64, 64]
[2, 256, 32, 32]
[2, 256, 16, 16]
[2, 256, 8, 8]
[2, 256, 4, 4]
--------bifpn_layer--------
----block1----
[2, 256, 4, 4]
[2, 512, 8, 8]
[2, 512, 16, 16]
[2, 512, 32, 32]
[2, 512, 64, 64]
----block2----
[2, 256, 64, 64]
[2, 256, 32, 32]
[2, 256, 16, 16]
[2, 256, 8, 8]
[2, 256, 4, 4]
# 以4个特征图为例model = ResNet18()
x = paddle.randn([2, 3, 64, 64])
fpn_list = model(x)
in_channel_list = [64,128,256,512]
out_channel = 256bifpn_num = 5bifpn = BiFPN(in_channel_list,out_channel,bifpn_num)
out = bifpn(fpn_list)
--------bifpn_layer--------
----block1----
[2, 512, 8, 8]
[2, 512, 16, 16]
[2, 384, 32, 32]
[2, 320, 64, 64]
----block2----
[2, 256, 64, 64]
[2, 256, 32, 32]
[2, 256, 16, 16]
[2, 256, 8, 8]
--------bifpn_layer--------
----block1----
[2, 256, 8, 8]
[2, 512, 16, 16]
[2, 512, 32, 32]
[2, 512, 64, 64]
----block2----
[2, 256, 64, 64]
[2, 256, 32, 32]
[2, 256, 16, 16]
[2, 256, 8, 8]
--------bifpn_layer--------
----block1----
[2, 256, 8, 8]
[2, 512, 16, 16]
[2, 512, 32, 32]
[2, 512, 64, 64]
----block2----
[2, 256, 64, 64]
[2, 256, 32, 32]
[2, 256, 16, 16]
[2, 256, 8, 8]
--------bifpn_layer--------
----block1----
[2, 256, 8, 8]
[2, 512, 16, 16]
[2, 512, 32, 32]
[2, 512, 64, 64]
----block2----
[2, 256, 64, 64]
[2, 256, 32, 32]
[2, 256, 16, 16]
[2, 256, 8, 8]
--------bifpn_layer--------
----block1----
[2, 256, 8, 8]
[2, 512, 16, 16]
[2, 512, 32, 32]
[2, 512, 64, 64]
----block2----
[2, 256, 64, 64]
[2, 256, 32, 32]
[2, 256, 16, 16]
[2, 256, 8, 8]
# 以6个特征图为例model = ResNet18()
x = paddle.randn([2, 3, 64, 64])
fpn_list = model(x)
c_to_p1 = C_to_P(inputs_size=8)
out = c_to_p1(fpn_list)
c_to_p2 = C_to_P(inputs_size=4)
out = c_to_p2(out)
in_channel_list = [64,128,256,512,512,512]
out_channel = 256bifpn_num = 5bifpn = BiFPN(in_channel_list,out_channel,bifpn_num)
out = bifpn(out)
/opt/conda/envs/python35-paddle120-env/lib/python3.7/site-packages/paddle/nn/layer/norm.py:653: UserWarning: When training, we now always track global mean and variance.
  "When training, we now always track global mean and variance.")
--------bifpn_layer--------
----1----
[2, 512, 2, 2]
[2, 768, 4, 4]
[2, 768, 8, 8]
[2, 512, 16, 16]
[2, 384, 32, 32]
[2, 320, 64, 64]
----2----
[2, 256, 64, 64]
[2, 256, 32, 32]
[2, 256, 16, 16]
[2, 256, 8, 8]
[2, 256, 4, 4]
[2, 256, 2, 2]
--------bifpn_layer--------
----1----
[2, 256, 2, 2]
[2, 512, 4, 4]
[2, 512, 8, 8]
[2, 512, 16, 16]
[2, 512, 32, 32]
[2, 512, 64, 64]
----2----
[2, 256, 64, 64]
[2, 256, 32, 32]
[2, 256, 16, 16]
[2, 256, 8, 8]
[2, 256, 4, 4]
[2, 256, 2, 2]
--------bifpn_layer--------
----1----
[2, 256, 2, 2]
[2, 512, 4, 4]
[2, 512, 8, 8]
[2, 512, 16, 16]
[2, 512, 32, 32]
[2, 512, 64, 64]
----2----
[2, 256, 64, 64]
[2, 256, 32, 32]
[2, 256, 16, 16]
[2, 256, 8, 8]
[2, 256, 4, 4]
[2, 256, 2, 2]
--------bifpn_layer--------
----1----
[2, 256, 2, 2]
[2, 512, 4, 4]
[2, 512, 8, 8]
[2, 512, 16, 16]
[2, 512, 32, 32]
[2, 512, 64, 64]
----2----
[2, 256, 64, 64]
[2, 256, 32, 32]
[2, 256, 16, 16]
[2, 256, 8, 8]
[2, 256, 4, 4]
[2, 256, 2, 2]
--------bifpn_layer--------
----1----
[2, 256, 2, 2]
[2, 512, 4, 4]
[2, 512, 8, 8]
[2, 512, 16, 16]
[2, 512, 32, 32]
[2, 512, 64, 64]
----2----
[2, 256, 64, 64]
[2, 256, 32, 32]
[2, 256, 16, 16]
[2, 256, 8, 8]
[2, 256, 4, 4]
[2, 256, 2, 2]
以上就是FPN综述保姆级教程的详细内容,更多请关注php中文网其它相关文章!

每个人都需要一台速度更快、更稳定的 PC。随着时间的推移,垃圾文件、旧注册表数据和不必要的后台进程会占用资源并降低性能。幸运的是,许多工具可以让 Windows 保持平稳运行。

Copyright 2014-2025 https://www.php.cn/ All Rights Reserved | php.cn | 湘ICP备2023035733号


 321
321